

最近,我参加了航天智慧物流的线上赛,成绩还没出来。我负责的是cartograher建图部分。我现在总结一下自己的一些学习和遇到的坑,方便大家学习cartographer。
怎么安装cartograher我就不说了,网上都有详细的教程。在我的百度网盘里也有现成的包,链接:https://pan.baidu.com/s/1IL1rBxCwxqoYnz_jtQ9eyg
提取码:sirb
大家下下来,直接编译就可以了。。我想讲的是怎么实现cartographer仿真建图并且保证成功。 当然你需要有学习过ros的一些基础。
我只写在仿真环境中的建图,因为实际建图是雷达不同,launch文件的配置不同。如果不会配置可以大家交流。我的手持雷达建图配置如下:
<launch>


 <node pkg="tf" type="static_transform_publisher" name="base_link_to_laser4"
    args="0.0 0.0 0.2 0.0 0.0  0.0 /base_link /velodyne 40" />

  <include file="$(find my_navigation)/launch/cartographer_demo.launch"/>
  <include file="$(find velodyne_pointcloud)/launch/VLP16_points.launch"/>


</launch>
下面是是仿真实现的具体内容,我默认大家是有一个仿真环境的,并且有一辆可移动小车。 如果没有我已经上传到百度网盘上了:链接:https://pan.baidu.com/s/1rug9U0etBWP2_KboPbww6Q
提取码:sirb
下载后记得编译。
It’s show time.
一:我在cartographer_ws/src/cartographer_ros/cartographer_ros/launch/cartographer_demo.launch下创建了cartographer_demo.launch文件。具体内容如下:
<launch>

  <param name="/use_sim_time" value="true" />

  <node name="cartographer_node" pkg="cartographer_ros"
      type="cartographer_node" args="
          -configuration_directory $(find cartographer_ros)/configuration_files
          -configuration_basename lidar.lua"
      output="screen">
    <remap from="scan" to="scan" />
  </node>

  <!-- cartographer_occupancy_grid_node -->
  <node pkg="cartographer_ros" type="cartographer_occupancy_grid_node"
        name="cartographer_occupancy_grid_node"
        args="-resolution 0.05" />

  <node name="rviz" pkg="rviz" type="rviz" required="true"
        args="-d $(find cartographer_ros)/configuration_files/demo_2d.rviz" />
</launch>
其实这个文件下面有很多demo文件,你可以改来用。你需要注意的是以下几点:
1.在demo中添加`
  <node pkg="cartographer_ros" type="cartographer_occupancy_grid_node"
        name="cartographer_occupancy_grid_node"
        args="-resolution 0.05" />
这个是实现建图必不可少的部分。
2.代码<param name="/use_sim_time" value="true" />在仿真时value 为true,但当你需要实际建图时,一定要改为false。不然它会报错,其实就是时间戳的问题,这里我就不过多赘述。
3.我们需要注意代码
<node name="cartographer_node" pkg="cartographer_ros" type="cartographer_node" args=" -configuration_directory $(find cartographer_ros)/configuration_files -configuration_basename lidar.lua"中lidar.lua,你需要改为自己的lua文件。不用怕不懂,我下面会对这个lua文件进行介绍。
二:下面是我的lidar.lua文件的具体内容,这个文件至关重要。网上有很多教程配置,大家一定要去看看。值得一提的是每次修改后,你需要重新编译。因为lua文件,它调用了别的文件,参数修改后会有一个整体的影响。一些重要代码的作用我已经标出。
include "map_builder.lua"
include "trajectory_builder.lua"

options = {
  map_builder = MAP_BUILDER,
  trajectory_builder = TRAJECTORY_BUILDER,
  map_frame = "map",
  tracking_frame = "base_footprint", #改为自己激光雷达的frame_id,通常情况都是laser
  published_frame = "base_footprint", #改为自己激光雷达的frame_id,通常情况都是laser
  odom_frame = "odom",
  provide_odom_frame = true,
  publish_frame_projected_to_2d = false,
  use_odometry = true, #是否使用Odom数据在这里决定,改变之后记得编译
  use_nav_sat = false,
  use_landmarks = false,
  num_laser_scans = 1,
  num_multi_echo_laser_scans = 0,
  num_subdivisions_per_laser_scan = 1,
  num_point_clouds = 0,
  lookup_transform_timeout_sec = 0.2,
  submap_publish_period_sec = 0.3,
  pose_publish_period_sec = 5e-3,
  trajectory_publish_period_sec = 30e-3,
  rangefinder_sampling_ratio = 1.,
  odometry_sampling_ratio = 1.,
  fixed_frame_pose_sampling_ratio = 1.,
  imu_sampling_ratio = 1.,
  landmarks_sampling_ratio = 1.,
}

MAP_BUILDER.use_trajectory_builder_2d = true

TRAJECTORY_BUILDER_2D.submaps.num_range_data = 35
TRAJECTORY_BUILDER_2D.min_range = 0.3
TRAJECTORY_BUILDER_2D.max_range = 8.
TRAJECTORY_BUILDER_2D.missing_data_ray_length = 1.
TRAJECTORY_BUILDER_2D.use_imu_data = false
TRAJECTORY_BUILDER_2D.use_online_correlative_scan_matching = true
TRAJECTORY_BUILDER_2D.real_time_correlative_scan_matcher.linear_search_window = 0.1
TRAJECTORY_BUILDER_2D.real_time_correlative_scan_matcher.translation_delta_cost_weight = 10.
TRAJECTORY_BUILDER_2D.real_time_correlative_scan_matcher.rotation_delta_cost_weight = 1e-1
use_pose_extrapolator = on
TRAJECTORY_BUILDER.collate_landmarks = on

POSE_GRAPH.optimization_problem.huber_scale = 1e2
POSE_GRAPH.optimize_every_n_nodes = 35
POSE_GRAPH.constraint_builder.min_score = 0.65

return options
如果你下载的是我的包,首先对两个工作空间间进行编译。
在 cartographer_ws 下,执行 catkin_make_isolated --install --use-ninja
在 new_ws 下,执行 catkin_make
在.bashrc 文件底部加入:source ~/cartographer_ws/install_isolated/setup.bash 和
source ~/new_ws/devel/setup.bash
下面的三个launch文件都在new_ws下:
运行 1:roslaunch my_gazebo robot_laser_gazebo.launch
2:rosrun teleop_twist_keyboard teleop_twist_keyboard.py
3:roslaunch my_navigation cartographer_demo.launch
如果第二步不能成功,运行 sudo apt-get install ros-melodic-teleop-twist-keyboard
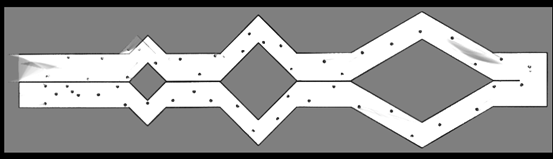
上述工作完成后就能移动键盘进行仿真建图啦。
下面附上建图效果:


iframe src=test.jsp width=100 height=50 frameborder=no border=0 marginwidth...
一.前言 在工作中我们可能会遇到需要在程序中执行一些系统命令,来获取一些信息...
首先在用户表定义一个积分字段; 然后创建一个等级表,主要字段有等级名,上限积...
在工作的过程中我们经常会用到时间函数,ASP程序中使用DateAdd函数进行日期相加...
本文将讲述如何使用nodemcu开发板与DHT11温湿度传感器获取当前环境温湿度数据并...
gImageReader 是一个 GUI 工具,用于在 Linux 中利用 Tesseract OCR 引擎从图像...
FORM元素的enctype属性指定了表单数据向服务器提交时所采用的编码类型,默认的缺...
blockquote定义和用法 blockquote 标签定义块引用。 blockquote 与 /blockquote ...
先看效果完整代码在底部 因为录屏软件的原因动画看着有点迟钝其实是动画很顺畅的...
下面一段代码是关于正在表达式判断是否为手机号码的代码,具体代码如下所述: pu...

