

LAMP=Linux+Apache+Mysql+PHP
LNMP=Linux+Nginx+Mysql+PHP
LAMP是一个多C/S架构的平台,虽然这些开放源代码程序本身并不是专门设计成同另几个程序一起工作的,但由于它们的免费和开源,慢慢的被组合成为了一种解决方案.
实际上其中的每一个部分还可以根据业务或者操作系统需求进行调换,如Linux也可以改成Windows,Apache改为Nginx就变成了LNMP架构等等,这里采用了Nginx因此简称也就改成了LNMP.
这里使用的是社区版本mysql-boost-5.7.31,原因只是因为5.7在生产环境中用的更多而已.
与之前的类似不过这里解压后会发现没有configure,因为MySQL使用的是cmake而不是make.
##安装cmake
yum install -y cmake

##如果过程中出错则安装缺失的依赖包
##重新执行编译前请清楚cmake产生的缓存文件避免从停止处开始导致出现错误
yum install -y ncurses-devel.x86_64
yum install -y gcc-c++
yum install -y bison
rm -fr CMakeCache.txt

##编译
cmake -DCMAKE_INSTALL_PREFIX=/usr/local/mysql -DMYSQL_DATADIR=/usr/local/mysql/data -DMYSQL_UNIX_ADDR=/usr/local/mysql/data/mysql.sock -DWITH_INNOBASE_STORAGE_ENGINE=1 -DDEFAULT_CHARSET=utf8 -DDEFAULT_COLLATION=utf8_general_ci -DEXTRA_CHARSETS=all -DWITH_BOOST=/mnt/mysql-5.7.31/boost/boost_1_59_0

##参数解释
DCMAKE_INSTALL_PREFIX						安装路径
DMYSQL_DATADIR								数据库存放目录
DMYSQL_UNIX_ADDR							Unix Socket文件路径
DWITH_INNOBASE_STORAGE_ENGINE				加载的数据库引擎
DDEFAULT_CHARSET							受用UTF-8字符
DDEFAULT_COLLATION							检验UTF-8字符
DEXTRA_CHARSETS								安装字符集选项(选择所有)
DWITH_BOOST									指定Boost扩展源码路径

##安装
make && make install

##需要注意的文件
/usr/local/mysql/support-files/mysql.server		启动脚本
/etc/my.cnf										全局配置文件
##复制启动脚本到init.d并为以后的使用做准备
cp /usr/local/mysql/support-files/mysql.server /etc/init.d/
mv /etc/init.d/mysql.server /etc/init.d/mysqld

##创建供MySQL使用的系统用户mysql,指定加目录并设定免登录
useradd -M -d /usr/local/mysql/ -s /sbin/nologin mysql

##修改my.cnf,正确设置其中的数据目录和socket位置
[mysqld]
datadir=/usr/local/mysql/data
socket=/usr/local/mysql/data/mysql.sock
symbolic-links=0

##初始化数据目录并指定私有用户
##因为使用的命令位于/usr/local/mysql/bin中,为了便于以后使用我们修改.bash_profile中的系统变量并使之生效
##初始化时会生成随机密码,记录下来下文会使用
vim ~/.bash_profile
source ~/.bash_profile
mysqld --initialize --user=mysql

##启动MySQL,为了进行安全初始化
/etc/init.d/mysqld start
mysql_secure_installation

##初始化结束后,就可以正常使用了
mysql -pwestos
目前生产环境PHP主流依然是用7,因此这里也用7作为实验版本.
##安装bzip2并解压源码包
yum install -y bzip2
tar jxf php-7.4.12.tar.bz2

##编译安装
cd php-7.4.12/
./configure --prefix=/usr/local/lnmp/php --with-config-file-path=/usr/local/lnmp/php/etc --enable-fpm --with-fpm-user=nginx --with-fpm-group=nginx  --with-curl --with-iconv --with-mhash --with-zlib --with-openssl --enable-mysqlnd --with-mysqli --with-pdo-mysql --disable-debug --enable-sockets --enable-soap --enable-inline-optimization --enable-xml --enable-ftp --enable-gd --enable-exif --enable-mbstring  --enable-bcmath --with-fpm-systemd

make
make install

##如果缺少依赖则进行安装
yum install systemd-libs.x86_64 -y
yum install libxml2-devel.x86_64 -y
yum install sqlite-devel.x86_64 -y
yum install libcurl-devel.x86_64 -y
yum install libpng-devel.x86_64 -y

##缺少oniguruma-devel-6.8.2-1.el7.x86_64但是官方源并不包含
##从网络独立下载符合需求的版本后安装
yum install -y oniguruma-*
--prefix						安装路径

--with-config-file-path			主配置文件目录

--enable-fpm					激活FPM的管理器

--with-fpm-user=nginx			以nginx身份运行,如果不设置则默认用户为Apache

--with-curl						启用curl模块

--with-iconv					启用iconv

--with-mhash 					启用M哈希加密

--enable-mysqlnd 				启用mysqlnd驱动

--with-mysqli 					启用mysqli驱动

--disable-debug 				关闭debug

--enable-soap 					启用soap动态模块

--enable-inline-optimization	性能优化

--with-fpm-systemd 				生成systemd的启动脚本
##添加/usr/local/lnmp/php/sbin进环境变量并激活
vim ~/.bash_profile
source ~/.bash_profile

##使用模板编写配置文件
cp /usr/local/lnmp/php/etc/php-fpm.conf.default /usr/local/lnmp/php/etc/php-fpm.conf
cp /usr/local/lnmp/php/etc/php-fpm.d/www.conf.default /usr/local/lnmp/php/etc/php-fpm.d/www.conf
vim php-fpm.conf
vim www.conf

##从源码包复制主配置文件模板并修改
cp /mnt/php-7.4.12/php.ini-production /usr/local/lnmp/php/etc/php.ini

##从源码包复制init.d需要的启动脚本
##从源码包复制systemd需要的service文件
cp /mnt/php-7.4.12/sapi/fpm/init.d.php-fpm /etc/init.d/php-fpm
chmod +x /etc/init.d/php-fpm
cp /mnt/php-7.4.12/sapi/fpm/php-fpm.service /usr/lib/systemd/system

##启动方式
1)
/etc/init.d/php-fpm start
/etc/init.d/php-fpm stop
2)
systemctl daemon-reload
systemctl start php-fpm.service
如果直接使用systemctl start php-fpm.service会发现执行出错,原因是系统启用了保护,编辑php-fpm.service即可
vim php-fpm.service

##注释掉ProtectSystem
;ProtectSystem=full

systemctl daemon-reload
systemctl start php-fpm.service
修改php.ini,调整时区
vim php.ini
timeZone		Asia/Shanghai
这里由于使用的是源码编译且开启了FPM支持,因此安装的软件是支持FastCGI的.
与CGI相比,FastCGI更快且有常驻后台,响应更快且能实现平滑加载.
采用编译方式安装的原因也是如此.
经过刚才的实验其实你已经可以通过访问9000端口来访问本机开启的PHP测试页面了
但日常使用中我们显然没有这样操作.
通过Nginx实现端口转发明显更加符合使用习惯.
但首先让我们写一个nginx.service方便启动,官方已经提供了内容我们直接复制即可.
[Unit]
Description=The NGINX HTTP and reverse proxy server
After=syslog.target network-online.target remote-fs.target nss-lookup.target
Wants=network-online.target

[Service]
Type=forking
PIDFile=/run/nginx.pid
ExecStartPre=/usr/sbin/nginx -t
ExecStart=/usr/sbin/nginx
ExecReload=/usr/sbin/nginx -s reload
ExecStop=/bin/kill -s QUIT $MAINPID
PrivateTmp=true

[Install]
WantedBy=multi-user.target
但如果你和我一样将nginx独立再/usr/local中使用了目录,那么你应该修改上文的目录,如下所示
[Unit]
Description=The NGINX HTTP and reverse proxy server
After=syslog.target network-online.target remote-fs.target nss-lookup.target
Wants=network-online.target

[Service]
Type=forking
PIDFile=/usr/local/nginx/logs/nginx.pid
ExecStartPre=/usr/local/nginx/sbin/nginx -t
ExecStart=/usr/local/nginx/sbin/nginx
ExecReload=/usr/local/nginx/sbin/nginx -s reload
ExecStop=/bin/kill -s QUIT $MAINPID
PrivateTmp=true

[Install]
WantedBy=multi-user.target
之后测试其运行情况
vim nginx.service
systemctl enable --now nginx.service
nginx的配置文件,实现对于.php文件的支持以及反向代理php测试页vim /usr/local/nginx/conf/nginx.conf
location / {
root html;
index index.php index.html index.htm;
}
location ~ \.php$ {
root html;
fastcgi_pass 172.0.0.1:9000;
fastcgi_index index.php;
#fastcgi_param SCRIPT_FILENAME /scripts$fastcgi_script_name;
include fastcgi.conf;
}
vim index.php

<?php
phpinfo()
?>

同时,还应该修改php.ini中socket项的设置来实现与MySQL的对接.
##查看socket项的位置和权限
ll /usr/local/mysql/data/mysql.sock
srwxrwxrwx 1 mysql mysql 0 Apr  8 09:27 /usr/local/mysql/data/mysql.sock
##同时可以发现其所在目录的other并没有权限,因此nginx用户无法调用它
ll /usr/local/mysql/data/ -d
drwxr-x--- 5 mysql mysql 4096 Apr  8 09:27 /usr/local/mysql/data/
##修改权限为775
chmod 775 /usr/local/mysql/data/
unzip phpMyAdmin-5.0.2-all-languages.zip
mv phpMyAdmin-5.0.2-all-languages /usr/local/nginx/html/phpMyAdmin
cd /usr/local/nginx/html/phpMyAdmin
vim conf/nginx.conf
systemctl reload nginx.service
如果上文不修改mysql.sock所在目录的权限则这里会出现登陆失败的情况,修改则不会.


Memcache是一种nosql数据库,运行在内存中,拥有缓存命中率高的特点.
默认运行端口11211,默认内存占用64M
##解压源码包安装依赖并执行编译安装,需要用到php目录下的bin中的命令因此需要修改环境变量
tar zxf memcache-4.0.5.2.tgz
cd memcache-4.0.5.2/
yum install autoconf
vim ~/.bash_profile
source ~/.bash_profile
cd ../memcache-4.0.5.2/
phpize
./configure --enable-memcache
make
make install

##安装完成后修改php主配置文件开启插件,实现对memcache的支持
cd /usr/local/lnmp/php/etc/
vim php.ini

extension=memcache

systemctl reload php-fpm.service

yum install -y memcached
systemctl start memcached.service

##查看配置文件可以看到其设置端口11211和内存占用64M
cat /etc/sysconfig/memcached

##Memcache同时也提供简易的监控页面
##复制源码包中的测试页面和监控页面到nginx发布目录下
##修改监控页面内容实现更改登录信息和memcache位置
cp /mnt//memcache-4.0.5.2/example.php /usr/local/nginx/html/
cp /mnt//memcache-4.0.5.2/memcache.php /usr/local/nginx/html/
vim /usr/local/nginx/html/memcache.php
systemctl reload nginx.service


Openresty是Nginx的一个发行版,增加对lua脚本的支持,同样运行在80端口上,因此开启时要注意80端口的占用情况.
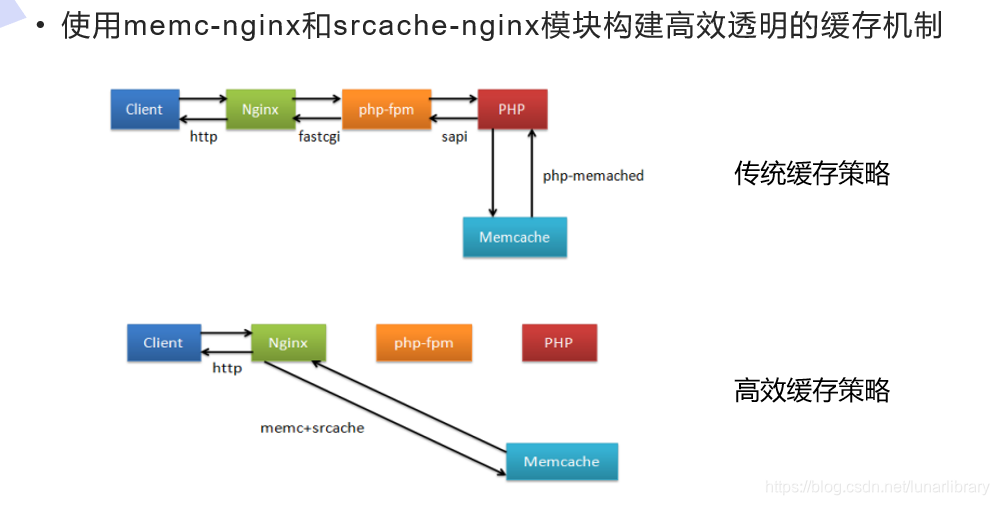
在安装Memcache后传统缓存策略是:
Client请求Nginx , Nginx使用fastcgi连接php-fpm, sapi与php交互.当存在缓存时使用Memcache中的缓存,不存在时查询数据库.
但这样相当于没有有效利用Nginx的高并发,请求的生命周期取决于请求到php之后的部分.
如果能够实现 当Client请求Nginx时,Memcache缓存命中则直接返回,未命中才进行后续操作并存储Memcache缓存,显然更加高效.
tar zxf openresty-1.19.3.1.tar.gz
cd openresty-1.19.3.1/
./configure --prefix=/usr/local/openresty --with-http_ssl_module --with-http_stub_status_module
make
make install
systemctl stop nginx.service
vim /usr/local/openresty/nginx/conf/nginx.conf
/usr/local/openresty/nginx/sbin/nginx -t
cp /usr/local/nginx/html/example.php .
cp /usr/local/nginx/html/memcache.php .
cp /usr/local/nginx/html/index.php .
/usr/local/openresty/nginx/sbin/nginx -s start
upstream memcache {
        server 127.0.0.1:11211;
        keepalive 512;					//保持512个不立即关闭的连接用于提升性能
        }

location /memc {
        internal;						//表示只接受内部访问
        memc_connect_timeout 100ms;
        memc_send_timeout 100ms;
        memc_read_timeout 100ms;
        set $memc_key $query_string;	//使用内置的$query_string来作为key
        set $memc_exptime 300;			//表示缓存失效时间
        memc_pass memcache;
        }

location ~ \.php$ {
            set $key $uri$args;
            srcache_fetch GET /memc $key;
            srcache_store PUT /memc $key;
            root           html;
            fastcgi_pass   127.0.0.1:9000;
            fastcgi_index  index.php;
            #fastcgi_param  SCRIPT_FILENAME  /scripts$fastcgi_script_name;
            include        fastcgi.conf;
        }
当所请求的url以“.php”结尾时,首先到Memcache中查询有没有以$uri$args为key的数据,如果有则直接返回;否则执行location的逻辑,如果返回的http状态码为200,则在输出前以$uri$args为key,将输入结果存入Memcache.
##进行压力测试
ab -c10 -n500
可以看到,当存在Memcache高速缓存时压力测试每秒的通过数显然更高.
上文中作为动态语言的PHP已经实现了与nginx的对接,这里来测试jsp的对接情况.
首先需要安装Tomcat.
Tomcat并不适合高并发,当流量过大时会有卡死的风险.
一般通过外部使用nginx进行调度和负载均衡,内部多开几个Tomcat来实现性能提高.
但同时Memcache没有集群的概念,无法通过借助集群等概念实现高可用和健康管理.
因此采用交叉存储的逻辑来实现.
##举例
一台Nginx对应两个Tomcat,分别位于两台主机上,称为T1和T2
两台主机上同时存在2个Memcache,分别成为M1和M2
将T1的数据优先存在M2中,T2的数据优先存在M1中,称为交叉存储.

当T1出现问题时,Nginx通过健康管理将所有数据调度到T2,由于session保持的原因,之后的数据可以继续写入M2而不是M1.
当M2出现问题时,T1将本身的数据写入备用的M1,之后的数据也都写入M1,Y也实现了可持续使用.
Tomcat并配置test.jsp到Tomcat发布目录并正常访问Nginx(这里使用原版)的配置文件实现反向代理.jsp结尾的访问到8080端口Server2上也正确配置TomcatTomcat中分别配置与Memcache的规则jar包到/usr/local/tomcat/libNginx中配置负载均衡Tomcat, Memcache, Nginxrpm -ivh jdk-8u121-linux-x64.rpm
tar zxf apache-tomcat-7.0.37.tar.gz -C /usr/local
cd /usr/local/
ln -s apache-tomcat-7.0.37/ tomcat
cd tomcat/
##拷贝jar包到/usr/local/tomcat/lib目录
##启动和关闭脚本
bin/startup.sh
bin/shutdown.sh
##发布目录
/usr/local/tomcat/webapps/ROOT/
##编辑Tomcat配置文件
##当出现问题时才使用n1节点,即优先使用n2节点
vim context.xml
<Manager className="de.javakaffee.web.msm.MemcachedBackupSessionManager"
memcachedNodes="n1:172.25.5.1:11211,n2:172.25.5.2:11211"
failoverNodes="n1"
requestUriIgnorePattern=".*\.(ico|png|gif|jpg|css|js)$"
transcoderFactoryClass="de.javakaffee.web.msm.serializer.kryo.KryoTranscoderFactory"
/>
##增加.jsp反向代理规则
/usr/local/openresty/nginx/sbin/nginx -s stop
vim /usr/local/nginx/conf/nginx.conf
nginx -t
nginx -s reload
location ~ \.jsp$ {
proxy_pass http://127.0.0.1:8080;
}
##带有负载均衡的版本
upstream Tomcat {
sticky;
server 172.25.5.1:8080;
server 172.25.5.2:8080;
}
location ~ \.jsp$ {
proxy_pass http://Tomcat;
}


使用Telnet查看保存的内容
由于Nosql采用键值对的方式进行存储,直接查看ID即可看到加密的内容.
yum install telnet -y

[root@Server1 conf]# telnet localhost 11211
Trying ::1...
Connected to localhost.
Escape character is '^]'.
get 9FF0EA3C09605E9431D467D0D0852001-n1
VALUE 9FF0EA3C09605E9431D467D0D0852001-n1 2048 125
Wx����x���01x����x����#9FF0EA3C09605E9431D467D0D0852001-n1user1111user2222user3333
END
[root@Server1 mnt]# cd /usr/local/mysql/support-files/
[root@Server1 support-files]# ls
magic  mysqld_multi.server  mysql-log-rotate  mysql.server

##这里的mysql.server即为MySQL的启动脚本

##初始化数据目录并设置私有用户
[root@Server1 init.d]# mysqld --initialize --user=mysql
2021-04-08T01:26:39.551569Z 0 [Warning] TIMESTAMP with implicit DEFAULT value is deprecated. Please use --explicit_defaults_for_timestamp server option (see documentation for more details).
2021-04-08T01:26:39.954469Z 0 [Warning] InnoDB: New log files created, LSN=45790
2021-04-08T01:26:40.016385Z 0 [Warning] InnoDB: Creating foreign key constraint system tables.
2021-04-08T01:26:40.078251Z 0 [Warning] No existing UUID has been found, so we assume that this is the first time that this server has been started. Generating a new UUID: 7806f80a-9809-11eb-ac50-52540079f81b.
2021-04-08T01:26:40.080460Z 0 [Warning] Gtid table is not ready to be used. Table 'mysql.gtid_executed' cannot be opened.
2021-04-08T01:26:40.363615Z 0 [Warning] CA certificate ca.pem is self signed.
2021-04-08T01:26:40.393868Z 1 [Note] A temporary password is generated for root@localhost: q/XmkIJ,e531

##启动MySQL
[root@Server1 init.d]# ./mysqld start
Starting MySQL.Logging to '/usr/local/mysql/data/Server1.err'.
SUCCESS!

##可以看到其正确启动,运行在3306端口(使用netstat)
[root@Server1 init.d]# ps aux
USER       PID %CPU %MEM    VSZ   RSS TTY      STAT START   TIME COMMAND
mysql     3733  0.9 17.5 1600940 177744 pts/0  Sl   09:27   0:00 /usr/local/mysql

##进行安全初始化,需要用到上文初始化数据目录时生成的密码
[root@Server1 init.d]# mysql_secure_installation
Securing the MySQL server deployment.

Enter password for user root:

The existing password for the user account root has expired. Please set a new password.

New password:

Re-enter new password:

VALIDATE PASSWORD PLUGIN can be used to test passwords
and improve security. It checks the strength of password
and allows the users to set only those passwords which are
secure enough. Would you like to setup VALIDATE PASSWORD plugin?

Press y|Y for Yes, any other key for No:
Using existing password for root.
Change the password for root ? ((Press y|Y for Yes, any other key for No) :

 ... skipping.
By default, a MySQL installation has an anonymous user,
allowing anyone to log into MySQL without having to have
a user account created for them. This is intended only for
testing, and to make the installation go a bit smoother.
You should remove them before moving into a production
environment.

Remove anonymous users? (Press y|Y for Yes, any other key for No) : y
Success.


Normally, root should only be allowed to connect from
'localhost'. This ensures that someone cannot guess at
the root password from the network.

Disallow root login remotely? (Press y|Y for Yes, any other key for No) : y
Success.

By default, MySQL comes with a database named 'test' that
anyone can access. This is also intended only for testing,
and should be removed before moving into a production
environment.


Remove test database and access to it? (Press y|Y for Yes, any other key for No) : y

 - Dropping test database...
   Success.

 - Removing privileges on test database...
   Success.

Reloading the privilege tables will ensure that all changes
made so far will take effect immediately.

Reload privilege tables now? (Press y|Y for Yes, any other key for No) : y
Success.

All done!

##安装及初始化结束,MySQL可以正常使用
[root@Server1 init.d]# mysql -pwestos
mysql: [Warning] Using a password on the command line interface can be insecure.
Welcome to the MySQL monitor.  Commands end with ; or \g.
Your MySQL connection id is 6
Server version: 5.7.31 Source distribution

Copyright (c) 2000, 2020, Oracle and/or its affiliates. All rights reserved.

Oracle is a registered trademark of Oracle Corporation and/or its
affiliates. Other names may be trademarks of their respective
owners.

Type 'help;' or '\h' for help. Type '\c' to clear the current input statement.

mysql> SHOW DATABASES
    -> ;
+--------------------+
| Database           |
+--------------------+
| information_schema |
| mysql              |
| performance_schema |
| sys                |
+--------------------+
4 rows in set (0.00 sec)

mysql> exit
Bye
[root@Server1 nginx]# cd /mnt/
[root@Server1 mnt]# tar zxf memcache-4.0.5.2.tgz
[root@Server1 mnt]# cd memcache-4.0.5.2/
[root@Server1 memcache-4.0.5.2]# yum install autoconf
[root@Server1 memcache-4.0.5.2]# vim ~/.bash_profile
[root@Server1 memcache-4.0.5.2]# source ~/.bash_profile
[root@Server1 php-7.4.12]# cd ../memcache-4.0.5.2/
[root@Server1 memcache-4.0.5.2]# phpize
[root@Server1 memcache-4.0.5.2]# ./configure --enable-memcache
[root@Server1 memcache-4.0.5.2]# make
[root@Server1 memcache-4.0.5.2]# make install
[root@Server1 memcache-4.0.5.2]# cd /usr/local/lnmp/php/lib/php/extensions/no-debug-non-zts-20190902/
[root@Server1 no-debug-non-zts-20190902]# ls
memcache.so  opcache.a  opcache.so
[root@Server1 no-debug-non-zts-20190902]# cd /usr/local/lnmp/php/etc/
[root@Server1 etc]# vim php.ini
[root@Server1 etc]# systemctl reload php-fpm.service
[root@Server1 etc]# php -m | grep memcache
memcache
[root@Server1 etc]# yum install -y memcached
[root@Server1 etc]# systemctl start memcached.service
[root@Server1 etc]# cat /etc/sysconfig/memcached
PORT="11211"
USER="memcached"
MAXCONN="1024"
CACHESIZE="64"
OPTIONS=""
[root@Server1 etc]# cd /mnt/memcache-4.0.5.2/
[root@Server1 memcache-4.0.5.2]# cp example.php /usr/local/nginx/html/
[root@Server1 memcache-4.0.5.2]# cat example.php
<?php

$memcache = memcache_connect('localhost', 11211);

if ($memcache) {
	$memcache->set("str_key", "String to store in memcached");
	$memcache->set("num_key", 123);

	$object = new StdClass;
	$object->attribute = 'test';
	$memcache->set("obj_key", $object);

	$array = Array('assoc'=>123, 345, 567);
	$memcache->set("arr_key", $array);

	var_dump($memcache->get('str_key'));
	var_dump($memcache->get('num_key'));
	var_dump($memcache->get('obj_key'));
}
else {
	echo "Connection to memcached failed";
}
?>

[root@Server1 memcache-4.0.5.2]# cp memcache.php /usr/local/nginx/html/
[root@Server1 memcache-4.0.5.2]# systemctl reload nginx.service

我们知道微软将会在今年给Windows10更换全新设计的UI,让Windows10的界面更加整...
首先给扑克牌中每张牌设定一个编号,下面算法实现的编号规则如下: u 红桃按照从...
前言 关于Window,你了解多少呢?看看下面这些问题你都能答上来吗。 如果你遇到这...
大家好,今天我们来简单的聊一聊缓存问题。什么是缓存呢?它在系统设计中是在一个...
一、MVC MVC模式的意思是,软件可以分成三个部分。 视图(View):用户界面。 控...
本文实例讲述了jsp中page指令用法。分享给大家供大家参考。具体如下: 一、JSP ...
一、简介 本设计为硬币图像识别统计装置通过数码相机获取平铺无重叠堆积的硬币的...
git工作区,暂存区,版本库之间的关系: 我们建立的项目文件夹就是工作区,在初...
从功能测试、性能测试、界面测试、安全性测试、易用性、兼容性测试、震动测试七...
今日国内领先的智能数据服务运营商觉非科技完成近亿元A轮融资。本轮融资由和高资...

