

新闻网站建立,后台登录界面的搭建
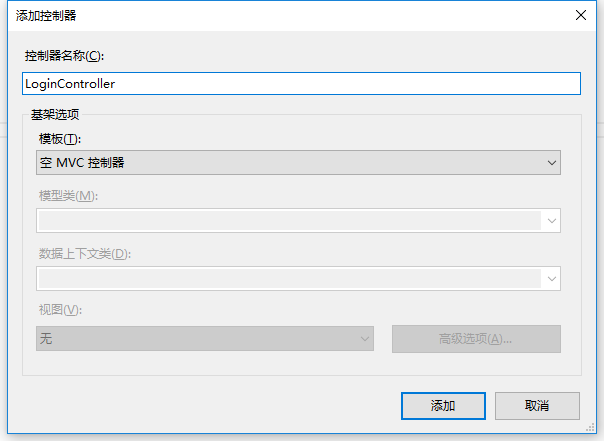
首先我们在Controllers里面新添加一个控制器就叫LoginController,右键点击Controllers添加控制器就可以了(注意后面一定是Controller结尾,这是一种约定)
其次:右键点击index建立Index视图。(不选择使用母版页)

现在我们就可以在Index视图中设计我们的登录页面了。
这里需要我们引入几个Css样式和JS文件

简单的进行登录界面的布局
<html>
<head>
 <meta name="viewport" content="width=device-width" />
 <title>登录</title>
 <script src="~/Scripts/jquery-1.8.2.js"></script>
 <script src="~/Content/EasyUI/jquery.easyui.min.js"></script>
 <script src="~/Content/EasyUI/easyui-lang-zh_CN.js"></script>
 <link href="~/Content/EasyUI/themes/default/easyui.css" rel="external nofollow" rel="stylesheet" />
 <link href="~/Content/EasyUI/themes/icon.css" rel="external nofollow" rel="stylesheet" />
 <script type="text/javascript">
  $(function () {
   initWin(); //初始化登录窗体
  });
  function initWin() {
   $("#win").window({
    title: "登录",
    width: 400,
    height: 270,
    collapsible: false,
    minimizable: false,
    maximizable: false,
    closable: false,
    modal: true,
    resizable: false,
   });
  }
 </script>
</head>
<body>
 <div id="win"class="easyui-window">
  <div>
   <div style="height:20px"></div>
   <table>
    <tr>
     <td style="width:20px"></td>
     <td>用户名:</td>
     <td><input type="text"class="easyui-textbox" id="txtName" name="txtName"/></td>
     <td><span id="spanName" style="color:red"></span></td>
    </tr>
    <tr style="height:10px"></tr>

    <tr>
     <td style="width:20px"></td>
     <td>密 码:</td>
     <td><input type="password/"class="easyui-textbox"id="txtPwd" name="txtPwd"></td>
     <td><span id="spanPwd" style="color:red"></span></td>
    </tr>
    <tr style="height:10px"></tr>
    <tr>
     <td style="width:20px"></td>
     <td>验证码:</td>
     <td><input type="text"class="easyui-textbox" id="txtVcode" name="txtVcode"/></td>
     <td><span id="spanVcode"style="color:red"></span></td>
    </tr>

    <tr style="height:10px"></tr>

    <tr>
     <td style="width:20px"></td>
     <td><img id="image" src="" style="float: left; height: 24px;" /></td>
     <td><a href="javascript:void(0)" rel="external nofollow" rel="external nofollow" id="changeVcode">看不清,换一张</a></td>
    </tr>

   </table>
  </div>
  <div style="height:10px"></div>
  <div data-options="region:'south',border:false" style="text-align:center;padding:5px 0 0;">
   <a class="easyui-linkbutton" data-options="iconCls:'icon-ok'" href="javascript:void(0)" rel="external nofollow" rel="external nofollow" id="btnOk" style="width:80px">登录</a>
  </div>
  </div>
</body>
</html>
运行的结果图:

这里验证码的图片没有显示出来,这是没有关系的,在下一节中就讲怎么把验证码显示出来。
以上就是本文的全部内容,希望对大家的学习有所帮助,也希望大家多多支持站长技术。

Mysql数据库五——mysql事务及引擎 一、事务 1、事务的概念 2、事务的ACID特点 ...
如果你很在意你的终端的外观的话,一个跨 shell 的提示符可以让你轻松地定制和配...
我之前写过一个简易版的自动+手动轮播图: 简易轮播图 但是这个轮播图在切换的时...
本文实例为大家分享了js实现电灯开关效果的具体代码,供大家参考,具体内容如下 ...
例如: 我们在百度中搜索 尊托云数,则网址后面的参数就是 http://www.baidu.com/...
Asp 解析 XML并分页显示,示例源码如下: 复制代码 代码如下: !DOCTYPE html PUB...
主要目的 a. 掌握获取 GridPanel 当前行的各个字段值的方法 b. 掌握如何将前台数...
关于我的SWFObject V1.5的使用过程,以 上篇 中的介绍暂时告一段落了,下面我将...
发现每个编辑实例都可以加载不同的css样式表,而且其样式不继承 页面的css。 于...
接着昨天的,如果forEach中的items类型是map或者Collection类型的,怎样使用增强...

