

所有阿里云服务都需要使用相同的地域。
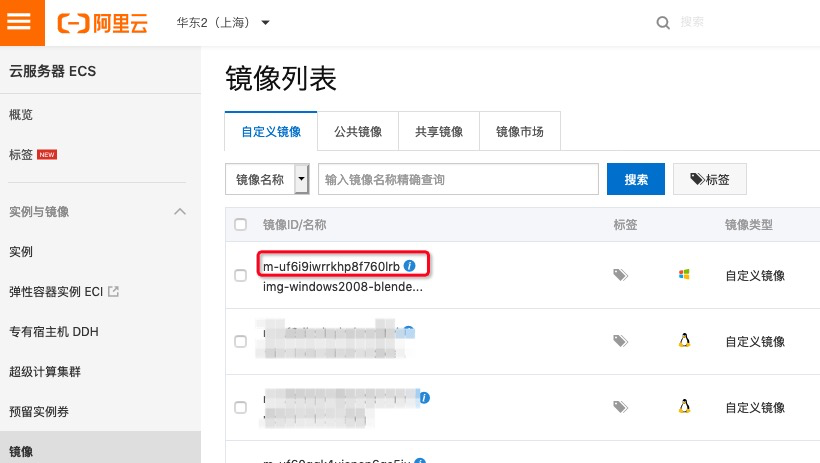
制作镜像具体步骤请参考集群镜像, 请严格按文档的步骤创建镜像。镜像制作完成后,通过以下方式可以获取到对应的镜像信息。
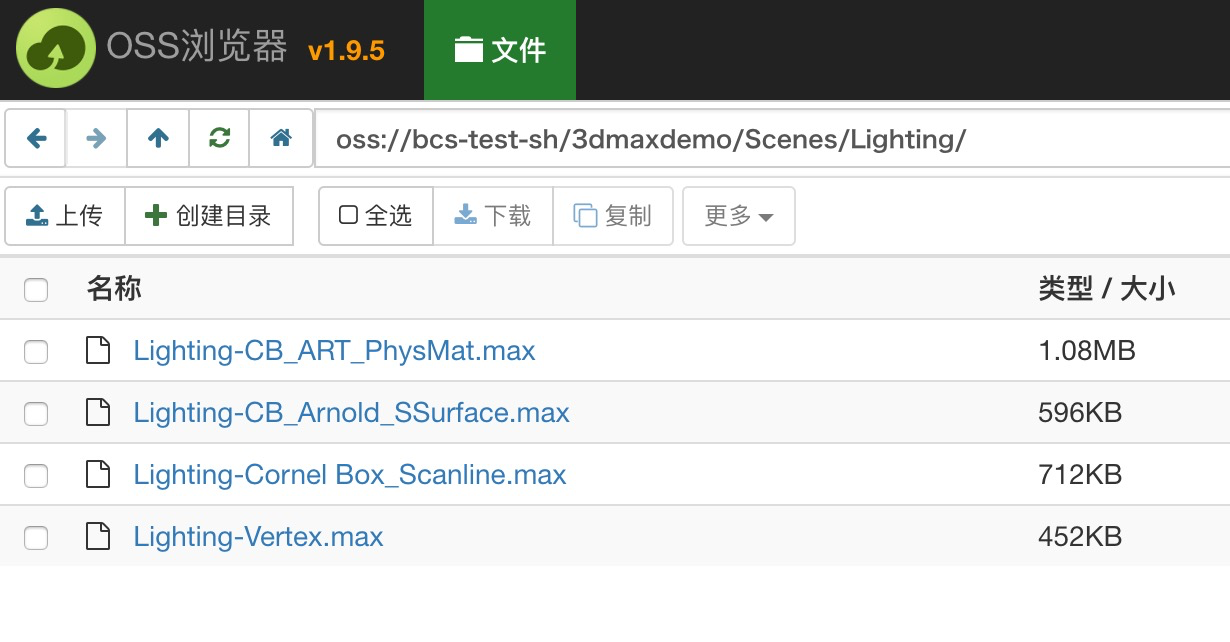
可以下载 3ds Max 官方提供的免费素材包进行测试。
通过 OSSBrowser 工具将渲染素材到指定的 OSS bucket 中,如下图:
在需要提交作业的机器上,安装批量计算 SDK 库;已经安装请忽略。Linux 安装执行如下命令;Windows 平台请参考文档。
pip install batchcompute
work.py
#!/usr/bin/env python# -*- coding: UTF-8 -*-import osimport mathimport sysimport reimport argparseNOTHING_TO_DO = 'Nothing to do, exit'def _calcRange(a,b, id, step):start = min(id * step + a, b)end = min((id+1) * step + a-1, b)return (start, end)def _parseContinuedFrames(render_frames, total_nodes, id=None, return_type='list'):'''解析连续帧, 如: 1-10'''[a,b]=render_frames.split('-')a=int(a)b=int(b)#print(a,b)step = int(math.ceil((b-a+1)*1.0/total_nodes))#print('step:', step)mod = (b-a+1) % total_nodes#print('mod:', mod)if mod==0 or id < mod:(start, end) = _calcRange(a,b, id, step)#print('--->',start, end)return (start, end) if return_type!='list' else range(start, end+1)else:a1 = step * mod + a#print('less', a1, b, id)(start, end) = _calcRange(a1 ,b, id-mod, step-1)#print('--->',start, end)return (start, end) if return_type!='list' else range(start, end+1)def _parseIntermittentFrames(render_frames, total_nodes, id=None):'''解析不连续帧, 如: 1,3,8-10,21'''a1=render_frames.split(',')a2=[]for n in a1:a=n.split('-')a2.append(range(int(a[0]),int(a[1])+1) if len(a)==2 else [int(a[0])])a3=[]for n in a2:a3=a3+n#print('a3',a3)step = int(math.ceil(len(a3)*1.0/total_nodes))#print('step',step)mod = len(a3) % total_nodes#print('mod:', mod)if mod==0 or id < mod:(start, end) = _calcRange(0, len(a3)-1, id, step)#print(start, end)a4= a3[start: end+1]#print('--->', a4)return a4else:#print('less', step * mod , len(a3)-1, id)(start, end) = _calcRange( step * mod ,len(a3)-1, id-mod, step-1)if start > len(a3)-1:print(NOTHING_TO_DO)sys.exit(0)#print(start, end)a4= a3[start: end+1]#print('--->', a4)return a4def parseFrames(render_frames, return_type='list', id=None, total_nodes=None):'''@param render_frames {string}: 需要渲染的总帧数列表范围,可以用"-"表示范围,不连续的帧可以使用","隔开, 如: 1,3,5-10@param return_type {string}: 取值范围[list,range]。 list样例: [1,2,3], range样例: (1,3)。注意: render_frames包含","时有效,强制为list。@param id, 节点ID,从0开始。 正式环境不要填写,将从环境变量 BATCH_COMPUTE_DAG_INSTANCE_ID 中取得。@param total_nodes, 总共的节点个数。正式环境不要填写,将从环境变量 BATCH_COMPUTE_DAG_INSTANCE_COUNT 中取得。'''if id==None:id=os.environ['BATCH_COMPUTE_DAG_INSTANCE_ID']if type(id)==str:id = int(id)if total_nodes==None:total_nodes = os.environ['BATCH_COMPUTE_DAG_INSTANCE_COUNT']if type(total_nodes)==str:total_nodes = int(total_nodes)if re.match(r'^(\d+)\-(\d+)$',render_frames):# 1-2# continued framesreturn _parseContinuedFrames(render_frames, total_nodes, id, return_type)else:# intermittent framesreturn _parseIntermittentFrames(render_frames, total_nodes, id)if __name__ == "__main__":parser = argparse.ArgumentParser(formatter_class = argparse.ArgumentDefaultsHelpFormatter,description = 'python scripyt for 3dmax dag job',usage='render3Dmax.py <positional argument> [<args>]',)parser.add_argument('-s', '--scene_file', action='store', type=str, required=True, help = 'the name of the file with .max subffix .')parser.add_argument('-i', '--input', action='store', type=str, required=True, help = 'the oss dir of the scene_file, eg: xxx.max.')parser.add_argument('-o', '--output', action='store', type=str, required=True, help = 'the oss of dir the result file to upload .')parser.add_argument('-f', '--frames', action='store', type=str, required=True, help = 'the frames to be renderd, eg: "1-10".')parser.add_argument('-t', '--retType', action='store', type=str, default="test.jpg", help = 'the tye of the render result,eg. xxx.jpg/xxx.png.')args = parser.parse_args()frames=parseFrames(args.frames)framestr='-'.join(map(lambda x:str(x), frames))s = "cd \"C:\\Program Files\\Autodesk\\3ds Max 2018\\\" && "s +='3dsmaxcmd.exe -o="%s%s" -frames=%s "%s\\%s"' % (args.output, args.retType, framestr, args.input, args.scene_file)print("exec: %s" % s)rc = os.system(s)sys.exit(rc>>8)
注意:

test.py
#!/usr/bin/env python# -*- coding: utf-8 -*-from batchcompute import Client, ClientErrorfrom batchcompute.resources import (ClusterDescription, GroupDescription, Configs, Networks, VPC,JobDescription, TaskDescription, DAG,Mounts,AutoCluster,Disks,Notification,)import timeimport argparsefrom batchcompute import CN_SHANGHAI as REGION #需要根据 region 做适配access_key_id = "xxxx" # your access key idaccess_key_secret = "xxxx" # your access key secretinstance_type = "ecs.g5.4xlarge" # instance type #需要根据 业务需要 做适配image_id = "m-xxx"workossPath = "oss://xxxxx/work/work.py"client = Client(REGION, access_key_id, access_key_secret)def getAutoClusterDesc(InstanceCount):auto_desc = AutoCluster()auto_desc.ECSImageId = image_id#任务失败保留环境,程序调试阶段设置。环境保留费用会继续产生请注意及时手动清除环境任务失败保留环境,# 程序调试阶段设置。环境保留费用会继续产生请注意及时手动清除环境auto_desc.ReserveOnFail = False# 实例规格auto_desc.InstanceType = instance_type#case3 按量auto_desc.ResourceType = "OnDemand"#Configsconfigs = Configs()#Configs.Networksnetworks = Networks()vpc = VPC()# CidrBlock和VpcId 都传入,必须保证VpcId的CidrBlock 和传入的CidrBlock保持一致vpc.CidrBlock = '172.26.0.0/16'# vpc.VpcId = "vpc-8vbfxdyhx9p2flummuwmq"networks.VPC = vpcconfigs.Networks = networks# 设置系统盘type(cloud_efficiency/cloud_ssd)以及size(单位GB)configs.add_system_disk(size=40, type_='cloud_efficiency')#设置数据盘type(必须和系统盘type保持一致) size(单位GB) 挂载点# case1 linux环境# configs.add_data_disk(size=40, type_='cloud_efficiency', mount_point='/path/to/mount/')# 设置节点个数configs.InstanceCount = InstanceCountauto_desc.Configs = configsreturn auto_descdef getTaskDesc(inputOssPath, outputossPath, scene_file, frames, retType, clusterId, InstanceCount):taskDesc = TaskDescription()timestamp = time.strftime("%Y_%m_%d_%H_%M_%S", time.localtime())inputLocalPath = "D:"outputLocalPath = "C:\\\\tmp\\\\" + timestamp + "\\\\"outputossBase = outputossPath + timestamp + "/"stdoutOssPath = outputossBase + "stdout/" #your stdout oss pathstderrOssPath = outputossBase + "stderr/" #your stderr oss pathoutputossret = outputossBase + "ret/"taskDesc.InputMapping = {inputOssPath: inputLocalPath}taskDesc.OutputMapping = {outputLocalPath: outputossret}taskDesc.Parameters.InputMappingConfig.Lock = True# 设置程序的标准输出地址,程序中的print打印会实时上传到指定的oss地址taskDesc.Parameters.StdoutRedirectPath = stdoutOssPath# 设置程序的标准错误输出地址,程序抛出的异常错误会实时上传到指定的oss地址taskDesc.Parameters.StderrRedirectPath = stderrOssPath#触发程序运行的命令行# PackagePath存放commandLine中的可执行文件或者二进制包taskDesc.Parameters.Command.PackagePath = workossPathtaskDesc.Parameters.Command.CommandLine = "python work.py -i %s -o %s -s %s -f %s -t %s" % (inputLocalPath, outputLocalPath, scene_file, frames, retType)# 设置任务的超时时间taskDesc.Timeout = 86400# 设置任务所需实例个数taskDesc.InstanceCount = InstanceCount# 设置任务失败后重试次数taskDesc.MaxRetryCount = 3if clusterId:# 采用固定集群提交作业taskDesc.ClusterId = clusterIdelse:#采用auto集群提交作业taskDesc.AutoCluster = getAutoClusterDesc(InstanceCount)return taskDescdef getDagJobDesc(inputOssPath, outputossPath, scene_file, frames, retType, clusterId = None, instanceNum = 1):job_desc = JobDescription()dag_desc = DAG()job_desc.Name = "testBatch"job_desc.Description = "test 3dMAX job"job_desc.Priority = 1# 任务失败job_desc.JobFailOnInstanceFail = False# 作业运行成功后户自动会被立即释放掉job_desc.AutoRelease = Falsejob_desc.Type = "DAG"render = getTaskDesc(inputOssPath, outputossPath, scene_file, frames, retType, clusterId, instanceNum)# 添加任务dag_desc.add_task('render', render)job_desc.DAG = dag_descreturn job_descif __name__ == "__main__":parser = argparse.ArgumentParser(formatter_class = argparse.ArgumentDefaultsHelpFormatter,description = 'python scripyt for 3dmax dag job',usage='render3Dmax.py <positional argument> [<args>]',)parser.add_argument('-n','--instanceNum', action='store',type = int, default = 1,help = 'the parell instance num .')parser.add_argument('-s', '--scene_file', action='store', type=str, required=True, help = 'the name of the file with .max subffix .')parser.add_argument('-i', '--inputoss', action='store', type=str, required=True, help = 'the oss dir of the scene_file, eg: xxx.max.')parser.add_argument('-o', '--outputoss', action='store', type=str, required=True, help = 'the oss of dir the result file to upload .')parser.add_argument('-f', '--frames', action='store', type=str, required=True, help = 'the frames to be renderd, eg: "1-10".')parser.add_argument('-t', '--retType', action='store', type=str, default = "test.jpg", help = 'the tye of the render result,eg. xxx.jpg/xxx.png.')parser.add_argument('-c', '--clusterId', action='store', type=str, default=None, help = 'the clusterId to be render .')args = parser.parse_args()try:job_desc = getDagJobDesc(args.inputoss, args.outputoss, args.scene_file, args.frames,args.retType, args.clusterId, args.instanceNum)# print job_descjob_id = client.create_job(job_desc).Idprint('job created: %s' % job_id)except ClientError,e:print (e.get_status_code(), e.get_code(), e.get_requestid(), e.get_msg())
注意:
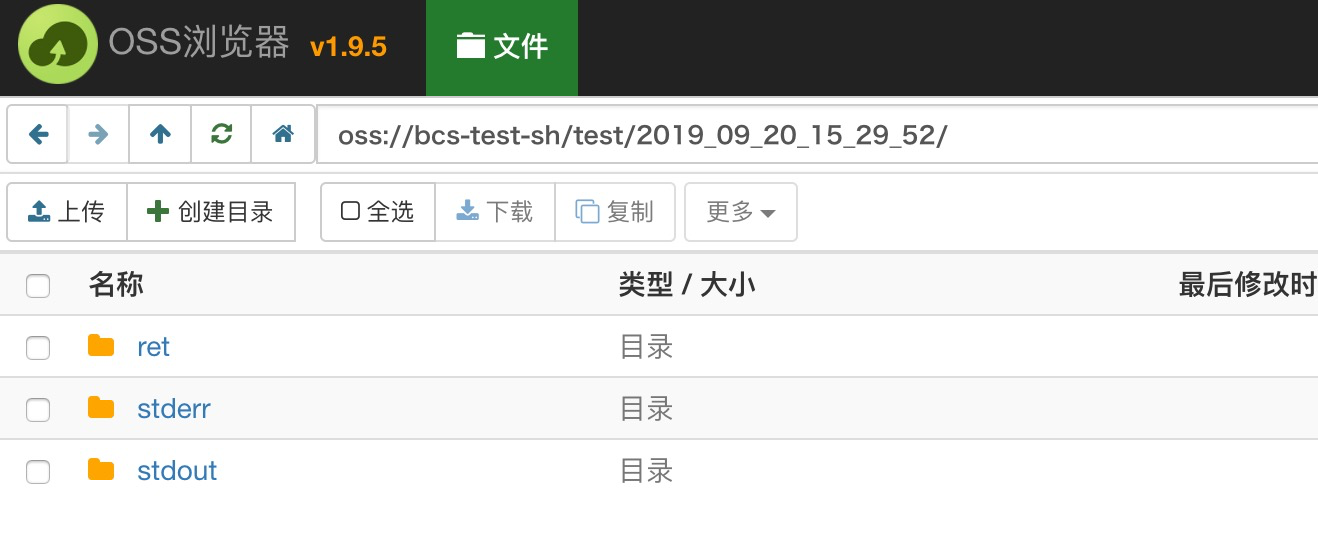
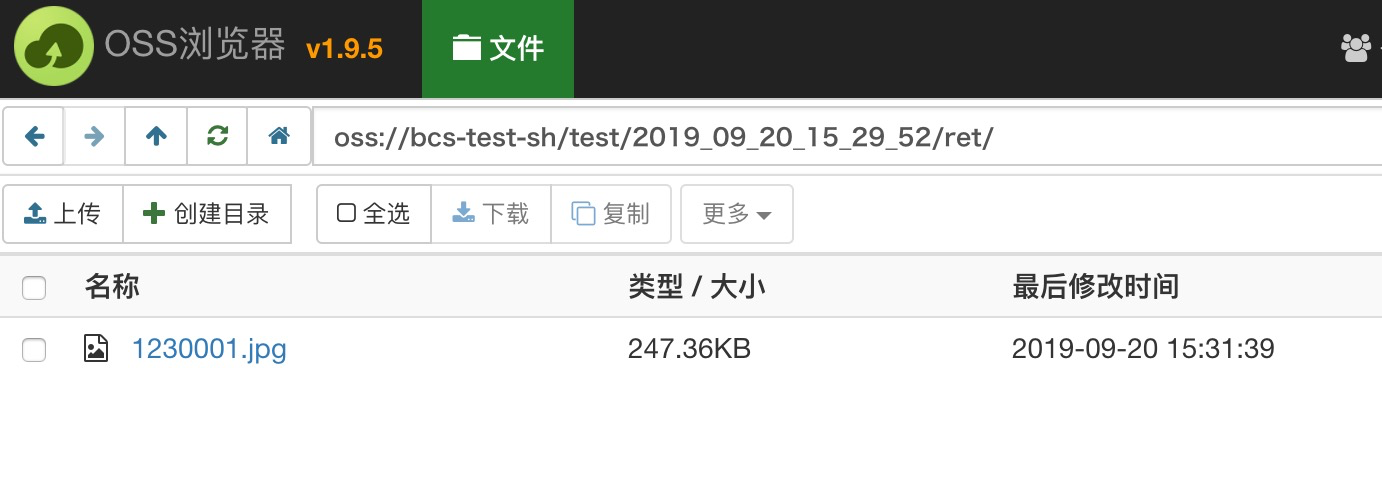
根据以上示例文档,执行以下命令:
python test.py -s Lighting-CB_Arnold_SSurface.max -i oss://bcs-test-sh/3dmaxdemo/Scenes/Lighting/ -o oss://bcs-test-sh/test/ -f 1-1 -t 123.jpg
示例运行结果:

近年来,广告业的飞速发展不断助推着我国互联网产业和数字经济的繁荣。与此同时...
操作场景 VNC 登录是腾讯云为用户提供的一种通过 Web 浏览器远程连接实例的方式...
1. 接口描述 接口请求域名: batch.tencentcloudapi.com 。 用于批量销毁计算节...
你知道新的市场领导者和曾经的领导者之间的关键区别是什么吗? 那就是数据管理。...
操作场景 腾讯云容器镜像服务(Tencent Container Registry,TCR)支持托管 Helm...
在这里把任务跑的慢的问题划分为以下几类 资源不足导致的排队(一般是包年包月项...
理解代码的内存消耗,最关键是要知道自己所用编程语言的内存管理。 不同语言的内...
TOP云 (west.cn)6月17日消息,上周末小编接到投资人曝料,多枚 域名 悄然易主...
【51CTO.com原创稿件】近期,一家中立的市场调查公司TRUE Global Intelligence在...
本文介绍Alibaba Cloud Linux 2在 4.19.91-18.al7 内核版本新增的memcg全局最低...

