

本文介绍如何设置样式(Android)
说明:更多实操教学视频请参见:设置样式(Android)。
会话列表 Layout 由标题区 TitleBarLayout 与列表区 ConversationListLayout 组成,每部分都提供了 UI 样式以及事件注册的接口可供修改。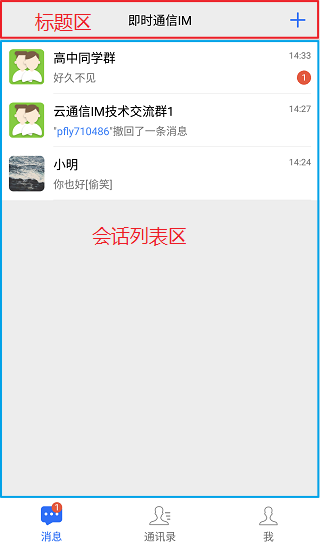
标题区除了本身作为 View 所具有的属性功能之外,还包含左、中、右三块区域,如下图所示:
您可以参考 ITitleBarLayout 进行自定义修改。
例如,在 ConversationLayout 中,隐藏左边的 LeftGroup,设置中间的标题,隐藏右边的文本和图片按钮,代码如下:
// 获取 TitleBarLayout
TitleBarLayout titleBarLayout = mConversationLayout.findViewById(R.id.conversation_title);
// 设置标题
titleBarLayout.setTitle(getResources().getString(R.string.conversation_title), TitleBarLayout.POSITION.MIDDLE);
// 隐藏左侧 Group
titleBarLayout.getLeftGroup().setVisibility(View.GONE);
// 设置右侧的菜单图标
titleBarLayout.setRightIcon(R.drawable.conversation_more);
效果如下图所示:
另外,您也可以定制点击事件:
// 菜单类
mMenu = new Menu(getActivity(), titleBarLayout, Menu.MENU_TYPE_CONVERSATION);
// 响应菜单按钮的点击事件
titleBarLayout.setOnRightClickListener(new View.OnClickListener() {
  @Override
  public void onClick(View view) {
      if (mMenu.isShowing()) {
          mMenu.hide();
      } else {
          mMenu.show();
      }
  }
});列表区的自定义 layout 继承自 RecyclerView,登录后 TUIKit 会根据用户名从 SDK 读取该用户的会话列表。
会话列表提供一些常用功能定制,例如,头像是否圆角、背景、字体大小、点击与长按事件等。示例代码如下:
public static void customizeConversation(final ConversationLayout layout) {
  // 从 ConversationLayout 获取会话列表
  ConversationListLayout listLayout = layout.getConversationList();
  listLayout.setItemTopTextSize(16); // 设置 item 中 top 文字大小
  listLayout.setItemBottomTextSize(12);// 设置 item 中 bottom 文字大小
  listLayout.setItemDateTextSize(10);// 设置 item 中 timeline 文字大小
  listLayout.setItemAvatarRadius(5); // 设置 adapter item 头像圆角大小
  listLayout.disableItemUnreadDot(false);// 设置 item 是否不显示未读红点,默认显示
  // 长按弹出菜单
  listLayout.setOnItemLongClickListener(new ConversationListLayout.OnItemLongClickListener() {
      @Override
      public void OnItemLongClick(View view, int position, ConversationInfo conversationInfo) {
          startPopShow(view, position, conversationInfo);
      }
  });
}
更多详细信息请参见 ConversationLayoutHelper.java。
IM SDK 不做头像存储,需要集成者有头像存储接口获取头像 URL,这里 TUIKit 通过随机头像接口进行演示,如何设置头像。
首先您需要在个人资料页面中,上传头像图片,调用修改资料接口。
HashMap<String, Object> hashMap = new HashMap<>();
// 头像,mIconUrl 就是您上传头像后的 URL,可以参考 Demo 中的随机头像作为示例
if (!TextUtils.isEmpty(mIconUrl)) {
 hashMap.put(TIMUserProfile.TIM_PROFILE_TYPE_KEY_FACEURL, mIconUrl);
}
TIMFriendshipManager.getInstance().modifySelfProfile(hashMap, new TIMCallBack() {
 @Override
 public void onError(int i, String s) {
     DemoLog.e(TAG, "modifySelfProfile err code = " + i + ", desc = " + s);
     ToastUtil.toastShortMessage("Error code = " + i + ", desc = " + s);
 }
 @Override
 public void onSuccess() {
     DemoLog.i(TAG, "modifySelfProfile success");
 }
});
会话列表设置头像在 ConversationCommonHolder.java 中进行获取展示:
if (!TextUtils.isEmpty(conversation.getIconUrl())) {
 List<String> urllist = new ArrayList<>();
 urllist.add(conversation.getIconUrl());
 conversationIconView.setIconUrls(urllist);
 urllist.clear();
}聊天窗口包含标题区 TitleBarLayout,用法与会话列表相同。除此之外,聊天窗口还包含三个区域,从上到下为通知区 NoticeLayout、消息区 MessageLayout 和输入区 InputLayout,如下图所示: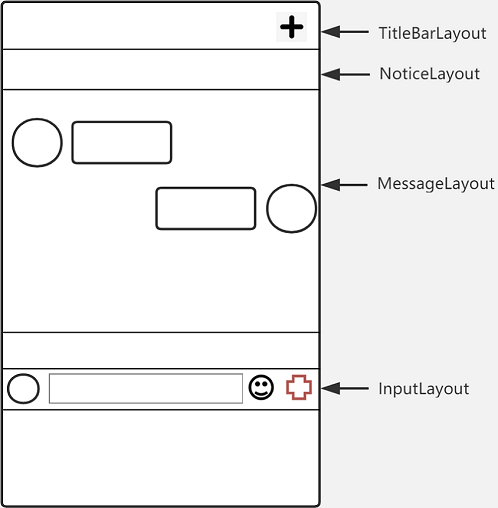
效果如下图所示: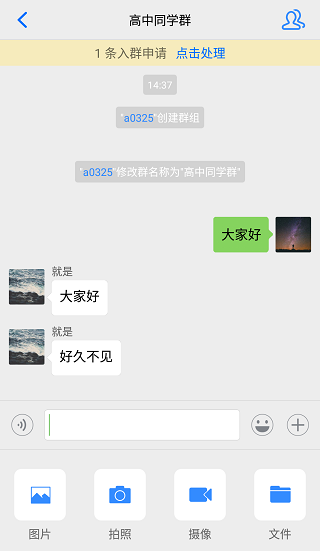
/**
* 获取聊天窗口 Notice 区域 Layout
* @return
*/
NoticeLayout getNoticeLayout();
/**
* 获取聊天窗口 Message 区域 Layout
* @return
*/
MessageLayout getMessageLayout();
/**
* 获取聊天窗口 Input 区域 Layout
* @return
*/
InputLayout getInputLayout();通知区域由两个 TextView 组成,如下图所示:
效果如下图所示: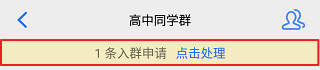
// 从 ChatLayout 里获取 NoticeLayout
NoticeLayout noticeLayout = layout.getNoticeLayout();
// 可以使通知区域一致展示
noticeLayout.alwaysShow(true);
// 设置通知主题
noticeLayout.getContent().setText("现在插播一条广告");
// 设置通知提醒文字
noticeLayout.getContentExtra().setText("参看有奖");
// 设置通知的点击事件
noticeLayout.setOnNoticeClickListener(new View.OnClickListener() {
  @Override
  public void onClick(View v) {
      ToastUtil.toastShortMessage("赏白银五千两");
  }
});MessageLayout 继承自 RecyclerView ,本文提供自定义修改聊天背景、气泡、文字、是否显示昵称等常见的用法,更多详情请参见 IMessageProperties。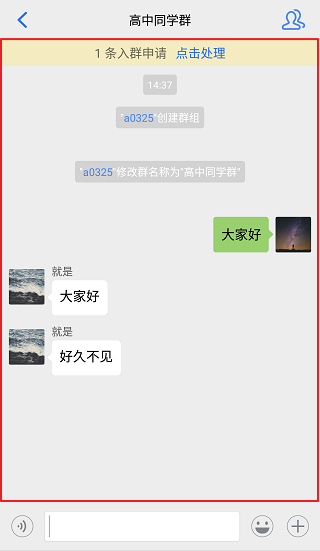
您可以自定义设置聊天背景。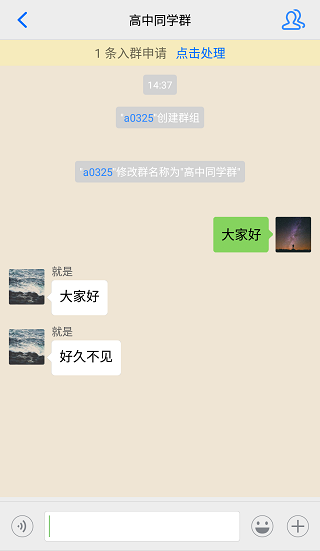
// 从ChatLayout 里获取 MessageLayout
MessageLayout messageLayout = layout.getMessageLayout();
////// 设置聊天背景 //////
messageLayout.setBackground(new ColorDrawable(0xB0E2FF00));TUIKit 的界面在显示用户时,会从用户资料中读取头像地址并显示。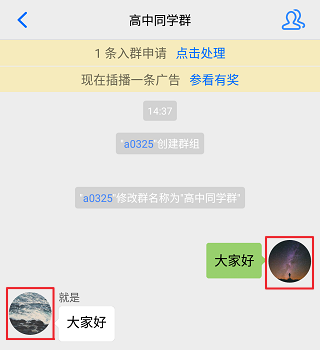
// 聊天界面设置头像和昵称
TIMUserProfile profile = TIMFriendshipManager.getInstance().queryUserProfile(msg.getFromUser());
if (profile == null) {
    usernameText.setText(msg.getFromUser());
} else {
    usernameText.setText(!TextUtils.isEmpty(profile.getNickName()) ? profile.getNickName() : msg.getFromUser());
if (!TextUtils.isEmpty(profile.getFaceUrl()) && !msg.isSelf()) {
    List<String> urllist = new ArrayList<>();
    urllist.add(profile.getFaceUrl());
    leftUserIcon.setIconUrls(urllist);
    urllist.clear();
}
}
TIMUserProfile selfInfo = TIMFriendshipManager.getInstance().queryUserProfile(TIMManager.getInstance().getLoginUser());
if (profile != null && msg.isSelf()) {
     if (!TextUtils.isEmpty(selfInfo.getFaceUrl())) {
     List<String> urllist = new ArrayList<>();
     urllist.add(profile.getFaceUrl());
     rightUserIcon.setIconUrls(urllist);
     urllist.clear();
}
}
如果用户没有设置头像会显示默认头像,您可以自定义设置默认头像、头像是否圆角以及头像大小等。
// 从 ChatLayout 里获取 MessageLayout
MessageLayout messageLayout = layout.getMessageLayout();
////// 设置头像 //////
// 设置默认头像,默认与朋友与自己的头像相同
messageLayout.setAvatar(R.drawable.ic_chat_input_file);
// 设置头像圆角,不设置则默认不做圆角处理
messageLayout.setAvatarRadius(50);
// 设置头像大小
messageLayout.setAvatarSize(new int[]{48, 48});左边为对方的气泡,右边为自己的气泡,您可以自定义设置双方的气泡背景。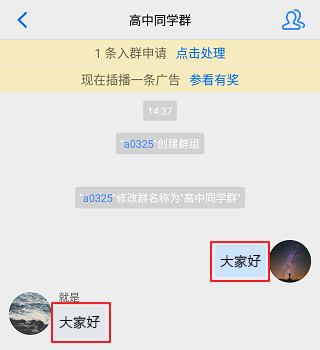
// 从 ChatLayout 里获取 MessageLayout
MessageLayout messageLayout = layout.getMessageLayout();
// 设置自己聊天气泡的背景
messageLayout.setRightBubble(context.getResources().getDrawable(R.drawable.chat_opposite_bg));
// 设置朋友聊天气泡的背景
messageLayout.setLeftBubble(context.getResources().getDrawable(R.drawable.chat_self_bg));您可以自定义设置昵称的字体大小与颜色等,但双方昵称样式必须保持一致。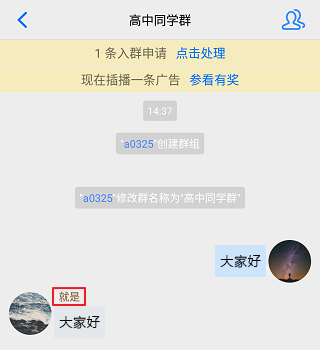
// 从 ChatLayout 里获取 MessageLayout
MessageLayout messageLayout = layout.getMessageLayout();
////// 设置昵称样式(对方与自己的样式保持一致)//////
messageLayout.setNameFontSize(12);
messageLayout.setNameFontColor(0x8B5A2B00);您可以自定义设置聊天内容的字体大小、双方字体颜色等,但双方字体大小必须保持一致。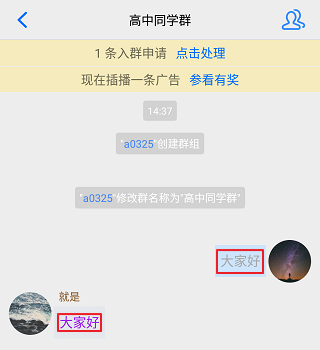
// 从 ChatLayout 里获取 MessageLayout
MessageLayout messageLayout = layout.getMessageLayout();
// 设置聊天内容字体大小,朋友和自己用一种字体大小
messageLayout.setChatContextFontSize(15);
// 设置自己聊天内容字体颜色
messageLayout.setRightChatContentFontColor(0xA9A9A900);
// 设置朋友聊天内容字体颜色
messageLayout.setLeftChatContentFontColor(0xA020F000);您可以自定义设置聊天时间线的背景、字体大小以及字体颜色等。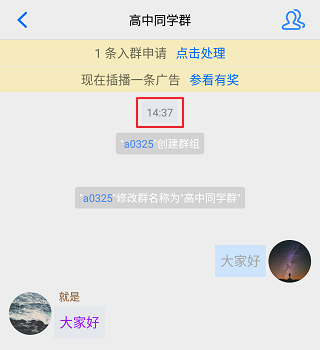
// 从 ChatLayout 里获取 MessageLayout
MessageLayout messageLayout = layout.getMessageLayout();
// 设置聊天时间线的背景
messageLayout.setChatTimeBubble(new ColorDrawable(0x8B691400));
// 设置聊天时间的字体大小
messageLayout.setChatTimeFontSize(20);
// 设置聊天时间的字体颜色
messageLayout.setChatTimeFontColor(0xEE00EE00);您可以自定义设置提示信息的背景、字体大小以及字体颜色等。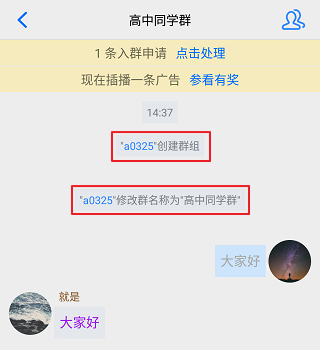
// 从ChatLayout里获取MessageLayout
MessageLayout messageLayout = layout.getMessageLayout();
// 设置提示的背景
messageLayout.setTipsMessageBubble(new ColorDrawable(0xA020F000));
// 设置提示的字体大小
messageLayout.setTipsMessageFontSize(20);
// 设置提示的字体颜色
messageLayout.setTipsMessageFontColor(0x7CFC0000);输入区域 InputLayout,包含语音输入、文字输入、表情输入以及更多的“+”输入。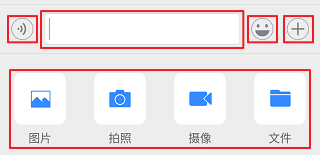
您可以自定义隐藏或展示更多“+”面板的图片、拍照、摄像以及发送文件的功能。
// 从 ChatLayout 里获取 InputLayout
InputLayout inputLayout = layout.getInputLayout();
// 隐藏拍照并发送
inputLayout.disableCaptureAction(true);
// 隐藏发送文件
inputLayout.disableSendFileAction(true);
// 隐藏发送图片
inputLayout.disableSendPhotoAction(true);
// 隐藏摄像并发送
inputLayout.disableVideoRecordAction(true);您可以自定义新增更多“+”面板的动作单元实现相应的功能。
本文以隐藏发送文件,增加一个动作单元且该动作单元会发送一条消息为例,示例代码如下:
// 从 ChatLayout 里获取 InputLayout
InputLayout inputLayout = layout.getInputLayout();
// 隐藏发送文件
inputLayout.disableSendFileAction(true);
// 定义一个动作单元
InputMoreActionUnit unit = new InputMoreActionUnit();
unit.setIconResId(R.drawable.default_user_icon); // 设置单元的图标
unit.setTitleId(R.string.profile); // 设置单元的文字标题
unit.setOnClickListener(new View.OnClickListener() { // 定义点击事件
  @Override
  public void onClick(View v) {
      ToastUtil.toastShortMessage("自定义的更多功能");
      MessageInfo info = MessageInfoUtil.buildTextMessage("我是谁");
      layout.sendMessage(info, false);
  }
});
// 把定义好的单元增加到更多面板
inputLayout.addAction(unit);您可以自定义替换更多“+”面板的各个动作单元的功能。
// 从 ChatLayout 里获取 InputLayout
InputLayout inputLayout = layout.getInputLayout();
// 可以用自定义的事件来替换更多功能的入口
inputLayout.replaceMoreInput(new View.OnClickListener() {
  @Override
  public void onClick(View v) {
      ToastUtil.toastShortMessage("自定义的更多功能按钮事件");
      MessageInfo info = MessageInfoUtil.buildTextMessage("自定义的消息");
      layout.sendMessage(info, false);
  }
});您可以自定义更多“+”面板的样式、各个动作单元以及其对应的功能。
// 从 ChatLayout 里获取 InputLayout
InputLayout inputLayout = layout.getInputLayout();
// 可以用自定义的 fragment 来替换更多功能
inputLayout.replaceMoreInput(new CustomInputFragment());
新面板 CustomInputFragment 的实现和普通的 Fragment 没有区别,在 onCreateView 时 inflate 自己的 View ,设置事件即可。本文以添加两个按钮 ,点击时弹出 toast 为例,示例代码如下:
public static class CustomInputFragment extends BaseInputFragment {
  @Nullable
  @Override
  public View onCreateView(LayoutInflater inflater, @Nullable ViewGroup container, Bundle savedInstanceState) {
      View baseView = inflater.inflate(R.layout.test_chat_input_custom_fragment, container, false);
      Button btn1 = baseView.findViewById(R.id.test_send_message_btn1);
      btn1.setOnClickListener(new View.OnClickListener() {
          @Override
          public void onClick(View v) {
              ToastUtil.toastShortMessage("发送一条超链接消息");
          }
      });
      Button btn2 = baseView.findViewById(R.id.test_send_message_btn2);
      btn2.setOnClickListener(new View.OnClickListener() {
          @Override
          public void onClick(View v) {
              ToastUtil.toastShortMessage("发送一条视频文字混合消息");
          }
      });
      return baseView;
  }
}
效果如下图所示:

TOP云 (west.cn)8月2日消息,昨天我们才报道了国别 域名 Furniture.co.uk以65...
公司介绍 行列秩以人工智能和计量金融为技术基础,致力构建消费金融的资产定价及...
在哪里查询裸金属服务器的价格? 预付费和后付费是什么意思?如何选择? 裸金属...
引言: 数据安全对企业生存发展有着举足轻重的影响,数据资产的外泄、破坏都会导...
ALIYUN::FC::Alias类型用于创建别名。 语法 { "Type": "ALIYUN::FC::Alias", "Pr...
环境:SpringBoot2.3.9.RELEASE 依赖 dependency groupIdorg.springframework.bo...
异步 generator 函数是 ES2018 中新增的特性。Node.js 从 v10 版本增加了对异步 ...
您无法直接删除该云硬盘,但是可以根据需求退订该云硬盘。退订规则和操作方法,...
哈喽各位同学们大家好呀 小编今天带着开发者学院中课程“什么是微服务架构Micros...
操作场景 对于部分传统框架,您需要先对项目入口进行简单改造,才可以完成迁移。...

