

代码如下所示:
<!DOCTYPE html>
<html>

<head>
    <meta charset="UTF-8">
    <link rel="stylesheet" href="https://unpkg.com/element-ui/lib/theme-chalk/index.css">
    <script src="https://cdn.jsdelivr.net/npm/vue/dist/vue.js"></script>
    <script src="https://unpkg.com/element-ui/lib/index.js"></script>
</head>

<body>
    <div id="app">
        <el-button round @click="visible = true">圆角按钮</el-button>
        <br>
        <el-dialog :visible.sync="visible" title="Hello world">
            <p>Try Element</p>
        </el-dialog>
        <br>

        <el-switch v-model="value1" active-text="按月付费" inactive-text="按年付费">
        </el-switch>
        <el-switch style="display: block" v-model="value2" active-color="#13ce66" inactive-color="#ff4949"
            active-text="按月付费" inactive-text="按年付费">
        </el-switch>

        <br>
        <el-time-picker is-range v-model="value1" range-separator="至" start-placeholder="开始时间" end-placeholder="结束时间"
            placeholder="选择时间范围">
        </el-time-picker>
        <el-time-picker is-range arrow-control v-model="value2" range-separator="至" start-placeholder="开始时间"
            end-placeholder="结束时间" placeholder="选择时间范围">
        </el-time-picker>
        <br>

        <el-progress type="circle" :percentage="0"></el-progress>
        <el-progress type="circle" :percentage="25"></el-progress>
        <el-progress type="circle" :percentage="100" status="success"></el-progress>
        <el-progress type="circle" :percentage="70" status="warning"></el-progress>
        <el-progress type="circle" :percentage="50" status="exception"></el-progress>
        <br>
        <el-row>
            <el-button icon="el-icon-search" circle></el-button>
            <el-button type="primary" icon="el-icon-edit" circle></el-button>
            <el-button type="success" icon="el-icon-check" circle></el-button>
            <el-button type="info" icon="el-icon-message" circle></el-button>
            <el-button type="warning" icon="el-icon-star-off" circle></el-button>
            <el-button type="danger" icon="el-icon-delete" circle></el-button>
        </el-row>
        <br>
        <el-steps :active="1" finish-status="success">
            <el-step title="已付款"></el-step>
            <el-step title="退款中"></el-step>
            <el-step title="已退款"></el-step>
            <el-step title="待结算"></el-step>
            <el-step title="已结算"></el-step>
        </el-steps>
    </div>
</body>
<script>
    new Vue({
        el: '#app',
        data: function () {
            return { visible: false }
        }
    })
</script>

</html>
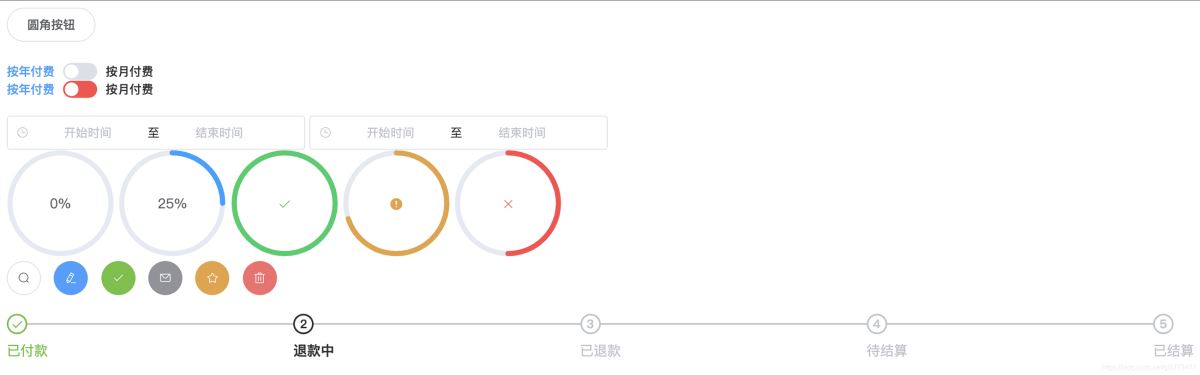
效果如图:
总结
到此这篇关于html直接引用vue和element-ui的方法的文章就介绍到这了,更多相关html引用vue和element-ui内容请搜索脚本之家以前的文章或继续浏览下面的相关文章,希望大家以后多多支持脚本之家!

content [Ctrl+A 全选 注: 引入外部Js需再刷新一下页面才能执行 ] 终于见识了这...
Dreamweaver中的代码想要插入注释,该怎么添加呢?下面我们就来看看详细的教程。...
下面介绍一下div嵌套div时margin不起作用的解决方案。 顺便科普下margin的定义和...
通过 display:bolck/none 完成一个菜单栏的效果 图1: 首先下面是已经完成的一...
本文学习的内容主要如下所示: 1.关闭按钮 2.Carets 3.快速设置浮动 4.内容区域...
官方文档 https://developers.weixin.qq.... index.wxml view class="container"...
链接可以制作 WML 卡片来显示 WML 的锚功能,图像可以制作 WML 卡片来显示图像. ...
不知道从什么时候开始,在网络上到处可以看到div+css,到底什么是div+css呢?难...
运维工程师这个岗位不同于后端开发岗位,到底运维工程师平时做什么? 老司机告诉...
效果图: 整体效果: 视频加载: 拍照: 第一步:创建HTML元素 首先,我们要创建...

