


本文将帮助您理解为什么需要版本控制,以及如何对REST API进行版本控制。我们将讨论4种版本控制的方法,并比较不同的方法。
您将学到
为什么我们需要对RESTful API进行版本化
最好的版本控制方法是不进行版本控制。只要不需要版本控制,就不要版本控制。
构建向后兼容的服务,以便尽可能避免版本控制!
然而,在许多情况下我们都需要进行版本控制,然我们看看下面具体的例子:
最初,你有个这个版本的Student服务,返回数据如下:
- {
- "name": "Bob Charlie"
- }
后来,您希望将学生的名字拆分,因此创建了这个版本的服务。
- {
- "name": {
- "firstName": "Bob",
- "lastName": "Charlie"
- }
- }
您可以从同一个服务支持这两个请求,但是随着每个版本的需求多样化,它会变得越来越复杂。
在这种情况下,版本控制就成必不可少,强制性的了。
接下来让我们创建一个简单的SpringBoot的maven项目,并理解对 RESTful 服务进行版本控制的4种不同方法。
- <dependencies>
- <dependency>
- <groupId>org.springframework.boot</groupId>
- <artifactId>spring-boot-starter</artifactId>
- </dependency>
- <dependency>
- <groupId>org.springframework.boot</groupId>
- <artifactId>spring-boot-starter-web</artifactId>
- </dependency>
- <dependency>
- <groupId>org.projectlombok</groupId>
- <artifactId>lombok</artifactId>
- </dependency>
- <dependency>
- <groupId>org.springframework.boot</groupId>
- <artifactId>spring-boot-starter-test</artifactId>
- <scope>test</scope>
- </dependency>
- </dependencies>
几个用于实现版本控制的Bean
第一个版本的 Bean
- @Data
- @AllArgsConstructor
- public class StudentV1 {
- private String name;
- }
第二个版本的 Bean
- @Data
- public class StudentV2 {
- private Name name;
- }
StudentV2使用的Name实体
- @Data
- @AllArgsConstructor
- public class Name {
- private String firstName;
- private String lastName;
- }
Restful 版本控制的方法
我们希望创建两个版本的服务,一个返回 StudentV1,另一个返回 StudentV2。
让我们来看看创建相同服务版本的4种不同方法。
通过 URI 进行版本控制
- @RestController
- public class StudentUriController {
- @GetMapping("v1/student")
- public StudentV1 studentV1() {
- return new StudentV1("javadaily");
- }
- @GetMapping("v2/student")
- public StudentV2 studentV2() {
- return new StudentV2(new Name("javadaily", "JAVA日知录"));
- }
- }
请求:http://localhost:8080/v1/student
响应:{"name":"javadaily"}
请求:http://localhost:8080/v2/student
响应:{"name":{"firstName":"javadaily","lastName":"JAVA日知录"}}
通过请求参数进行版本控制
版本控制的第二种方法是使用请求参数来区分版本。请求示例如下所示:
实现方式如下:
- @RestController
- public class StudentParmController {
- @GetMapping(value="/student/param",params = "version=1")
- public StudentV1 studentV1() {
- return new StudentV1("javadaily");
- }
- @GetMapping(value="/student/param",params = "version=2")
- public StudentV2 studentV2() {
- return new StudentV2(new Name("javadaily", "JAVA日知录"));
- }
- }
请求:http://localhost:8080/student/param?version=1
响应:{"name":"javadaily"}
请求:http://localhost:8080/student/param?version=2
响应:{"name":{"firstName":"javadaily","lastName":"JAVA日知录"}}
通过自定义Header进行版本控制
版本控制的第三种方法是使用请求头来区分版本,请求示例如下:
- http://localhost:8080/student/header
- http://localhost:8080/student/header
实现方式如下所示:
- @RestController
- public class StudentHeaderController {
- @GetMapping(value="/student/header",headers = "X-API-VERSION=1")
- public StudentV1 studentV1() {
- return new StudentV1("javadaily");
- }
- @GetMapping(value="/student/header",headers = "X-API-VERSION=2")
- public StudentV2 studentV2() {
- return new StudentV2(new Name("javadaily", "JAVA日知录"));
- }
- }
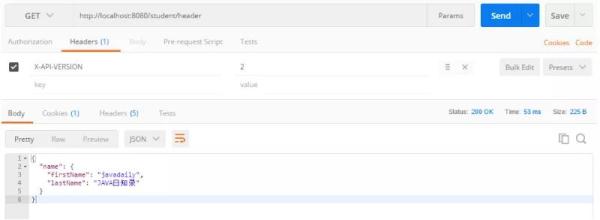
下图展示了我们如何使用Postman执行带有请求头的Get请求方法。
请求:http://localhost:8080/student/header
header:X-API-VERSION = 1

请求:http://localhost:8080/student/header
header:X-API-VERSION = 2
通过媒体类型进行版本控制
最后一种版本控制方法是在请求中使用Accept Header,请求示例如下:
- http://localhost:8080/student/produce
- http://localhost:8080/student/produce
实现方式如下:
- @RestController
- public class StudentProduceController {
- @GetMapping(value="/student/produce",produces = "application/api-v1+json")
- public StudentV1 studentV1() {
- return new StudentV1("javadaily");
- }
- @GetMapping(value="/student/produce",produces = "application/api-v2+json")
- public StudentV2 studentV2() {
- return new StudentV2(new Name("javadaily", "JAVA日知录"));
- }
- }
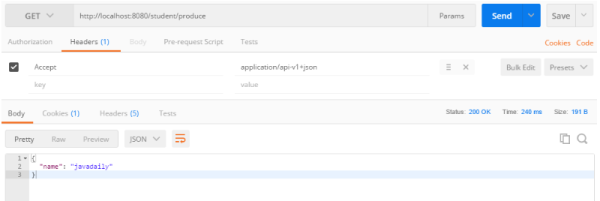
下图展示了我们如何使用Postman执行带有请求Accept的Get方法。
请求:http://localhost:8080/student/produce
header:Accept = application/api-v1+json
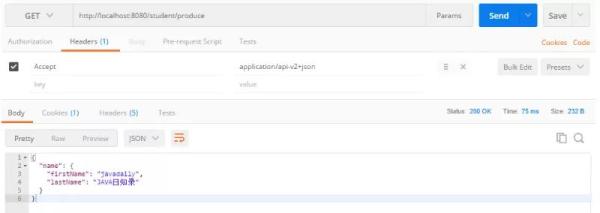
请求:http://localhost:8080/student/produce
header:Accept = application/api-v2+json
影响版本选择的因素
以下因素影响版本控制的选择
URI 污染 - URL版本和请求参数版本控制会污染URI空间。
滥用请求头 - Accept 请求头并不是为版本控制而设计的。
缓存 - 如果你使用基于头的版本控制,我们不能仅仅基于URL缓存,你需要考虑特定的请求头。
是否能在浏览器直接执行 ? - 如果您有非技术消费者,那么基于URL的版本将更容易使用,因为它们可以直接在浏览器上执行。
API文档 - 如何让文档生成理解两个不同的url是同一服务的版本?
事实上,并没有完美的版本控制解决方案,你需要根据项目实际情况进行选择。
下面列表展示了主要API提供商使用的不同版本控制方法:
媒体类型的版本控制
自定义Header
Twitter,百度,知乎
Amazon

网速越来越慢?路由器是关键! 近几年,随着宽带的高速发展,WiFi几乎填满了我们的...
我在两三年前就看到美国的医生坐在手术室外,手里端着咖啡,只需要动动遥控操纵...
本文转载自微信公众号「新智元」,作者新智元。转载本文请联系新智元公众号。 无...
3月11日,全国两会闭幕, 人工智能依然是热议话题,不过今年意义却大不一样,十...
编者按:不论是设计网页还是 APP,在 UI设计的时候,确保产品的可访问性都是一件...
你们还相信光吗? 这一句《奥特曼》中的台词,让众多人内心依然保存了一份初心,...
最近北京发了1000万数字人民币,之前深圳也发了1000万,接下来还会有很多城市会...
最近学了近一个月半月的深度学习,所以想检验一下学习成果。正好毕设是图像处理A...
深度学习是机器学习算法的子类,其特殊性是有更高的复杂度。因此,深度学习属于...
众所周知,商业世界的变化速度比人们想象的还要快。为了解决这个问题,需要采用...

