

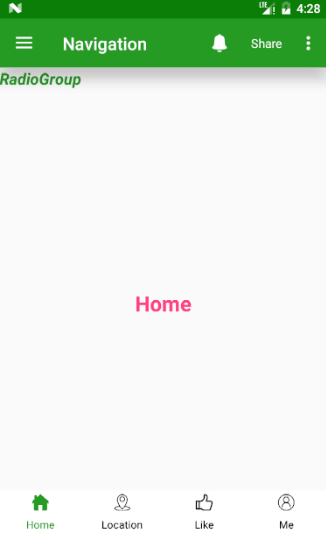
这里简单记录一下Android底部导航栏通过RadioGroup+Fragment的实现。
布局:
- <?xml version="1.0" encoding="utf-8"?>
- <RelativeLayout xmlns:android="http://schemas.android.com/apk/res/android"
- android:layout_width="match_parent"
- android:layout_height="match_parent"
- android:orientation="vertical">
- <include layout="@layout/fragment_content"/>
- <View
- android:layout_width="match_parent"
- android:layout_height="1px"
- android:background="@color/grey_300"
- android:elevation="20dp"/>
- <RadioGroup
- android:id="@+id/radio_group"
- android:layout_width="match_parent"
- android:layout_height="56dp"
- android:layout_alignParentBottom="true"
- android:background="@color/white"
- android:orientation="horizontal">
- <RadioButton
- android:id="@+id/rb_home"
- style="@style/radiobutton_style"
- android:checked="true"
- android:drawableTop="@drawable/radiobutton_bg_home"
- android:text="@string/item_home"
- />
- <RadioButton
- android:id="@+id/rb_location"
- style="@style/radiobutton_style"
- android:drawableTop="@drawable/radiobutton_bg_location"
- android:text="@string/item_location"/>
- <RadioButton
- android:id="@+id/rb_like"
- style="@style/radiobutton_style"
- android:drawableTop="@drawable/radiobutton_bg_like"
- android:text="@string/item_like"/>
- <RadioButton
- android:id="@+id/rb_me"
- style="@style/radiobutton_style"
- android:drawableTop="@drawable/radiobutton_bg_me"
- android:text="@string/item_person"/>
- </RadioGroup>
- </RelativeLayout>
这里的drawableTop使用了状态选择器
- <selector xmlns:android="http://schemas.android.com/apk/res/android">
- <item android:drawable="@drawable/home_fill" android:state_checked="true"/>
- <item android:drawable="@drawable/home"/>
- </selector>
style
- <style name="radiobutton_style">
- <item name="android:layout_width">0dp</item>
- <item name="android:padding">3dp</item>
- <item name="android:layout_height">match_parent</item>
- <item name="android:layout_weight">1</item>
- <item name="android:button">@null</item><!--去除RadioButton默认带的圆点-->
- <item name="android:gravity">center</item>
- <item name="android:textSize">12sp</item>
- </style>
代码
初始化的代码就不记录了,都是一些findViewById,实现过程无非就是对RadioButton进行监听一下:
- mRadioGroup.setOnCheckedChangeListener(this);
- @Override
- public void onCheckedChanged(RadioGroup group, int checkId) {
- FragmentTransaction transaction = getFragmentManager().beginTransaction();
- switch (checkId) {
- case R.id.rb_home:
- if (mHomeFragment == null) {
- mHomeFragment = HomeFragment.newInstance(getString(R.string.item_home));
- }
- transaction.replace(R.id.sub_content, mHomeFragment);
- break;
- case R.id.rb_location:
- if (mLocationFragment == null) {
- mLocationFragment = LocationFragment.newInstance(getString(R.string.item_location));
- }
- transaction.replace(R.id.sub_content, mLocationFragment);
- break;
- case R.id.rb_like:
- if (mLikeFragment == null) {
- mLikeFragment = LikeFragment.newInstance(getString(R.string.item_like));
- }
- transaction.replace(R.id.sub_content, mLikeFragment);
- break;
- case R.id.rb_me:
- if (mPersonFragment == null) {
- mPersonFragment = PersonFragment.newInstance(getString(R.string.item_person));
- }
- transaction.replace(R.id.sub_content, mPersonFragment);
- break;
- }
- setTabState();//设置状态
- transaction.commit();
- }
状态的设置
- private void setTabState() {
- setHomeState();
- setLocationState();
- setLikeState();
- setMeState();
- }
- /**
- * set tab home state
- */
- private void setHomeState() {
- if (mRadioHome.isChecked()) {
- mRadioHome.setTextColor(ContextCompat.getColor(getActivity(), R.color.colorPrimary));
- } else {
- mRadioHome.setTextColor(ContextCompat.getColor(getActivity(), R.color.black));
- }
- }
- private void setLocationState() {
- if (mRadioLocation.isChecked()) {
- mRadioLocation.setTextColor(ContextCompat.getColor(getActivity(), R.color.colorPrimary));
- } else {
- mRadioLocation.setTextColor(ContextCompat.getColor(getActivity(), R.color.black));
- }
- }
- private void setLikeState() {
- if (mRadioLike.isChecked()) {
- mRadioLike.setTextColor(ContextCompat.getColor(getActivity(), R.color.colorPrimary));
- } else {
- mRadioLike.setTextColor(ContextCompat.getColor(getActivity(), R.color.black));
- }
- }
- private void setMeState() {
- if (mRadioMe.isChecked()) {
- mRadioMe.setTextColor(ContextCompat.getColor(getActivity(), R.color.colorPrimary));
- } else {
- mRadioMe.setTextColor(ContextCompat.getColor(getActivity(), R.color.black));
- }
- }
这里需要注意的是, setDefaultFragment();我写在onCreateVew里面并没有生效。这里我写在了onStart()方法里了。
- @Override
- public void onStart() {
- setDefaultFragment();//写在onCreateView里面,当页面跑到其他Fragment再回来就不会生效
- super.onStart();
- }
说明:这几篇文章没有过多的文字叙述,因为这些东西也不是很难,而且都是常用的,相信很多人都了如指掌了,多说亦是废话,直接上代码看的反而更清楚。

现在手机系统基本可以分为安卓和苹果两大阵营。在这之后,安卓系统又因为手机厂...
您是否为拔下机器人的插头或关闭人工智能算法感到难过?暂时不行。但是,当我们的...
本文主要记录: 使用 Intent 打开第三方应用或指定 Activity 的三种方式 使用上...
HTTP 协议仅仅制定了互联网传输的标准,简化了直接使用 TCP 协议进行通信的难度...
近期苹果官网发布的 新的 iCloud 支持文档,宣布与云上贵州大数据产业发展有限公...
今天跟大家探讨的问题是:【微信即将更新哪些实用的功能】。 微信作为主流的社交...
不知道大家是否还记得,苹果曾经推出过一款小屏手机iPhone SE。当年的iPhone SE...
不久前,微信终于支持修改微信号了,不过一年仅限一次,而且必须满足一定的条件...
尽管2020年全球新冠大流行造成了破坏,但全球经济仍在朝着数字命运前进,因为大...
本文讨论了评估模型性能时的数据泄漏问题以及避免数据泄漏的方法。 在模型评估过...

