国内 CentOS 7 安装 K8S v1.29.2(CRI:containerd),通过安装 K8S,了解 K8S 的核心概念
原创国内 CentOS 7 安装 K8S v1.29.2(CRI:containerd),通过安装 K8S,了解 K8S 的核心概念
原创
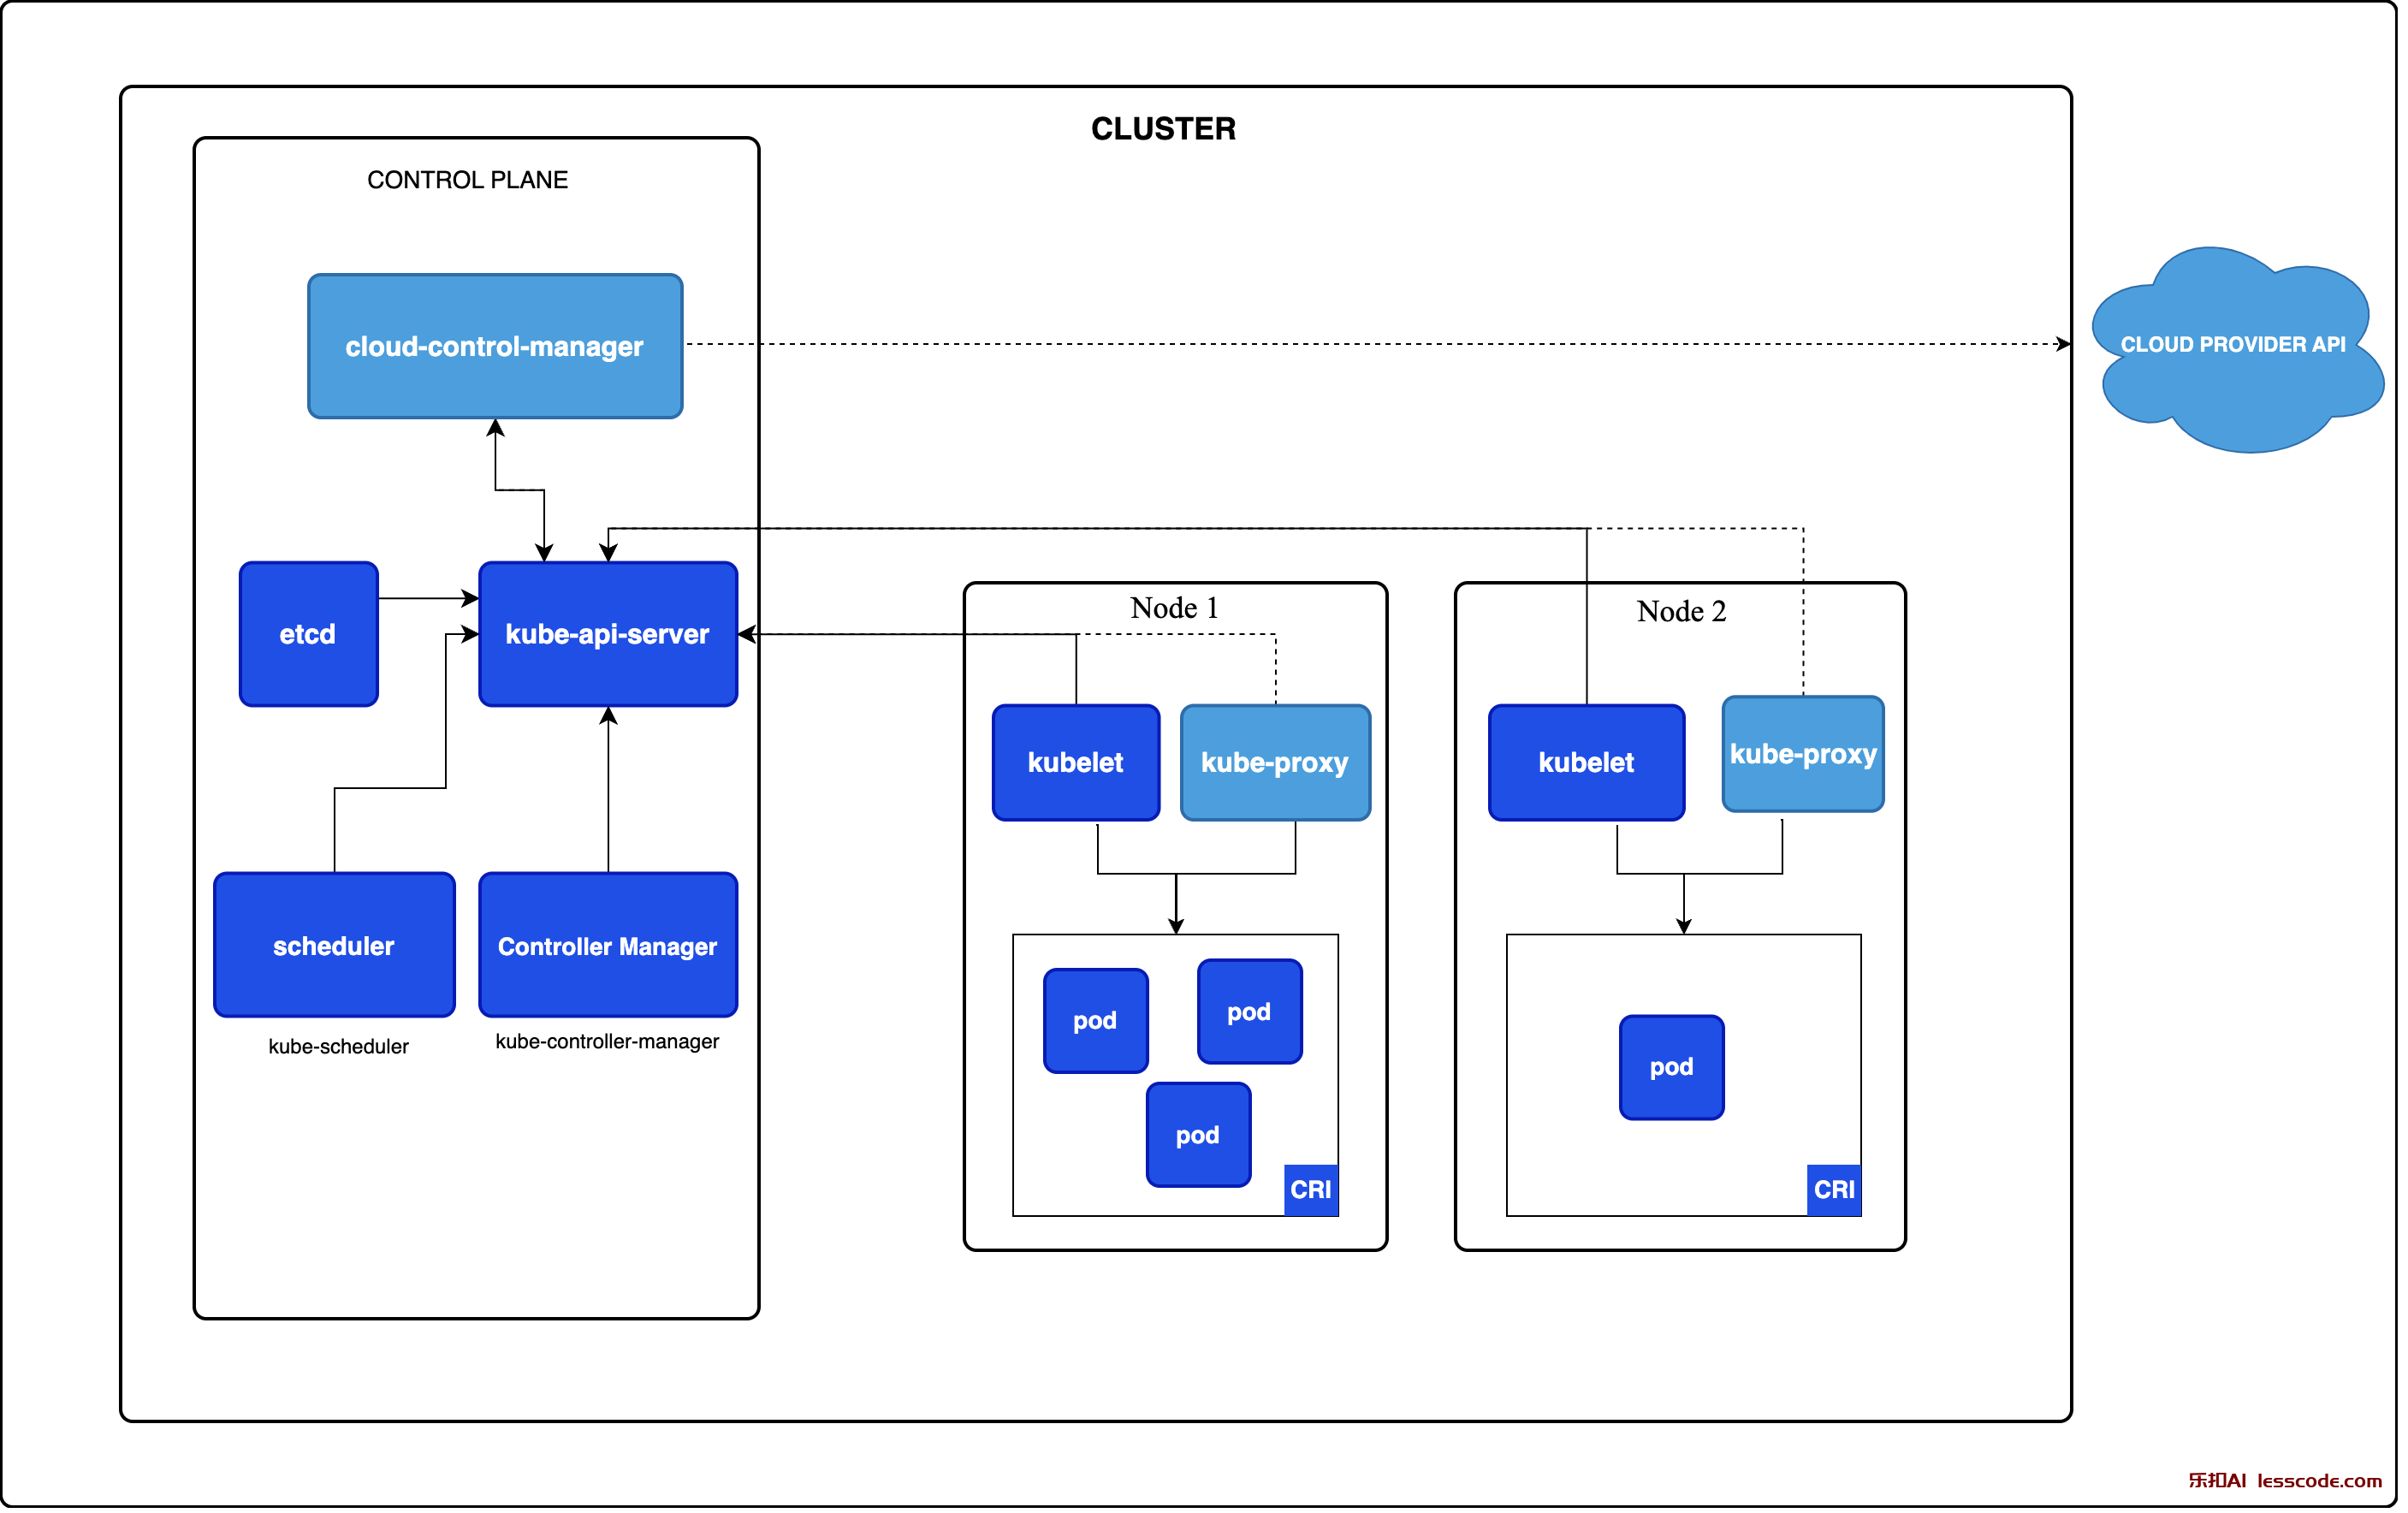
通过安装 K8S,了解 K8S 的核心概念:控制面、CRI、CNI、Deployment、Service、sandbox 等,本文不仅包含安装流程,而且包含丰富的 Troubeshooting 实战,以及解释这背后发生了什么。
前置项
端口占用情况
kubelet 10250 10248
kube-controller 127.0.0.1:10257
kube-schedule 10259
kube-proxy 10256 127.0.0.1:10249
kube-apiserver 6443
etcd 2379 2380 2381
安装环境
- 主机:腾讯云 CVM
- OS: CentOS 7.6
架构
- 服务器2台:1台控制面,1台数据面
1. 安装 kubeadm
参考官方文档 安装 kubeadm
1.1 安装容器运行时 containerd
所有节点中安装容器运行时
容器运行时有好几个 containerd、CRI-O、Docker Engine(使用 cri-dockerd),这里选择containerd
参照文档 Getting started with containerd
containerd 调用链更短,组件更少,更稳定,支持OCI标准,占用节点资源更少。 建议选择 containerd。 以下情况,请选择 docker 作为运行时组件: 如需使用 docker in docker 如需在 K8S 节点使用 docker build/push/save/load 等命令 如需调用 docker API 如需 docker compose 或 docker swarm
前置条件:转发 IPv4 并让 iptables 看到桥接流量
cat <<EOF | sudo tee /etc/modules-load.d/k8s.conf
overlay
br_netfilter
EOF

sudo modprobe overlay
sudo modprobe br_netfilter

# 设置所需的 sysctl 参数,参数在重新启动后保持不变
cat <<EOF | sudo tee /etc/sysctl.d/k8s.conf
net.bridge.bridge-nf-call-iptables  = 1
net.bridge.bridge-nf-call-ip6tables = 1
net.ipv4.ip_forward                 = 1
EOF

# 应用 sysctl 参数而不重新启动
sudo sysctl --system
通过运行以下指令确认 br_netfilter 和 overlay 模块被加载:
lsmod | grep br_netfilter
lsmod | grep overlay
通过运行以下指令确认 net.bridge.bridge-nf-call-iptables、net.bridge.bridge-nf-call-ip6tables 和 net.ipv4.ip_forward 系统变量在你的 sysctl 配置中被设置为 1:
sysctl net.bridge.bridge-nf-call-iptables net.bridge.bridge-nf-call-ip6tables net.ipv4.ip_forward1.1 安装 containerd
containerd 和 runc 的关系 在提供的文档中,
containerd和runc的关系主要体现在containerd作为容器运行时的高级管理层,而runc则是底层的容器运行时。containerd提供了一系列的功能,包括但不限于容器的生命周期管理、镜像管理、存储和网络配置等。而runc是一个轻量级的容器运行时,它实现了 Open Container Initiative (OCI) 规范,负责直接与操作系统交互,执行容器。在文档中,通过使用
containerd的 CLI 工具ctr来演示如何与containerd交互,包括拉取镜像、创建容器和任务等操作。这些操作背后,containerd会调用runc来实际启动和运行容器。这样的设计允许containerd提供更高级的功能,同时利用runc的轻量级和遵循标准的特性来执行容器。简而言之,
containerd和runc的关系可以看作是分层的:containerd提供了丰富的管理功能和用户接口,而runc负责底层的容器执行,两者共同协作,提供了一个完整的容器运行时环境。
前往 https://github.com/containerd/containerd/releases 下载 containerd 下载包
## 解压到 /usr/local 目录下
tar Czxvf /usr/local/  containerd-1.7.14-linux-amd64.tar.gz
使用 systemd 管理 containerd ,将配置文件存放至 /usr/lib/systemd/system/ 下
wget -O /usr/lib/systemd/system/containerd.service https://raw.githubusercontent.com/containerd/containerd/main/containerd.service

systemctl daemon-reload
systemctl enable --now containerd
之后找到 Unix 域套接字,安装成功
ll /var/run/containerd/containerd.sock
srw-rw---- 1 root root 0 Mar 13 11:21 /var/run/containerd/containerd.sock
当使用 containerd 作为容器运行时后,拉取镜像会 使用 ctr 命令 完成,请查看文末的 ctr 拉取镜像或查看容器列表
小知识:containerd 与 containerd-shim-runc-v2 的关系
[root@hadoop-30 certs.d]# ps -ef | grep containerd
root      274213       1  0 3月16 ?       00:00:09 /usr/local/bin/containerd-shim-runc-v2 -namespace moby -id 500ee902a17e8190a237da13ae0f0bc97d65093d8871125a49b20c6be1058ac1 -address /run/containerd/containerd.sock
root     1453036       1  0 3月17 ?       00:03:15 /usr/local/bin/containerd --config /etc/containerd/config.toml
containerd
containerd是一个开源的容器运行时,它是Docker的核心组件之一,但也可以独立于Docker使用。它负责管理容器的整个生命周期,包括容器的创建、执行、暂停、停止、删除以及管理容器的镜像、存储和网络。containerd提供了一个完整的容器运行时环境,但设计上保持了足够的轻量级和模块化,使得它可以容易地集成到更大的系统中,比如Kubernetes。
在你提供的进程列表中,containerd运行着一个守护进程(daemon),通常通过/usr/local/bin/containerd命令启动。--config /etc/containerd/config.toml参数指定了配置文件的位置,这个文件包含了containerd的配置信息。
containerd-shim-runc-v2
containerd-shim-runc-v2是containerd的一部分,它是一个容器运行时接口(container runtime interface,CRI)的实现,用于创建和运行容器。shim是一个轻量级的中间组件,它允许containerd与不同的容器运行时(如runc或其他兼容OCI(Open Container Initiative)标准的运行时)进行交互。
shim的主要目的是在后台处理容器的执行,而不需要containerd守护进程持续运行。这样一来,即使containerd守护进程停止或崩溃,容器也可以继续运行。shim进程还负责收集容器的输出(如日志)并将其转发回containerd。
在你的进程列表中,containerd-shim-runc-v2是运行中的多个实例,每个实例都与一个特定的容器关联。例如:
/usr/local/bin/containerd-shim-runc-v2 -namespace moby -id 500ee902... -address /run/containerd/containerd.sock这里,-namespace moby参数指示shim实例是在Docker的命名空间下运行的,-id后面跟着的是容器的唯一标识符,-address指定了containerd守护进程的socket地址,shim通过这个地址与containerd通信。
总结来说,containerd是容器运行时环境的核心守护进程,而containerd-shim-runc-v2是它用来与各个容器运行时进行交互的轻量级中间件。
1.2 安装 runc
CLI tool for spawning and running containers according to the OCI specification
根据 OCI 规范生成和运行容器的 CLI 工具
wget https://github.com/opencontainers/runc/releases/download/v1.1.12/runc.amd64
install -m 755 runc.amd64 /usr/local/sbin/runc
1.3 安装 CNI plugins
# wget https://github.com/containernetworking/plugins/releases/download/v1.4.1/cni-plugins-linux-amd64-v1.4.1.tgz

# mkdir -p /opt/cni/bin
[root@clouderamanager-15 containerd]# tar Cxzvf /opt/cni/bin cni-plugins-linux-amd64-v1.4.1.tgz

#ll /opt/cni/bin/
total 128528
-rwxr-xr-x 1 1001  127  4119661 Mar 12 18:56 bandwidth
-rwxr-xr-x 1 1001  127  4662227 Mar 12 18:56 bridge
-rwxr-xr-x 1 1001  127 11065251 Mar 12 18:56 dhcp
-rwxr-xr-x 1 1001  127  4306546 Mar 12 18:56 dummy
-rwxr-xr-x 1 1001  127  4751593 Mar 12 18:56 firewall
-rwxr-xr-x 1 root root  2856252 Feb 21  2020 flannel
-rwxr-xr-x 1 1001  127  4198427 Mar 12 18:56 host-device
-rwxr-xr-x 1 1001  127  3560496 Mar 12 18:56 host-local
-rwxr-xr-x 1 1001  127  4324636 Mar 12 18:56 ipvlan
-rw-r--r-- 1 1001  127    11357 Mar 12 18:56 LICENSE
-rwxr-xr-x 1 1001  127  3651038 Mar 12 18:56 loopback
-rwxr-xr-x 1 1001  127  4355073 Mar 12 18:56 macvlan
-rwxr-xr-x 1 root root 37545270 Feb 21  2020 multus
-rwxr-xr-x 1 1001  127  4095898 Mar 12 18:56 portmap
-rwxr-xr-x 1 1001  127  4476535 Mar 12 18:56 ptp
-rw-r--r-- 1 1001  127     2343 Mar 12 18:56 README.md
-rwxr-xr-x 1 root root  2641877 Feb 21  2020 sample
-rwxr-xr-x 1 1001  127  3861176 Mar 12 18:56 sbr
-rwxr-xr-x 1 1001  127  3120090 Mar 12 18:56 static
-rwxr-xr-x 1 1001  127  4381887 Mar 12 18:56 tap
-rwxr-xr-x 1 root root  7506830 Aug 18  2021 tke-route-eni
-rwxr-xr-x 1 1001  127  3743844 Mar 12 18:56 tuning
-rwxr-xr-x 1 1001  127  4319235 Mar 12 18:56 vlan
-rwxr-xr-x 1 1001  127  4008392 Mar 12 18:56 vrf
1.2 安装 kubeadm、kubelet 和 kubectl
参考 官方文档
你需要在每台机器上安装以下的软件包:
- kubeadm:用来初始化集群的指令。
- kubelet:在集群中的每个节点上用来启动 Pod 和容器等。
- kubectl:用来与集群通信的命令行工具。
cat <<EOF | sudo tee /etc/yum.repos.d/kubernetes.repo
[kubernetes]
name=Kubernetes
baseurl=https://pkgs.k8s.io/core:/stable:/v1.29/rpm/
enabled=1
gpgcheck=1
gpgkey=https://pkgs.k8s.io/core:/stable:/v1.29/rpm/repodata/repomd.xml.key
exclude=kubelet kubeadm kubectl cri-tools kubernetes-cni
EOFyum install -y kubelet kubeadm kubectl --disableexcludes=kubernetes
systemctl enable --now kubelet1.3 配置 cgroup 驱动程序
参考文件:官方文档
存在两种驱动 cgroupfs、systemd,当 systemd 是初始化系统时, 不 推荐使用 cgroupfs 驱动,因为 systemd 期望系统上只有一个 cgroup 管理器。
当某个 Linux 系统发行版使用 systemd 作为其初始化系统时,初始化进程会生成并使用一个 root 控制组(cgroup),并充当 cgroup 管理器。
检查发行版是否将 systemd 作为初始化系统的方法:
在 CentOS 或任何其他使用 systemd 的 Linux 发行版中,您可以通过以下方法确认 systemd 是否为初始化系统:
- 检查 PID 1 的进程:
系统的初始化进程总是具有进程 ID(PID)1。通过检查 PID 1 的进程,您可以确定系统是否使用 systemd。使用以下命令: ps -p 1 如果输出显示 PID 1 属于
systemd,那么 systemd 就是初始化系统。 - 使用
systemctl命令: 因为systemctl是 systemd 的主要工具,如果您能够成功运行systemctl命令,那么您的系统很可能使用 systemd。例如:
systemctl如果系统响应并显示服务和单元状态,则表明 systemd 在运行。
- 检查
/sbin/init的链接:/sbin/init通常是初始化系统的符号链接。您可以检查它链接到什么来确定初始化系统:
ls -l /sbin/init 如果 /sbin/init 链接到了 systemd,那么您的系统使用的是 systemd。
- 检查 systemd 的 cgroup:
如果您想确认 systemd 是否作为 cgroup 管理器,可以查看
/sys/fs/cgroup/systemd目录:
ls -l /sys/fs/cgroup/systemd如果该目录存在并且包含许多与服务相关的文件和目录,那么 systemd 正在用作 cgroup 管理器。
- 查询系统服务管理器: 使用 hostnamectl 命令也可以提供当前运行的系统和服务管理器信息:
hostnamectl在输出中,查找 "Operating System" 和 "Boot ID" 下方的行,它通常会告诉您系统是否运行 systemd。
通过以上任一方法,您都能够确认在 CentOS 上是否使用 systemd 作为初始化系统。
2. 使用 kubeadm 创建集群
参考官方文档 使用 kubeadm 创建集群
Example usage:

    Create a two-machine cluster with one control-plane node
    (which controls the cluster), and one worker node
    (where your workloads, like Pods and Deployments run).

    ┌──────────────────────────────────────────────────────────┐
    │ On the first machine:                                    │
    ├──────────────────────────────────────────────────────────┤
    │ control-plane# kubeadm init                              │
    └──────────────────────────────────────────────────────────┘

    ┌──────────────────────────────────────────────────────────┐
    │ On the second machine:                                   │
    ├──────────────────────────────────────────────────────────┤
    │ worker# kubeadm join <arguments-returned-from-init>      │
    └──────────────────────────────────────────────────────────┘
2.1 初始化控制平面节点
通过 kubeadm init 初始化控制平台节点
kubeadm init 的背后发生了什么?
kubeadm init 是 Kubernetes 安装过程中的一个命令,它用于初始化一个 Kubernetes 集群的控制平面。这个命令会执行一系列的步骤来启动一个新的集群。以下是 kubeadm init 命令背后的主要步骤:
- 选择容器运行时 (Container Runtime)
I0315 14:21:43.347964 22137 initconfiguration.go:122] detected and using CRI socket: unix:///var/run/containerd/containerd.sockCRI(容器运行时接口)是 Kubernetes 用来与容器运行时进行交互的插件接口。常见的容器运行时包括 Docker、containerd 和 CRI-O 等。
在初始化 Kubernetes 集群时,kubeadm 需要确定要使用哪个容器运行时。它这样做的方式如下:
- 自动检测:
kubeadm会在默认的路径下自动检测是否存在已知的 CRI 套接字文件。这些路径通常包括/var/run/dockershim.sock(对于 Docker),/var/run/containerd/containerd.sock(对于 containerd), 和/var/run/crio/crio.sock(对于 CRI-O)。 - 配置文件或命令行参数: 如果管理员希望指定使用特定的 CRI,可以在
kubeadm的配置文件中指定nodeRegistration.criSocket字段,或者使用--cri-socket命令行参数来明确指定套接字的路径。
在你提供的命令输出中,kubeadm 检测到并使用了位于 unix:///var/run/containerd/containerd.sock 的 CRI 套接字,这意味着它选择了 containerd 作为容器运行时。这是因为 kubeadm 在默认的套接字路径中找到了 containerd.sock 文件,并且没有通过配置文件或命令行参数指定其他的运行时。
如果你的系统上安装了多个容器运行时,并且你想要 kubeadm 使用非默认的运行时,你需要在初始化命令中添加 --cri-socket 参数来指定你想要的 CRI 套接字路径。例如:
kubeadm init --cri-socket /var/run/crio/crio.sock ...这个命令会告诉 kubeadm 使用 CRI-O 作为容器运行时。如果没有指定,kubeadm 就会使用它自动检测到的第一个运行时。
- 检查 cgroup 驱动程序
I0315 14:21:43.348406 22137 kubelet.go:196] the value of KubeletConfiguration.cgroupDriver is empty; setting it to "systemd"- 预检查(Preflight Checks):
- 检查是否以 root 用户身份运行。
- 确认机器满足最低要求,例如 CPU、内存等。
- 检查是否安装了所需的依赖,如 Docker 或其他容器运行时、kubelet、kubeadm。
- 检查网络配置,确保节点间的通信是可行的。
- 检查端口是否开放,例如 Kubernetes API server 默认的 6443 端口。
- 确认系统的主机名、MAC 地址和产品 uuid 是唯一的。
validating Kubernetes and kubeadm version
validating if the firewall is enabled and active
validating availability of port 6443
validating availability of port 10259
validating availability of port 10257
validating the existence of file /etc/kubernetes/manifests/kube-apiserver.yaml
validating the existence of file /etc/kubernetes/manifests/kube-controller-manager.yaml
validating the existence of file /etc/kubernetes/manifests/kube-scheduler.yaml
validating the existence of file /etc/kubernetes/manifests/etcd.yaml
validating if the connectivity type is via proxy or direct
validating http connectivity to first IP address in the CIDR
validating http connectivity to first IP address in the CIDR
validating the container runtime
validating whether swap is enabled or not
validating the presence of executable crictl
validating the presence of executable conntrack
validating the presence of executable ip
validating the presence of executable iptables
validating the presence of executable mount
validating the presence of executable nsenter
validating the presence of executable ebtables
validating the presence of executable ethtool
validating the presence of executable socat
validating the presence of executable tc
validating the presence of executable touch
running all checks
checking whether the given node name is valid and reachable using net.LookupHost
validating kubelet version
validating if the "kubelet" service is enabled and active
validating availability of port 10250
validating the contents of file /proc/sys/net/bridge/bridge-nf-call-iptables
validating the contents of file /proc/sys/net/ipv4/ip_forward
validating availability of port 2379
validating availability of port 2380
validating the existence and emptiness of directory /var/lib/etcd- 拉取镜像
[preflight] Pulling images required for setting up a Kubernetes cluster
[preflight] This might take a minute or two, depending on the speed of your internet connection
[preflight] You can also perform this action in beforehand using 'kubeadm config images pull'
I0315 14:21:43.458945   22137 checks.go:828] using image pull policy: IfNotPresent
I0315 14:21:43.483244   22137 checks.go:846] image exists: registry.aliyuncs.com/google_containers/kube-apiserver:v1.29.2
I0315 14:21:43.507214   22137 checks.go:846] image exists: registry.aliyuncs.com/google_containers/kube-controller-manager:v1.29.2
I0315 14:21:43.530729   22137 checks.go:846] image exists: registry.aliyuncs.com/google_containers/kube-scheduler:v1.29.2
I0315 14:21:43.555095   22137 checks.go:846] image exists: registry.aliyuncs.com/google_containers/kube-proxy:v1.29.2
I0315 14:21:43.578368   22137 checks.go:846] image exists: registry.aliyuncs.com/google_containers/coredns:v1.11.1
W0315 14:21:43.601513   22137 checks.go:835] detected that the sandbox image "registry.k8s.io/pause:3.8" of the container runtime is inconsistent with that used by kubeadm. It is recommended that using "registry.aliyuncs.com/google_containers/pause:3.9" as the CRI sandbox image.
I0315 14:21:43.624418   22137 checks.go:846] image exists: registry.aliyuncs.com/google_containers/pause:3.9
I0315 14:21:43.648515 22137 checks.go:846] image exists: registry.aliyuncs.com/google_containers/etcd:3.5.10-0- 生成证书(Certificate Generation):
- 生成用于各种组件和通信加密的 TLS 证书,例如 API server、etcd、kubelet 等。
- 创建 CA(证书颁发机构)并使用它来签发所有其他证书。
[certs] Using certificateDir folder "/etc/kubernetes/pki"
I0315 14:21:43.648594   22137 certs.go:112] creating a new certificate authority for ca
[certs] Generating "ca" certificate and key
I0315 14:21:43.843075   22137 certs.go:519] validating certificate period for ca certificate
[certs] Generating "apiserver" certificate and key
[certs] apiserver serving cert is signed for DNS names [clouderamanager-15.com kubernetes kubernetes.default kubernetes.default.svc kubernetes.default.svc.cluster.local] and IPs [10.96.0.1 10.0.0.15]
[certs] Generating "apiserver-kubelet-client" certificate and key
I0315 14:21:44.706100   22137 certs.go:112] creating a new certificate authority for front-proxy-ca
[certs] Generating "front-proxy-ca" certificate and key
I0315 14:21:45.004243   22137 certs.go:519] validating certificate period for front-proxy-ca certificate
[certs] Generating "front-proxy-client" certificate and key
I0315 14:21:45.245872   22137 certs.go:112] creating a new certificate authority for etcd-ca
[certs] Generating "etcd/ca" certificate and key
I0315 14:21:45.457730   22137 certs.go:519] validating certificate period for etcd/ca certificate
[certs] Generating "etcd/server" certificate and key
[certs] etcd/server serving cert is signed for DNS names [clouderamanager-15.com localhost] and IPs [10.0.0.15 127.0.0.1 ::1]
[certs] Generating "etcd/peer" certificate and key
[certs] etcd/peer serving cert is signed for DNS names [clouderamanager-15.com localhost] and IPs [10.0.0.15 127.0.0.1 ::1]
[certs] Generating "etcd/healthcheck-client" certificate and key
[certs] Generating "apiserver-etcd-client" certificate and key
I0315 14:21:46.994972   22137 certs.go:78] creating new public/private key files for signing service account users
[certs] Generating "sa" key and public key- 生成 Kubeconfig 文件:
- 为了能让 kubelet、controller-manager、scheduler 等组件与 API server 通信,kubeadm 会生成相应的 kubeconfig 文件。
[kubeconfig] Using kubeconfig folder "/etc/kubernetes"
I0315 14:21:47.152235   22137 kubeconfig.go:112] creating kubeconfig file for admin.conf
[kubeconfig] Writing "admin.conf" kubeconfig file
I0315 14:21:47.413017   22137 kubeconfig.go:112] creating kubeconfig file for super-admin.conf
[kubeconfig] Writing "super-admin.conf" kubeconfig file
I0315 14:21:47.830913   22137 kubeconfig.go:112] creating kubeconfig file for kubelet.conf
[kubeconfig] Writing "kubelet.conf" kubeconfig file
I0315 14:21:48.061428   22137 kubeconfig.go:112] creating kubeconfig file for controller-manager.conf
[kubeconfig] Writing "controller-manager.conf" kubeconfig file
I0315 14:21:48.542560   22137 kubeconfig.go:112] creating kubeconfig file for scheduler.conf
[kubeconfig] Writing "scheduler.conf" kubeconfig file- 生成静态 Pod 清单:
- 生成用于控制平面组件的静态 Pod 清单,包括 API server、controller-manager、scheduler、etcd(如果没有使用外部的 etcd 集群)。
- 这些清单会放在
/etc/kubernetes/manifests目录下,kubelet 会监控这个目录,自动启动这些 Pod。
[etcd] Creating static Pod manifest for local etcd in "/etc/kubernetes/manifests"
I0315 14:21:48.710218   22137 local.go:65] [etcd] wrote Static Pod manifest for a local etcd member to "/etc/kubernetes/manifests/etcd.yaml"
[control-plane] Using manifest folder "/etc/kubernetes/manifests"
[control-plane] Creating static Pod manifest for "kube-apiserver"
I0315 14:21:48.710250   22137 manifests.go:102] [control-plane] getting StaticPodSpecs
I0315 14:21:48.710451   22137 certs.go:519] validating certificate period for CA certificate
I0315 14:21:48.710540   22137 manifests.go:128] [control-plane] adding volume "ca-certs" for component "kube-apiserver"
I0315 14:21:48.710555   22137 manifests.go:128] [control-plane] adding volume "etc-pki" for component "kube-apiserver"
I0315 14:21:48.710565   22137 manifests.go:128] [control-plane] adding volume "k8s-certs" for component "kube-apiserver"
I0315 14:21:48.711485   22137 manifests.go:157] [control-plane] wrote static Pod manifest for component "kube-apiserver" to "/etc/kubernetes/manifests/kube-apiserver.yaml"
[control-plane] Creating static Pod manifest for "kube-controller-manager"
I0315 14:21:48.711506   22137 manifests.go:102] [control-plane] getting StaticPodSpecs
I0315 14:21:48.711741   22137 manifests.go:128] [control-plane] adding volume "ca-certs" for component "kube-controller-manager"
I0315 14:21:48.711761   22137 manifests.go:128] [control-plane] adding volume "etc-pki" for component "kube-controller-manager"
I0315 14:21:48.711772   22137 manifests.go:128] [control-plane] adding volume "flexvolume-dir" for component "kube-controller-manager"
I0315 14:21:48.711782   22137 manifests.go:128] [control-plane] adding volume "k8s-certs" for component "kube-controller-manager"
I0315 14:21:48.711793   22137 manifests.go:128] [control-plane] adding volume "kubeconfig" for component "kube-controller-manager"
I0315 14:21:48.712608   22137 manifests.go:157] [control-plane] wrote static Pod manifest for component "kube-controller-manager" to "/etc/kubernetes/manifests/kube-controller-manager.yaml"
[control-plane] Creating static Pod manifest for "kube-scheduler"
I0315 14:21:48.712629   22137 manifests.go:102] [control-plane] getting StaticPodSpecs
I0315 14:21:48.712845   22137 manifests.go:128] [control-plane] adding volume "kubeconfig" for component "kube-scheduler"
I0315 14:21:48.713399   22137 manifests.go:157] [control-plane] wrote static Pod manifest for component "kube-scheduler" to "/etc/kubernetes/manifests/kube-scheduler.yaml"
I0315 14:21:48.713417 22137 kubelet.go:68] Stopping the kubelet- 设置控制平面组件:
- 启动 Kubernetes 控制平面组件,包括 kube-apiserver、kube-controller-manager、kube-scheduler。
- 这些组件可以作为静态 Pod 运行,也可以作为系统服务运行。
- 创建 kubelet 配置:
- 为 kubelet 生成配置文件,通常位于
/var/lib/kubelet/config.yaml。 - 这个配置文件指定了 kubelet 连接到 API server 的参数。
- 为 kubelet 生成配置文件,通常位于
- 标记控制平面节点:
- 使用标签和污点来标记控制平面节点,确保普通的工作负载不会调度到控制平面节点上。
- 安装核心组件:
- 安装必要的核心插件,如 CoreDNS 和 kube-proxy。
[addons] Applied essential addon: CoreDNS
[addons] Applied essential addon: kube-proxy- 生成 admin.conf:
- 生成
admin.confKubeconfig 文件,以便管理员可以使用 kubectl 与集群交互。
- 生成
- 输出结果:
- 打印出一条消息,说明如何加入更多的节点到集群,并给出
kubeadm join命令的具体语法。
- 打印出一条消息,说明如何加入更多的节点到集群,并给出
- 后续步骤提示:
- 提供后续步骤的提示,比如如何使用生成的 Kubeconfig 文件来运行 kubectl 命令。
执行 kubeadm init 命令时,你可以通过指定不同的标志和配置文件来自定义初始化过程。
开始安装
# kubeadm init
[init] Using Kubernetes version: v1.29.2
[preflight] Running pre-flight checks
        [WARNING HTTPProxy]: Connection to "https://10.0.0.15" uses proxy "http://10.0.0.15:27070". If that is not intended, adjust your proxy settings
        [WARNING HTTPProxyCIDR]: connection to "10.96.0.0/12" uses proxy "http://10.0.0.15:27070". This may lead to malfunctional cluster setup. Make sure that Pod and Services IP ranges specified correctly as exceptions in proxy configuration
[preflight] Pulling images required for setting up a Kubernetes cluster
[preflight] This might take a minute or two, depending on the speed of your internet connection
[preflight] You can also perform this action in beforehand using 'kubeadm config images pull'
基本遇到镜像拉取失败,国内无法访问 K8S 默认的镜像仓库 registry.k8s.io
output: E0313 16:10:16.955851 26777 remote_image.go:180] "PullImage from image service failed" err="rpc error: code = DeadlineExceeded desc = failed to pull and unpack image \"registry.k8s.io/kube-apiserver:v1.29.2\": failed to resolve reference \"registry.k8s.io/kube-apiserver:v1.29.2\": failed to do request: Head \"https://us-west2-docker.pkg.dev/v2/k8s-artifacts-prod/images/kube-apiserver/manifests/v1.29.2\": dial tcp 142.251.170.82:443: i/o timeout" image="registry.k8s.io/kube-apiserver:v1.29.2"指定镜像仓库为阿里云的 registry.aliyuncs.com/google_containers
kubeadm init --image-repository registry.aliyuncs.com/google_containers --kubernetes-version=v1.29.2 --v=5发现仍然有报错
查看日志 journalctl -exfu kubelet,发现 kubelet 节点依赖 registry.k8s.io/pause:3.8,这个镜像不受 kubeadm init --image-repository 参数的影响。
3月 15 11:10:59 clouderamanager-15.com kubelet[16149]: E0315 11:10:59.973384   16149 kuberuntime_sandbox.go:72] "Failed to create sandbox for pod" err="rpc error: code = Unknown desc = failed to get sandbox image \"registry.k8s.io/pause:3.8\": f
3月 15 11:10:59 clouderamanager-15.com kubelet[16149]: E0315 11:10:59.973425   16149 kuberuntime_manager.go:1172] "CreatePodSandbox for pod failed" err="rpc error: code = Unknown desc = failed to get sandbox image \"registry.k8s.io/pause:3.8\
导入吧
docker save registry.k8s.io/pause:3.8 -o pause.tar
ctr -n k8s.io images import pause.tar   #注:默认会从k8s.io仓库内寻找所需镜像,仓库名不可修改,否则会初始化失败。
systemctl daemon-reload
systemctl restart kubelet# ctr -n k8s.io images import pause.tar
unpacking registry.k8s.io/pause:3.9 (sha256:e4bb1cdb96c8a65d8c69352db24d4c1051baae44bbeb3f2ecd33153b7c2ca9ee)...done小思考:kubelet 本身会使用 pause 镜像来做垃圾清理等事项,是通过
--pod-infra-container-image来指定。这是一个 kubelet 运行时的进程参数:/usr/bin/kubelet --bootstrap-kubeconfig=/etc/kubernetes/bootstrap-kubelet.conf --kubeconfig=/etc/kubernetes/kubelet.conf --config=/var/lib/kubelet/config.yaml --container-runtime-endpoint=unix:///var/run/containerd/containerd.sock --pod-infra-container-image=registry.aliyuncs.com/google_containers/pause:3.9
重置环境,重新安装
[root@clouderamanager-15 containerd]# kubeadm reset
[reset] Reading configuration from the cluster...
[reset] FYI: You can look at this config file with 'kubectl -n kube-system get cm kubeadm-config -o yaml'
W0315 14:21:08.255268   21480 reset.go:124] [reset] Unable to fetch the kubeadm-config ConfigMap from cluster: failed to get config map: configmaps "kubeadm-config" is forbidden: User "kubernetes-admin" cannot get resource "configmaps" in API group "" in the namespace "kube-system"
W0315 14:21:08.255400   21480 preflight.go:56] [reset] WARNING: Changes made to this host by 'kubeadm init' or 'kubeadm join' will be reverted.
[reset] Are you sure you want to proceed? [y/N]: y
[preflight] Running pre-flight checks
W0315 14:21:09.030378   21480 removeetcdmember.go:106] [reset] No kubeadm config, using etcd pod spec to get data directory
[reset] Deleted contents of the etcd data directory: /var/lib/etcd
[reset] Stopping the kubelet service
[reset] Unmounting mounted directories in "/var/lib/kubelet"
[reset] Deleting contents of directories: [/etc/kubernetes/manifests /var/lib/kubelet /etc/kubernetes/pki]
[reset] Deleting files: [/etc/kubernetes/admin.conf /etc/kubernetes/super-admin.conf /etc/kubernetes/kubelet.conf /etc/kubernetes/bootstrap-kubelet.conf /etc/kubernetes/controller-manager.conf /etc/kubernetes/scheduler.conf]

The reset process does not clean CNI configuration. To do so, you must remove /etc/cni/net.d

The reset process does not reset or clean up iptables rules or IPVS tables.
If you wish to reset iptables, you must do so manually by using the "iptables" command.

If your cluster was setup to utilize IPVS, run ipvsadm --clear (or similar)
to reset your system's IPVS tables.

The reset process does not clean your kubeconfig files and you must remove them manually.
Please, check the contents of the $HOME/.kube/config file.
[root@clouderamanager-15 containerd]# rm -rf $HOME/.kube/config
[root@clouderamanager-15 containerd]# rm -rf /var/lib/etcd
开始安装
[root@clouderamanager-15 containerd]# kubeadm init --image-repository registry.aliyuncs.com/google_containers --kubernetes-version=v1.29.2 --apiserver-advertise-address=0.0.0.0 --service-cidr=10.96.0.0/12 --pod-network-cidr=10.244.0.0/16 --v=5
I0315 14:21:43.347964   22137 initconfiguration.go:122] detected and using CRI socket: unix:///var/run/containerd/containerd.sock
I0315 14:21:43.348211   22137 interface.go:432] Looking for default routes with IPv4 addresses
I0315 14:21:43.348221   22137 interface.go:437] Default route transits interface "eth0"
I0315 14:21:43.348314   22137 interface.go:209] Interface eth0 is up
I0315 14:21:43.348349   22137 interface.go:257] Interface "eth0" has 3 addresses :[10.0.0.15/24 2402:4e00:1016:d700:0:968d:60f8:9786/64 fe80::5054:ff:feb2:f159/64].
I0315 14:21:43.348363   22137 interface.go:224] Checking addr  10.0.0.15/24.
I0315 14:21:43.348371   22137 interface.go:231] IP found 10.0.0.15
I0315 14:21:43.348383   22137 interface.go:263] Found valid IPv4 address 10.0.0.15 for interface "eth0".
I0315 14:21:43.348390   22137 interface.go:443] Found active IP 10.0.0.15
I0315 14:21:43.348406   22137 kubelet.go:196] the value of KubeletConfiguration.cgroupDriver is empty; setting it to "systemd"
[init] Using Kubernetes version: v1.29.2
[preflight] Running pre-flight checks
I0315 14:21:43.351789   22137 checks.go:563] validating Kubernetes and kubeadm version
I0315 14:21:43.351821   22137 checks.go:168] validating if the firewall is enabled and active
I0315 14:21:43.359788   22137 checks.go:203] validating availability of port 6443
I0315 14:21:43.359910   22137 checks.go:203] validating availability of port 10259
I0315 14:21:43.359941   22137 checks.go:203] validating availability of port 10257
I0315 14:21:43.359993   22137 checks.go:280] validating the existence of file /etc/kubernetes/manifests/kube-apiserver.yaml
I0315 14:21:43.360018   22137 checks.go:280] validating the existence of file /etc/kubernetes/manifests/kube-controller-manager.yaml
I0315 14:21:43.360034   22137 checks.go:280] validating the existence of file /etc/kubernetes/manifests/kube-scheduler.yaml
I0315 14:21:43.360046   22137 checks.go:280] validating the existence of file /etc/kubernetes/manifests/etcd.yaml
I0315 14:21:43.360079   22137 checks.go:430] validating if the connectivity type is via proxy or direct
I0315 14:21:43.360117   22137 checks.go:469] validating http connectivity to first IP address in the CIDR
I0315 14:21:43.360142   22137 checks.go:469] validating http connectivity to first IP address in the CIDR
I0315 14:21:43.360164   22137 checks.go:104] validating the container runtime
I0315 14:21:43.383947   22137 checks.go:639] validating whether swap is enabled or not
I0315 14:21:43.384026   22137 checks.go:370] validating the presence of executable crictl
I0315 14:21:43.384063   22137 checks.go:370] validating the presence of executable conntrack
I0315 14:21:43.384091   22137 checks.go:370] validating the presence of executable ip
I0315 14:21:43.384158   22137 checks.go:370] validating the presence of executable iptables
I0315 14:21:43.384185   22137 checks.go:370] validating the presence of executable mount
I0315 14:21:43.384210   22137 checks.go:370] validating the presence of executable nsenter
I0315 14:21:43.384235   22137 checks.go:370] validating the presence of executable ebtables
I0315 14:21:43.384257   22137 checks.go:370] validating the presence of executable ethtool
I0315 14:21:43.384282   22137 checks.go:370] validating the presence of executable socat
I0315 14:21:43.384335   22137 checks.go:370] validating the presence of executable tc
I0315 14:21:43.384364   22137 checks.go:370] validating the presence of executable touch
I0315 14:21:43.384391   22137 checks.go:516] running all checks
I0315 14:21:43.390968   22137 checks.go:401] checking whether the given node name is valid and reachable using net.LookupHost
I0315 14:21:43.391678   22137 checks.go:605] validating kubelet version
I0315 14:21:43.448373   22137 checks.go:130] validating if the "kubelet" service is enabled and active
I0315 14:21:43.458602   22137 checks.go:203] validating availability of port 10250
I0315 14:21:43.458680   22137 checks.go:329] validating the contents of file /proc/sys/net/bridge/bridge-nf-call-iptables
I0315 14:21:43.458741   22137 checks.go:329] validating the contents of file /proc/sys/net/ipv4/ip_forward
I0315 14:21:43.458769   22137 checks.go:203] validating availability of port 2379
I0315 14:21:43.458803   22137 checks.go:203] validating availability of port 2380
I0315 14:21:43.458833   22137 checks.go:243] validating the existence and emptiness of directory /var/lib/etcd
[preflight] Pulling images required for setting up a Kubernetes cluster
[preflight] This might take a minute or two, depending on the speed of your internet connection
[preflight] You can also perform this action in beforehand using 'kubeadm config images pull'
I0315 14:21:43.458945   22137 checks.go:828] using image pull policy: IfNotPresent
I0315 14:21:43.483244   22137 checks.go:846] image exists: registry.aliyuncs.com/google_containers/kube-apiserver:v1.29.2
I0315 14:21:43.507214   22137 checks.go:846] image exists: registry.aliyuncs.com/google_containers/kube-controller-manager:v1.29.2
I0315 14:21:43.530729   22137 checks.go:846] image exists: registry.aliyuncs.com/google_containers/kube-scheduler:v1.29.2
I0315 14:21:43.555095   22137 checks.go:846] image exists: registry.aliyuncs.com/google_containers/kube-proxy:v1.29.2
I0315 14:21:43.578368   22137 checks.go:846] image exists: registry.aliyuncs.com/google_containers/coredns:v1.11.1
W0315 14:21:43.601513   22137 checks.go:835] detected that the sandbox image "registry.k8s.io/pause:3.8" of the container runtime is inconsistent with that used by kubeadm. It is recommended that using "registry.aliyuncs.com/google_containers/pause:3.9" as the CRI sandbox image.
I0315 14:21:43.624418   22137 checks.go:846] image exists: registry.aliyuncs.com/google_containers/pause:3.9
I0315 14:21:43.648515   22137 checks.go:846] image exists: registry.aliyuncs.com/google_containers/etcd:3.5.10-0
[certs] Using certificateDir folder "/etc/kubernetes/pki"
I0315 14:21:43.648594   22137 certs.go:112] creating a new certificate authority for ca
[certs] Generating "ca" certificate and key
I0315 14:21:43.843075   22137 certs.go:519] validating certificate period for ca certificate
[certs] Generating "apiserver" certificate and key
[certs] apiserver serving cert is signed for DNS names [clouderamanager-15.com kubernetes kubernetes.default kubernetes.default.svc kubernetes.default.svc.cluster.local] and IPs [10.96.0.1 10.0.0.15]
[certs] Generating "apiserver-kubelet-client" certificate and key
I0315 14:21:44.706100   22137 certs.go:112] creating a new certificate authority for front-proxy-ca
[certs] Generating "front-proxy-ca" certificate and key
I0315 14:21:45.004243   22137 certs.go:519] validating certificate period for front-proxy-ca certificate
[certs] Generating "front-proxy-client" certificate and key
I0315 14:21:45.245872   22137 certs.go:112] creating a new certificate authority for etcd-ca
[certs] Generating "etcd/ca" certificate and key
I0315 14:21:45.457730   22137 certs.go:519] validating certificate period for etcd/ca certificate
[certs] Generating "etcd/server" certificate and key
[certs] etcd/server serving cert is signed for DNS names [clouderamanager-15.com localhost] and IPs [10.0.0.15 127.0.0.1 ::1]
[certs] Generating "etcd/peer" certificate and key
[certs] etcd/peer serving cert is signed for DNS names [clouderamanager-15.com localhost] and IPs [10.0.0.15 127.0.0.1 ::1]
[certs] Generating "etcd/healthcheck-client" certificate and key
[certs] Generating "apiserver-etcd-client" certificate and key
I0315 14:21:46.994972   22137 certs.go:78] creating new public/private key files for signing service account users
[certs] Generating "sa" key and public key
[kubeconfig] Using kubeconfig folder "/etc/kubernetes"
I0315 14:21:47.152235   22137 kubeconfig.go:112] creating kubeconfig file for admin.conf
[kubeconfig] Writing "admin.conf" kubeconfig file
I0315 14:21:47.413017   22137 kubeconfig.go:112] creating kubeconfig file for super-admin.conf
[kubeconfig] Writing "super-admin.conf" kubeconfig file
I0315 14:21:47.830913   22137 kubeconfig.go:112] creating kubeconfig file for kubelet.conf
[kubeconfig] Writing "kubelet.conf" kubeconfig file
I0315 14:21:48.061428   22137 kubeconfig.go:112] creating kubeconfig file for controller-manager.conf
[kubeconfig] Writing "controller-manager.conf" kubeconfig file
I0315 14:21:48.542560   22137 kubeconfig.go:112] creating kubeconfig file for scheduler.conf
[kubeconfig] Writing "scheduler.conf" kubeconfig file
[etcd] Creating static Pod manifest for local etcd in "/etc/kubernetes/manifests"
I0315 14:21:48.710218   22137 local.go:65] [etcd] wrote Static Pod manifest for a local etcd member to "/etc/kubernetes/manifests/etcd.yaml"
[control-plane] Using manifest folder "/etc/kubernetes/manifests"
[control-plane] Creating static Pod manifest for "kube-apiserver"
I0315 14:21:48.710250   22137 manifests.go:102] [control-plane] getting StaticPodSpecs
I0315 14:21:48.710451   22137 certs.go:519] validating certificate period for CA certificate
I0315 14:21:48.710540   22137 manifests.go:128] [control-plane] adding volume "ca-certs" for component "kube-apiserver"
I0315 14:21:48.710555   22137 manifests.go:128] [control-plane] adding volume "etc-pki" for component "kube-apiserver"
I0315 14:21:48.710565   22137 manifests.go:128] [control-plane] adding volume "k8s-certs" for component "kube-apiserver"
I0315 14:21:48.711485   22137 manifests.go:157] [control-plane] wrote static Pod manifest for component "kube-apiserver" to "/etc/kubernetes/manifests/kube-apiserver.yaml"
[control-plane] Creating static Pod manifest for "kube-controller-manager"
I0315 14:21:48.711506   22137 manifests.go:102] [control-plane] getting StaticPodSpecs
I0315 14:21:48.711741   22137 manifests.go:128] [control-plane] adding volume "ca-certs" for component "kube-controller-manager"
I0315 14:21:48.711761   22137 manifests.go:128] [control-plane] adding volume "etc-pki" for component "kube-controller-manager"
I0315 14:21:48.711772   22137 manifests.go:128] [control-plane] adding volume "flexvolume-dir" for component "kube-controller-manager"
I0315 14:21:48.711782   22137 manifests.go:128] [control-plane] adding volume "k8s-certs" for component "kube-controller-manager"
I0315 14:21:48.711793   22137 manifests.go:128] [control-plane] adding volume "kubeconfig" for component "kube-controller-manager"
I0315 14:21:48.712608   22137 manifests.go:157] [control-plane] wrote static Pod manifest for component "kube-controller-manager" to "/etc/kubernetes/manifests/kube-controller-manager.yaml"
[control-plane] Creating static Pod manifest for "kube-scheduler"
I0315 14:21:48.712629   22137 manifests.go:102] [control-plane] getting StaticPodSpecs
I0315 14:21:48.712845   22137 manifests.go:128] [control-plane] adding volume "kubeconfig" for component "kube-scheduler"
I0315 14:21:48.713399   22137 manifests.go:157] [control-plane] wrote static Pod manifest for component "kube-scheduler" to "/etc/kubernetes/manifests/kube-scheduler.yaml"
I0315 14:21:48.713417   22137 kubelet.go:68] Stopping the kubelet
[kubelet-start] Writing kubelet environment file with flags to file "/var/lib/kubelet/kubeadm-flags.env"
[kubelet-start] Writing kubelet configuration to file "/var/lib/kubelet/config.yaml"
[kubelet-start] Starting the kubelet
I0315 14:21:48.845893   22137 waitcontrolplane.go:83] [wait-control-plane] Waiting for the API server to be healthy
[wait-control-plane] Waiting for the kubelet to boot up the control plane as static Pods from directory "/etc/kubernetes/manifests". This can take up to 4m0s
[apiclient] All control plane components are healthy after 8.004355 seconds
I0315 14:21:56.854730   22137 kubeconfig.go:606] ensuring that the ClusterRoleBinding for the kubeadm:cluster-admins Group exists
I0315 14:21:56.856377   22137 kubeconfig.go:682] creating the ClusterRoleBinding for the kubeadm:cluster-admins Group by using super-admin.conf
I0315 14:21:56.870281   22137 uploadconfig.go:112] [upload-config] Uploading the kubeadm ClusterConfiguration to a ConfigMap
[upload-config] Storing the configuration used in ConfigMap "kubeadm-config" in the "kube-system" Namespace
I0315 14:21:56.885744   22137 uploadconfig.go:126] [upload-config] Uploading the kubelet component config to a ConfigMap
[kubelet] Creating a ConfigMap "kubelet-config" in namespace kube-system with the configuration for the kubelets in the cluster
I0315 14:21:56.903116   22137 uploadconfig.go:131] [upload-config] Preserving the CRISocket information for the control-plane node
I0315 14:21:56.903145   22137 patchnode.go:31] [patchnode] Uploading the CRI Socket information "unix:///var/run/containerd/containerd.sock" to the Node API object "clouderamanager-15.com" as an annotation
[upload-certs] Skipping phase. Please see --upload-certs
[mark-control-plane] Marking the node clouderamanager-15.com as control-plane by adding the labels: [node-role.kubernetes.io/control-plane node.kubernetes.io/exclude-from-external-load-balancers]
[mark-control-plane] Marking the node clouderamanager-15.com as control-plane by adding the taints [node-role.kubernetes.io/control-plane:NoSchedule]
[bootstrap-token] Using token: 0grr01.zbqxdtmuc5qd9d05
[bootstrap-token] Configuring bootstrap tokens, cluster-info ConfigMap, RBAC Roles
[bootstrap-token] Configured RBAC rules to allow Node Bootstrap tokens to get nodes
[bootstrap-token] Configured RBAC rules to allow Node Bootstrap tokens to post CSRs in order for nodes to get long term certificate credentials
[bootstrap-token] Configured RBAC rules to allow the csrapprover controller automatically approve CSRs from a Node Bootstrap Token
[bootstrap-token] Configured RBAC rules to allow certificate rotation for all node client certificates in the cluster
[bootstrap-token] Creating the "cluster-info" ConfigMap in the "kube-public" namespace
I0315 14:21:57.971263   22137 clusterinfo.go:47] [bootstrap-token] loading admin kubeconfig
I0315 14:21:57.971832   22137 clusterinfo.go:58] [bootstrap-token] copying the cluster from admin.conf to the bootstrap kubeconfig
I0315 14:21:57.972121   22137 clusterinfo.go:70] [bootstrap-token] creating/updating ConfigMap in kube-public namespace
I0315 14:21:57.977561   22137 clusterinfo.go:84] creating the RBAC rules for exposing the cluster-info ConfigMap in the kube-public namespace
I0315 14:21:57.994965   22137 kubeletfinalize.go:91] [kubelet-finalize] Assuming that kubelet client certificate rotation is enabled: found "/var/lib/kubelet/pki/kubelet-client-current.pem"
[kubelet-finalize] Updating "/etc/kubernetes/kubelet.conf" to point to a rotatable kubelet client certificate and key
I0315 14:21:57.995934   22137 kubeletfinalize.go:135] [kubelet-finalize] Restarting the kubelet to enable client certificate rotation
[addons] Applied essential addon: CoreDNS
[addons] Applied essential addon: kube-proxy

Your Kubernetes control-plane has initialized successfully!

To start using your cluster, you need to run the following as a regular user:

  mkdir -p $HOME/.kube
  sudo cp -i /etc/kubernetes/admin.conf $HOME/.kube/config
  sudo chown $(id -u):$(id -g) $HOME/.kube/config

Alternatively, if you are the root user, you can run:

  export KUBECONFIG=/etc/kubernetes/admin.conf

You should now deploy a pod network to the cluster.
Run "kubectl apply -f [podnetwork].yaml" with one of the options listed at:
  https://kubernetes.io/docs/concepts/cluster-administration/addons/

Then you can join any number of worker nodes by running the following on each as root:

kubeadm join 10.0.0.15:6443 --token 0grr01.zbqxdtmuc5qd9d05 \
        --discovery-token-ca-cert-hash sha256:7942fdfd7e7e47318bc1b31f7ad8c1a05162b2292e706ad4c6c4b128abaa8e0b
good,初始化成功,准备连接集群的配置文件
  mkdir -p $HOME/.kube
  sudo cp -i /etc/kubernetes/admin.conf $HOME/.kube/config
  sudo chown $(id -u):$(id -g) $HOME/.kube/config
警告: kubeadm init 生成的 kubeconfig 文件 admin.conf 包含一个带有 Subject: O = > > kubeadm:cluster-admins, CN = kubernetes-admin 的证书。 kubeadm:cluster-admins 组被绑定到内置的 cluster-admin ClusterRole 上。 不要与任何人共享 admin.conf 文件。kubeadm init 生成另一个 kubeconfig 文件 super-admin.conf, 其中包含带有 Subject: O = > system:masters, CN = kubernetes-super-admin 的证书。 system:masters 是一个紧急访问、超级用户组,可以绕过授权层(例如 RBAC)。 不要与任何人共享 super-admin.conf 文件,建议将其移动到安全位置。有关如何使用 kubeadm kubeconfig user 为其他用户生成 kubeconfig 文件,请参阅 为其他用户生成 kubeconfig 文件。
检查运行情况,控制面安装完毕,帅的一比。?
# kubectl  get pod -A
NAMESPACE     NAME                                             READY   STATUS    RESTARTS   AGE
kube-system   coredns-857d9ff4c9-rhljv                         1/1     Running   0          122m
kube-system   coredns-857d9ff4c9-wdhmh                         1/1     Running   0          122m
kube-system   etcd-clouderamanager-15.com                      1/1     Running   1          123m
kube-system   kube-apiserver-clouderamanager-15.com            1/1     Running   1          123m
kube-system   kube-controller-manager-clouderamanager-15.com   1/1     Running   1          123m
kube-system   kube-proxy-chw7d                                 1/1     Running   0          122m
kube-system   kube-scheduler-clouderamanager-15.com            1/1     Running   1          123m

#  kubectl get nodes
NAME                     STATUS   ROLES           AGE    VERSION
clouderamanager-15.com   Ready    control-plane   133m   v1.29.2
2.2 安装网络插件 CNI
参考官方文档
部署一个基于 Pod 网络插件 的容器网络接口(CNI), 以便你的 Pod 可以相互通信。
在 Kubernetes 集群中,Underlay 网络提供了物理的传输路径,CNI 插件则根据 Kubernetes 的要求配置和管理容器间的网络,Overlay 网络则是 CNI 插件可能使用的一种技术来实现跨越物理网络限制的容器通信。选择合适的 CNI 插件和是否使用 Overlay 网络通常取决于对性能、可扩展性、跨越不同云或数据中心的需求以及网络策略等因素。
我们选择一个 overlay 的插件,不需要云厂商支持。Flannel 是一个可以用于 Kubernetes 的 overlay 网络提供者。
Flannel 官方介绍 Flannel 是一种简单易用的方式,用于配置为 Kubernetes 设计的第三层网络结构。Flannel 在每个主机上运行一个小型的单一二进制代理程序 flanneld,负责从更大的预配置地址空间中为每个主机分配一个子网租约。Flannel 使用 Kubernetes API 或直接使用 etcd 来存储网络配置、分配的子网以及任何辅助数据(例如主机的公共 IP)。数据包通过几种后端机制之一进行转发,包括 VXLAN 和各种云集成。
像 Kubernetes 这样的平台假设集群内的每个容器(pod)都有一个唯一的、可路由的 IP。这种模型的优势在于它消除了共享单个主机 IP 时出现的端口映射复杂性。Flannel 负责在集群中多个节点之间提供第三层 IPv4 网络。Flannel 不控制容器如何连接到主机,只控制主机之间的流量传输方式。然而,flannel 为 Kubernetes 提供了一个 CNI 插件,并提供了与 Docker 集成的指导。
Flannel 专注于网络。对于网络策略,可以使用其他项目,例如 Calico。
wget https://github.com/flannel-io/flannel/releases/latest/download/kube-flannel.yml
kubectl apply -f kube-flannel.yml
默认情况下 kube-flannel.yml 中的 Network 与 kubeadm init --pod-network-cidr=10.244.0.0/16 一致,否则修改。
  net-conf.json: |
    {
      "Network": "10.244.0.0/16",
      "Backend": {
        "Type": "vxlan"
      }
    }
很好,flannel 部署成功。
[root@clouderamanager-15 k8s]# kubectl  get pod -A
NAMESPACE      NAME                                             READY   STATUS    RESTARTS   AGE
kube-flannel   kube-flannel-ds-xmlpp                            1/1     Running   0          109s
控制面部署成功,接下来部署节点。
3. 新增K8S节点
前置项
和 控制面要求的一致,需要完成第一步 安装 kubeadm 中的所有内容。
[root@hadoop-30 bin]# kubeadm join 10.0.0.15:6443 --token 0grr01.zbqxdtmuc5qd9d05         --discovery-token-ca-cert-hash sha256:7942fdfd7e7e47318bc1b31f7ad8c1a05162b2292e706ad4c6c4b128abaa8e0b --v=5
I0315 22:19:01.131078 3367241 join.go:413] [preflight] found NodeName empty; using OS hostname as NodeName
I0315 22:19:01.131226 3367241 initconfiguration.go:122] detected and using CRI socket: unix:///var/run/containerd/containerd.sock


This node has joined the cluster:
* Certificate signing request was sent to apiserver and a response was received.
* The Kubelet was informed of the new secure connection details.

Run 'kubectl get nodes' on the control-plane to see this node join the cluster.
good,节点加入集群成功 ?
如果 token 过期,会报错
The cluster-info ConfigMap does not yet contain a JWS signature for token ID,则使用kubeadm token create重新获取。获取 CA 证书的哈希值:
openssl x509 -pubkey -in /etc/kubernetes/pki/ca.crt | openssl rsa -pubin -outform der 2>/dev/null | openssl dgst -sha256 -hex | sed 's/^.* //'
4. 验证
创建 deployment
创建一个 nginx 的 deploy,部署 nginx 1.22 版本。
[root@hadoop-30 certs.d]# kubectl  create deploy nginx-web --image=nginx:1.22
deployment.apps/nginx-web created

[root@hadoop-30 certs.d]# kubectl  get deploy nginx-web -o yaml
apiVersion: apps/v1
kind: Deployment
metadata:
  annotations:
    deployment.kubernetes.io/revision: "1"
  generation: 1
  labels:
    app: nginx-web
  name: nginx-web
  namespace: default
spec:
  progressDeadlineSeconds: 600
  replicas: 1
  revisionHistoryLimit: 10
  selector:
    matchLabels:
      app: nginx-web
  strategy:
    rollingUpdate:
      maxSurge: 25%
      maxUnavailable: 25%
    type: RollingUpdate
  template:
    metadata:
      creationTimestamp: null
      labels:
        app: nginx-web
    spec:
      containers:
      - image: nginx:1.22
        imagePullPolicy: IfNotPresent
        name: nginx
      dnsPolicy: ClusterFirst
      restartPolicy: Always
      schedulerName: default-scheduler
      securityContext: {}
      terminationGracePeriodSeconds: 30


[root@hadoop-30 certs.d]# kubectl  get deploy nginx-web -o wide
NAME        READY   UP-TO-DATE   AVAILABLE   AGE   CONTAINERS   IMAGES       SELECTOR
nginx-web   1/1     1            1           25s   nginx        nginx:1.22   app=nginx-web

[root@hadoop-30 certs.d]# kubectl  get pod -l app=nginx-web -o wide
NAME                         READY   STATUS    RESTARTS   AGE   IP            NODE            NOMINATED NODE   READINESS GATES
nginx-web-65d5f4d459-ptt46   1/1     Running   0          99s   10.244.1.47   hadoop-30.com   <none>           <none>
[root@hadoop-30 certs.d]# curl -I 10.244.1.47
HTTP/1.1 200 OK
Server: nginx/1.22.1
Date: Mon, 18 Mar 2024 01:37:10 GMT
Content-Type: text/html
Content-Length: 615
Last-Modified: Wed, 19 Oct 2022 08:02:20 GMT
Connection: keep-alive
ETag: "634faf0c-267"
Accept-Ranges: bytes
从上面的结果来看,直接访问 Pod IP 返回了 Nginx 的版本 Server: nginx/1.22.1,而 Pod IP 10.244.1.47 是 2.1 安装控制平面(kubeadm init --pod-network-cidr=10.244.0.0/16) 和 2.2 章节安装 CNI插件 时指定的容器网络。
接下来,给这个 deployment 创建 service
创建 Service
[root@hadoop-30 containerd]# kubectl  expose deploy nginx-web --port=80 --target-port=80
service/nginx-web exposed

[root@hadoop-30 containerd]#  kubectl  get services -l app=nginx-web -o wide
NAME        TYPE        CLUSTER-IP       EXTERNAL-IP   PORT(S)   AGE   SELECTOR
nginx-web   ClusterIP   10.105.151.200   <none>        80/TCP    17m   app=nginx-web

[root@hadoop-30 containerd]# curl 10.105.151.200 -I
HTTP/1.1 200 OK
Server: nginx/1.22.1
Date: Mon, 18 Mar 2024 02:40:24 GMT
Content-Type: text/html
Content-Length: 615
Last-Modified: Wed, 19 Oct 2022 08:02:20 GMT
Connection: keep-alive
ETag: "634faf0c-267"
Accept-Ranges: bytes
值得注意的是,Service的 IP地址 10.105.151.200 属于 kubeadm init --service-cidr=10.96.0.0/12 指定的 10.96.0.0/12 网段。
恭喜,K8S 终于安装成功了,?
reference
原创声明:本文系作者授权腾讯云开发者社区发表,未经许可,不得转载。
如有侵权,请联系 cloudcommunity@tencent.com 删除。
原创声明:本文系作者授权腾讯云开发者社区发表,未经许可,不得转载。
如有侵权,请联系 cloudcommunity@tencent.com 删除。