Kubernetes | МЏШКАВзА - ClusterInstallation
ЮФеТ/Д№АИ/ММЪѕДѓХЃ
ЗЂВМ
Kubernetes | МЏШКАВзА - ClusterInstallation

Zkeq
ЗЂВМгк 2023-04-29 14:10:10
ЗЂВМгк 2023-04-29 14:10:10
ЧАЦкзМБИ
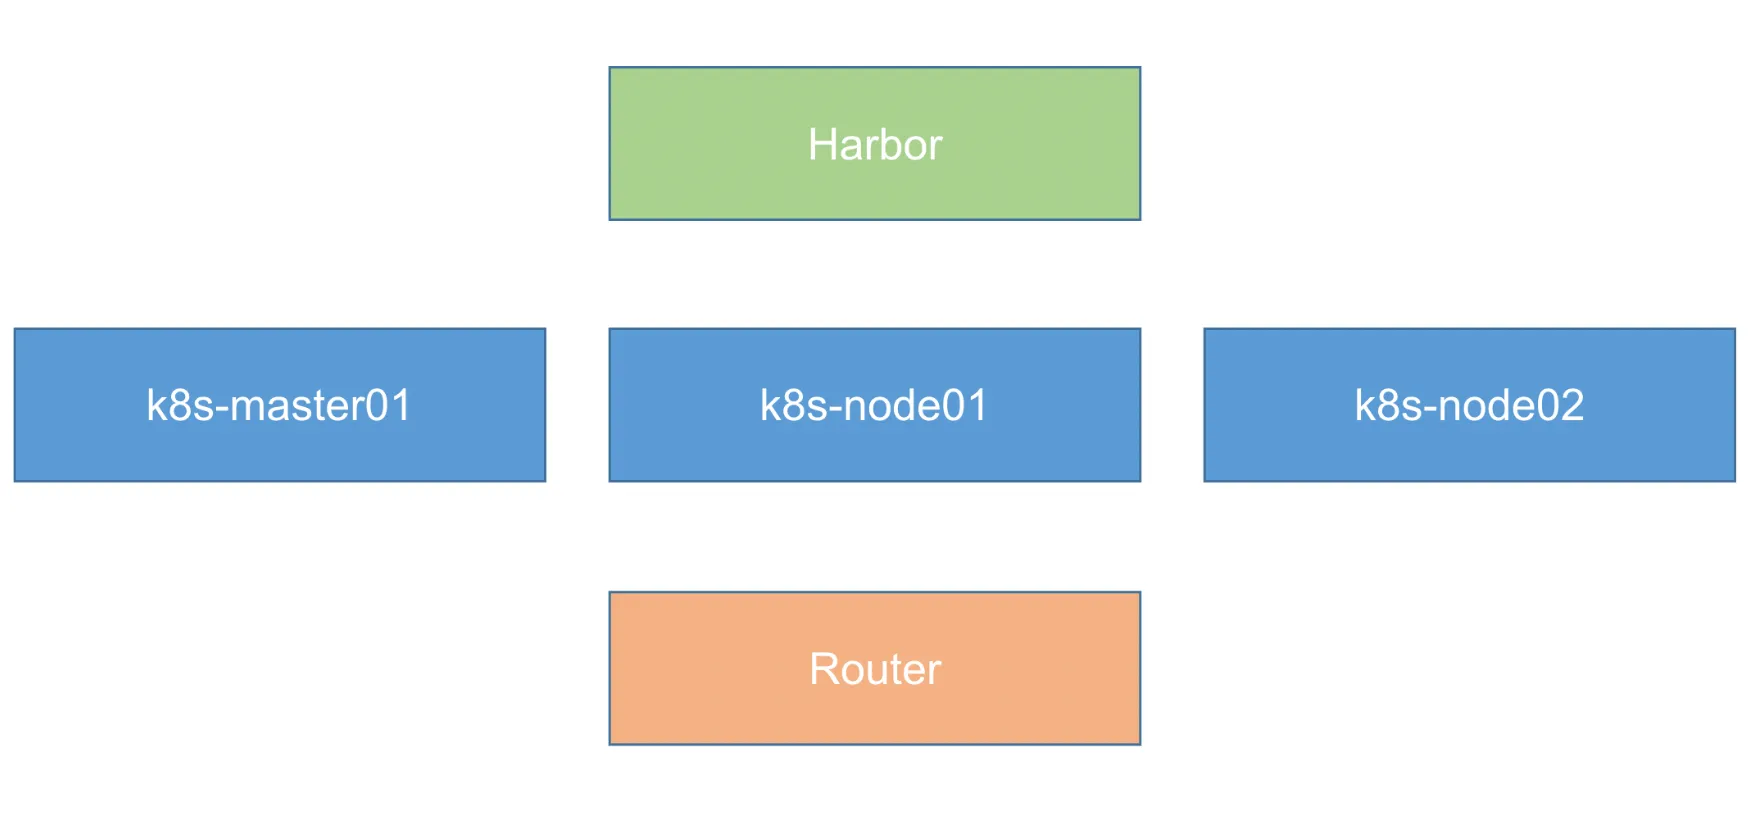
image-20230422033943863
- ЪЙгУ KubeAdm АВзАМЏШК
- ЪЙгУ Centos 7 РДАВзА(ФкКЫ 4.4 вдЩЯ)
- ашвЊ4ЬЈ Centos7 + 1ЬЈШэТЗгЩ
- ШэТЗгЩЪЙгУ KoolShare РДЙЙНЈ
ПЊЪМВйзї
1ЁЂЯЕЭГГѕЪМЛЏ
ЩшжУЯЕЭГжїЛњУћвдМА Host ЮФМўЕФЯрЛЅНтЮі
hostnamectl set-hostname k8s-master01АВзАвРРЕАќ
yum install -y conntrack ntpdate ntp ipvsadm ipset jq iptables curl sysstat libseccomp wget vim net-tools gitЩшжУЗРЛ№ЧНЮЊ Iptables ВЂЩшжУПеЙцдђ
systemctl stop firewalld && systemctl disable firewalld
yum -y install iptables-services && systemctl start iptables && systemctl enable iptables && iptables -F && service iptables saveЙиБе SELINUX
swapoff -a && sed -i '/ swap / s/^\(.*\)$/#\1/g' /etc/fstab
# ЮЊСЫадФм, k8s МЏШКдкАВзАЕФЪБКђЛсШЅМьВтащФтФкДцЪЧЗёЙиБе ПЩжЦЖЈ ingress ВЮЪ§ЪЙЦфВЛМьВт ЕЋЪЧвЛАуВЛжИЖЈ
setenforce 0 && sed -i 's/^SELINUX=.*/SELINUX=disabled/' /etc/selinux/configЕїећФкКЫВЮЪ§ЃЌЖдгк K8S
cat > kubernetes.conf <<EOF
net.bridge.bridge-nf-call-iptables=1
net.bridge.bridge-nf-call-ip6tables=1
net.ipv4.ip_forward=1
net.ipv4.tcp_tw_recycle=0
vm.swappiness=0 # НћжЙЪЙгУ swap ПеМфЃЌжЛгаЕБЯЕЭГ OOM ЪБВХдЪаэЪЙгУЫќ
vm.overcommit_memory=1 # ВЛМьВщЮяРэФкДцЪЧЗёЙЛгУ
vm.panic_on_oom=0 # ПЊЦє OOM
fs.inotify.max_user_instances=8192
fs.inotify.max_user_watches=1048576
fs.file-max=52706963
fs.nr_open=52706963
net.ipv6.conf.all.disable_ipv6=1
net.netfilter.nf_conntrack_max=2310720
EOF
cp kubernetes.conf /etc/sysctl.d/kubernetes.conf
sysctl -p /etc/sysctl.d/kubernetes.confЕїећЯЕЭГЪБЧј
# ЩшжУЯЕЭГЪБЧјЮЊ жаЙњ/ЩЯКЃ
timedatectl set-timezone Asia/Shanghai
# НЋЕБЧАЕФ UTC ЪБМфаДШыгВМўЪБжг
timedatectl set-local-rtc 0
# жиЦєвРРЕгкЯЕЭГЪБМфЕФЗўЮё
systemctl restart rsyslog
systemctl restart crondЙиБеЯЕЭГВЛашвЊЗўЮё
systemctl stop postfix && systemctl disable postfixЩшжУ rsyslogd КЭ systemd journald
mkdir /var/log/journal # ГжОУЛЏБЃДцШежОЕФФПТМ
mkdir /etc/systemd/journald.conf.d
cat > /etc/systemd/journald.conf.d/99-prophet.conf <<EOF
[Journal]
# ГжОУЛЏБЃДцЕНДХХЬ
Storage=persistent
# бЙЫѕРњЪЗШежО
Compress=yes
SyncIntervalSec=5m
RateLimitInterval=30s
RateLimitBurst=1000
# зюДѓеМгУПеМф 10G
SystemMaxUse=10G
# ЕЅШежОЮФМўзюДѓ 200M
SystemMaxFileSize=200M
# ШежОБЃДцЪБМф 2 жм
MaxRetentionSec=2week
# ВЛНЋШежОзЊЗЂЕН syslog
ForwardToSyslog=no
EOF
systemctl restart systemd-journaldЩ§МЖЯЕЭГФкКЫЮЊ 4.44
CentOS 7.x ЯЕЭГздДјЕФ 3.10.x ФкКЫДцдквЛаЉ BugsЃЌЕМжТдЫааЕФ DockerЁЂKubernetes ВЛЮШЖЈЃЌР§ШчЃК rpm -Uvhhttp://www.elrepo.org/elrepo-release-7.0-3.el7.elrepo.noarch.rpm
rpm -Uvh http://www.elrepo.org/elrepo-release-7.0-3.el7.elrepo.noarch.rpm
# АВзАЭъГЩКѓМьВщ /boot/grub2/grub.cfg жаЖдгІФкКЫ menuentry жаЪЧЗёАќКЌ initrd16 ХфжУЃЌШчЙћУЛгаЃЌдйАВзА
вЛДЮЃЁ
yum --enablerepo=elrepo-kernel install -y kernel-lt
# ЩшжУПЊЛњДгаТФкКЫЦєЖЏ
grub2-set-default 'CentOS Linux (4.4.189-1.el7.elrepo.x86_64) 7 (Core)'
# 2023-04-22: Щ§МЖФкКЫжЎКѓ ЮвЕУЕНЕФЪЧ 5.4 (вђЮЊЪЧзюаТАцЕФ)
# ШчЙћгУЕФЪЧ Centos7.9 ЕФЛА ФЌШЯЕФФкКЫвВФмгУ
# етвЛааУќСюЦфЪЕУЛЩњаЇ ЕНЯТЮФЛсдйаоИФжДаавЛДЮ- ШєЮоЗЈе§ГЃМгдиЃЌЧыЕуЛїВщПД PDF ЭјвГАцБО: 1ЁЂЯЕЭГГѕЪМЛЏ.pdf
2ЁЂKubeadm ВПЪ№АВзА
kube-proxy ПЊЦє ipvs ЕФЧАжУЬѕМў
modprobe br_netfilter
cat > /etc/sysconfig/modules/ipvs.modules <<EOF
#!/bin/bash
modprobe -- ip_vs
modprobe -- ip_vs_rr
modprobe -- ip_vs_wrr
modprobe -- ip_vs_sh
modprobe -- nf_conntrack
EOF
chmod 755 /etc/sysconfig/modules/ipvs.modules && bash /etc/sysconfig/modules/ipvs.modules && lsmod | grep -e ip_vs -e nf_conntrack
# modprobe: FATAL: Module nf_conntrack_ipv4 not found.
# дкИпАцБОФкКЫвбОАбnf_conntrack_ipv4ЬцЛЛЮЊnf_conntrackСЫ
# https://blog.csdn.net/weixin_45387943/article/details/123225090АВзА Docker ШэМў
yum install -y yum-utils device-mapper-persistent-data lvm2
yum-config-manager \
--add-repo \
http://mirrors.aliyun.com/docker-ce/linux/centos/docker-ce.repo
yum update -y && yum install -y docker-ce
## ДДНЈ /etc/docker ФПТМ
mkdir /etc/docker
# ХфжУ daemon.
cat > /etc/docker/daemon.json <<EOF
{
"exec-opts": ["native.cgroupdriver=systemd"],
"log-driver": "json-file",
"log-opts": {
"max-size": "100m"
}
}
EOF
mkdir -p /etc/systemd/system/docker.service.d
# жиЦєdockerЗўЮё
systemctl daemon-reload && systemctl restart docker && systemctl enable docker# НтОівЛИі yum БЈДэ
[root@k8s-master01 ~]# yum install -y docker-ce
...
...
Downloading packages:
(1/10): container-selinux-2.119.2-1.911c772.el7_8.noarch.rpm | 40 kB 00:00:00
warning: /var/cache/yum/x86_64/7/docker-ce-stable/packages/docker-buildx-plugin-0.10.4-1.el7.x86_64.rpm: Header V4 RSA/SHA512 Signature, key ID 621e9f35: NOKEYTA
Public key for docker-buildx-plugin-0.10.4-1.el7.x86_64.rpm is not installed
(2/10): docker-buildx-plugin-0.10.4-1.el7.x86_64.rpm | 12 MB 00:00:04
docker-ce-23.0.4-1.el7.x86_64. FAILED
https://mirrors.aliyun.com/docker-ce/linux/centos/7/x86_64/stable/Packages/docker-ce-23.0.4-1.el7.x86_64.rpm: [Errno -1] Package does not match intended download. Suggestion: run yum --enablerepo=docker-ce-stable clean metadata
Trying other mirror.
(3/10): docker-ce-cli-23.0.4-1.el7.x86_64.rpm | 13 MB 00:00:04
(4/10): containerd.io-1.6.20-3.1.el7.x86_64.rpm | 34 MB 00:00:11
(5/10): fuse-overlayfs-0.7.2-6.el7_8.x86_64.rpm | 54 kB 00:00:00
(6/10): fuse3-libs-3.6.1-4.el7.x86_64.rpm | 82 kB 00:00:00
(7/10): slirp4netns-0.4.3-4.el7_8.x86_64.rpm | 81 kB 00:00:00
(8/10): docker-ce-rootless-extras-23.0.4-1.el7.x86_64.rpm | 8.8 MB 00:00:03
(9/10): docker-compose-plugin-2.17.2-1.el7.x86_64.rpm | 12 MB 00:00:04
Error downloading packages:
3:docker-ce-23.0.4-1.el7.x86_64: [Errno 256] No more mirrors to try.
[root@k8s-master01 ~]# sudo yum clean all
Loaded plugins: fastestmirror
Cleaning repos: base docker-ce-stable elrepo extras updates
Cleaning up list of fastest mirrors
Other repos take up 11 M of disk space (use --verbose for details)
[root@k8s-master01 ~]# yum --enablerepo=docker-ce-stable clean metadata
Loaded plugins: fastestmirror
Cleaning repos: base docker-ce-stable elrepo extras updates
16 metadata files removed
10 sqlite files removed
0 metadata files removed
[root@k8s-master01 ~]# yum install -y docker-ce
...
...
Dependency Installed:
container-selinux.noarch 2:2.119.2-1.911c772.el7_8 containerd.io.x86_64 0:1.6.20-3.1.el7 docker-buildx-plugin.x86_64 0:0.10.4-1.el7
docker-ce-cli.x86_64 1:23.0.4-1.el7 docker-ce-rootless-extras.x86_64 0:23.0.4-1.el7 docker-compose-plugin.x86_64 0:2.17.2-1.el7
fuse-overlayfs.x86_64 0:0.7.2-6.el7_8 fuse3-libs.x86_64 0:3.6.1-4.el7 slirp4netns.x86_64 0:0.4.3-4.el7_8
Complete!# liunx ВщПДгаФФаЉФкКЫ
cat /boot/grub2/grub.cfg | grep menuentry
[root@k8s-master01 ~]# cat /boot/grub2/grub.cfg | grep menuentry
if [ x"${feature_menuentry_id}" = xy ]; then
menuentry_id_option="--id"
menuentry_id_option=""
export menuentry_id_option
menuentry 'CentOS Linux (3.10.0-1160.88.1.el7.x86_64) 7 (Core)' --class centos --class gnu-linux --class gnu --class os --unrestricted $menuentry_id_option 'gnulinux-3.10.0-1160.el7.x86_64-advanced-9cff3d69-3769-4ad9-8460-9c54050583f9' {
menuentry 'CentOS Linux (5.4.241-1.el7.elrepo.x86_64) 7 (Core)' --class centos --class gnu-linux --class gnu --class os --unrestricted $menuentry_id_option 'gnulinux-3.10.0-1160.el7.x86_64-advanced-9cff3d69-3769-4ad9-8460-9c54050583f9' {
menuentry 'CentOS Linux (3.10.0-1160.el7.x86_64) 7 (Core)' --class centos --class gnu-linux --class gnu --class os --unrestricted $menuentry_id_option 'gnulinux-3.10.0-1160.el7.x86_64-advanced-9cff3d69-3769-4ad9-8460-9c54050583f9' {
menuentry 'CentOS Linux (0-rescue-cc2c86fe566741e6a2ff6d399c5d5daa) 7 (Core)' --class centos --class gnu-linux --class gnu --class os --unrestricted $menuentry_id_option 'gnulinux-0-rescue-cc2c86fe566741e6a2ff6d399c5d5daa-advanced-9cff3d69-3769-4ad9-8460-9c54050583f9' {
[root@k8s-master01 ~]# grub2-set-default 'CentOS Linux (5.4.241-1.el7.elrepo.x86_64) 7 (Core)' && reboot
[root@k8s-master01 ~]# uname -r
5.4.241-1.el7.elrepo.x86_64 # АВзАЭъ docker ЦєЖЏ
[root@k8s-master01 ~]# systemctl start docker
[root@k8s-master01 ~]# systemctl enable docker
Created symlink from /etc/systemd/system/multi-user.target.wants/docker.service to /usr/lib/systemd/system/docker.service.АВзА Kubeadm ЃЈжїДгХфжУЃЉ
cat <<EOF > /etc/yum.repos.d/kubernetes.repo
[kubernetes]
name=Kubernetes
baseurl=http://mirrors.aliyun.com/kubernetes/yum/repos/kubernetes-el7-x86_64
enabled=1
gpgcheck=0
repo_gpgcheck=0
gpgkey=http://mirrors.aliyun.com/kubernetes/yum/doc/yum-key.gpg
http://mirrors.aliyun.com/kubernetes/yum/doc/rpm-package-key.gpg
EOF

yum -y install kubeadm-1.15.1 kubectl-1.15.1 kubelet-1.15.1
systemctl enable kubelet.serviceГѕЪМЛЏжїНкЕу
kubeadm config print init-defaults > kubeadm-config.yaml
  localAPIEndpoint:
  	advertiseAddress: 192.168.66.10
  kubernetesVersion: v1.15.1
  networking:
    podSubnet: "10.244.0.0/16"
    serviceSubnet: 10.96.0.0/12
  ---
  apiVersion: kubeproxy.config.k8s.io/v1alpha1
  kind: KubeProxyConfiguration
  featureGates:
  	SupportIPVSProxyMode: true
  mode: ipvs

kubeadm init --config=kubeadm-config.yaml --experimental-upload-certs | tee kubeadm-init.logapiVersion: kubeadm.k8s.io/v1beta2
bootstrapTokens:
- groups:
- system:bootstrappers:kubeadm:default-node-token
token: abcdef.0123456789abcdef
ttl: 24h0m0s
usages:
- signing
- authentication
kind: InitConfiguration
localAPIEndpoint:
advertiseAddress: 172.129.78.136
bindPort: 6443
nodeRegistration:
criSocket: /var/run/dockershim.sock
name: k8s-master01
taints:
- effect: NoSchedule
key: node-role.kubernetes.io/master
---
apiServer:
timeoutForControlPlane: 4m0s
apiVersion: kubeadm.k8s.io/v1beta2
certificatesDir: /etc/kubernetes/pki
clusterName: kubernetes
controllerManager: {}
dns:
type: CoreDNS
etcd:
local:
dataDir: /var/lib/etcd
imageRepository: k8s.gcr.io
kind: ClusterConfiguration
kubernetesVersion: v1.15.1
networking:
dnsDomain: cluster.local
podSubnet: "10.244.0.0/16"
serviceSubnet: 10.96.0.0/12
scheduler: {}
---
apiVersion: kubeproxy.config.k8s.io/v1alpha1
kind: KubeProxyConfiguration
featureGates:
SupportIPVSProxyMode: true
mode: ipvs[root@k8s-master01 ~]# kubeadm init --config=kubeadm-config.yaml --experimental-upload-certs | tee kubeadm-init.log
Flag --experimental-upload-certs has been deprecated, use --upload-certs instead
[init] Using Kubernetes version: v1.15.1
[preflight] Running pre-flight checks
[WARNING SystemVerification]: this Docker version is not on the list of validated versions: 23.0.4. Latest validated version: 18.09
[preflight] Pulling images required for setting up a Kubernetes cluster
[preflight] This might take a minute or two, depending on the speed of your internet connection
[preflight] You can also perform this action in beforehand using 'kubeadm config images pull'
[kubelet-start] Writing kubelet environment file with flags to file "/var/lib/kubelet/kubeadm-flags.env"
[kubelet-start] Writing kubelet configuration to file "/var/lib/kubelet/config.yaml"
[kubelet-start] Activating the kubelet service
[certs] Using certificateDir folder "/etc/kubernetes/pki"
[certs] Generating "ca" certificate and key
[certs] Generating "apiserver" certificate and key
[certs] apiserver serving cert is signed for DNS names [k8s-master01 kubernetes kubernetes.default kubernetes.default.svc kubernetes.default.svc.cluster.local] and IPs [10.96.0.1 172.129.78.136]
[certs] Generating "apiserver-kubelet-client" certificate and key
[certs] Generating "etcd/ca" certificate and key
[certs] Generating "etcd/healthcheck-client" certificate and key
[certs] Generating "apiserver-etcd-client" certificate and key
[certs] Generating "etcd/server" certificate and key
[certs] etcd/server serving cert is signed for DNS names [k8s-master01 localhost] and IPs [172.129.78.136 127.0.0.1 ::1]
[certs] Generating "etcd/peer" certificate and key
[certs] etcd/peer serving cert is signed for DNS names [k8s-master01 localhost] and IPs [172.129.78.136 127.0.0.1 ::1]
[certs] Generating "front-proxy-ca" certificate and key
[certs] Generating "front-proxy-client" certificate and key
[certs] Generating "sa" key and public key
[kubeconfig] Using kubeconfig folder "/etc/kubernetes"
[kubeconfig] Writing "admin.conf" kubeconfig file
[kubeconfig] Writing "kubelet.conf" kubeconfig file
[kubeconfig] Writing "controller-manager.conf" kubeconfig file
[kubeconfig] Writing "scheduler.conf" kubeconfig file
[control-plane] Using manifest folder "/etc/kubernetes/manifests"
[control-plane] Creating static Pod manifest for "kube-apiserver"
[control-plane] Creating static Pod manifest for "kube-controller-manager"
[control-plane] Creating static Pod manifest for "kube-scheduler"
[etcd] Creating static Pod manifest for local etcd in "/etc/kubernetes/manifests"
[wait-control-plane] Waiting for the kubelet to boot up the control plane as static Pods from directory "/etc/kubernetes/manifests". This can take up to 4m0s
[apiclient] All control plane components are healthy after 17.002118 seconds
[upload-config] Storing the configuration used in ConfigMap "kubeadm-config" in the "kube-system" Namespace
[kubelet] Creating a ConfigMap "kubelet-config-1.15" in namespace kube-system with the configuration for the kubelets in the cluster
[upload-certs] Storing the certificates in Secret "kubeadm-certs" in the "kube-system" Namespace
[upload-certs] Using certificate key:
9280d519bb53c33fec7149b1ac2e6f0385b863dcee2ff7bf901d07d715de4dea
[mark-control-plane] Marking the node k8s-master01 as control-plane by adding the label "node-role.kubernetes.io/master=''"
[mark-control-plane] Marking the node k8s-master01 as control-plane by adding the taints [node-role.kubernetes.io/master:NoSchedule]
[bootstrap-token] Using token: abcdef.0123456789abcdef
[bootstrap-token] Configuring bootstrap tokens, cluster-info ConfigMap, RBAC Roles
[bootstrap-token] configured RBAC rules to allow Node Bootstrap tokens to post CSRs in order for nodes to get long term certificate credentials
[bootstrap-token] configured RBAC rules to allow the csrapprover controller automatically approve CSRs from a Node Bootstrap Token
[bootstrap-token] configured RBAC rules to allow certificate rotation for all node client certificates in the cluster
[bootstrap-token] Creating the "cluster-info" ConfigMap in the "kube-public" namespace
[addons] Applied essential addon: CoreDNS
[addons] Applied essential addon: kube-proxy
Your Kubernetes control-plane has initialized successfully!
To start using your cluster, you need to run the following as a regular user:
mkdir -p $HOME/.kube
sudo cp -i /etc/kubernetes/admin.conf $HOME/.kube/config
sudo chown $(id -u):$(id -g) $HOME/.kube/config
You should now deploy a pod network to the cluster.
Run "kubectl apply -f [podnetwork].yaml" with one of the options listed at:
https://kubernetes.io/docs/concepts/cluster-administration/addons/
Then you can join any number of worker nodes by running the following on each as root:
kubeadm join 172.129.78.136:6443 --token abcdef.0123456789abcdef \
--discovery-token-ca-cert-hash sha256:a93684cdb29000b025a9ed35054b9611bc913fe1ddbf880f8e9077b812704396
[root@k8s-master01 ~]#  mkdir -p $HOME/.kube
[root@k8s-master01 ~]#  sudo cp -i /etc/kubernetes/admin.conf $HOME/.kube/config
[root@k8s-master01 ~]#  sudo chown $(id -u):$(id -g) $HOME/.kube/config
[root@k8s-master01 ~]# kubectl get node
NAME           STATUS     ROLES    AGE     VERSION
k8s-master01 NotReady master 2m53s v1.15.1МгШыжїНкЕувдМАЦфгрЙЄзїНкЕу
жДааАВзАШежОжаЕФМгШыУќСюМДПЩ
ВПЪ№ЭјТч
kubectl apply -f https://raw.githubusercontent.com/coreos/flannel/master/Documentation/kube-flannel.yml
# вбОЙ§ШЅ4ФъСЫ ЩЯЪіУќСювбОВЛПЩгУСЫ ВщдФ Commit РњЪЗ ЕУЕНПЩгУСДНг
[root@k8s-master01 ~]# kubectl apply -f https://raw.githubusercontent.com/flannel-io/flannel/d893bcbfe6b04791054aea6c7569dea4080cc289/Documentation/kube-flannel.yml
podsecuritypolicy.policy/psp.flannel.unprivileged created
clusterrole.rbac.authorization.k8s.io/flannel created
clusterrolebinding.rbac.authorization.k8s.io/flannel created
serviceaccount/flannel created
configmap/kube-flannel-cfg created
daemonset.apps/kube-flannel-ds-amd64 created
daemonset.apps/kube-flannel-ds-arm64 created
daemonset.apps/kube-flannel-ds-arm created
daemonset.apps/kube-flannel-ds-ppc64le created
daemonset.apps/kube-flannel-ds-s390x created
[root@k8s-master01 ~]# kubectl get pod -n kube-system
// ДЫДІВЛПЩгУЮЊдЄЦкзДЬЌ ЯТЮФЬсЙЉСЫНтОіАьЗЈ
NAME READY STATUS RESTARTS AGE
coredns-5c98db65d4-gjnpg 0/1 ContainerCreating 0 16m
coredns-5c98db65d4-v89m2 0/1 ContainerCreating 0 16m
etcd-k8s-master01 1/1 Running 0 15m
kube-apiserver-k8s-master01 1/1 Running 0 15m
kube-controller-manager-k8s-master01 1/1 Running 0 15m
kube-flannel-ds-amd64-qmksn 1/1 Running 0 2m29s
kube-proxy-445g7 1/1 Running 0 16m
kube-scheduler-k8s-master01 1/1 Running 0 15m
[root@k8s-master01 ~]# kubectl get node
NAME STATUS ROLES AGE VERSION
k8s-master01 Ready master 15m v1.15.1
[root@k8s-master01 ~]# ifconfig
docker0: flags=4099<UP,BROADCAST,MULTICAST> mtu 1500
inet 172.17.0.1 netmask 255.255.0.0 broadcast 172.17.255.255
ether 02:42:d3:2f:dc:ce txqueuelen 0 (Ethernet)
RX packets 0 bytes 0 (0.0 B)
RX errors 0 dropped 0 overruns 0 frame 0
TX packets 0 bytes 0 (0.0 B)
TX errors 0 dropped 0 overruns 0 carrier 0 collisions 0
eth0: flags=4163<UP,BROADCAST,RUNNING,MULTICAST> mtu 1500
inet 172.129.78.136 netmask 255.255.255.0 broadcast 172.129.78.255
ether fa:16:3e:36:5c:71 txqueuelen 1000 (Ethernet)
RX packets 169718 bytes 339692579 (323.9 MiB)
RX errors 0 dropped 0 overruns 0 frame 0
TX packets 83371 bytes 1680809729 (1.5 GiB)
TX errors 0 dropped 0 overruns 0 carrier 0 collisions 0
flannel.1: flags=4163<UP,BROADCAST,RUNNING,MULTICAST> mtu 1450
inet 10.244.0.0 netmask 255.255.255.255 broadcast 0.0.0.0
ether ba:df:2f:da:90:4c txqueuelen 0 (Ethernet)
RX packets 0 bytes 0 (0.0 B)
RX errors 0 dropped 0 overruns 0 frame 0
TX packets 0 bytes 0 (0.0 B)
TX errors 0 dropped 0 overruns 0 carrier 0 collisions 0
lo: flags=73<UP,LOOPBACK,RUNNING> mtu 65536
inet 127.0.0.1 netmask 255.0.0.0
loop txqueuelen 1000 (Local Loopback)
RX packets 141284 bytes 26146180 (24.9 MiB)
RX errors 0 dropped 0 overruns 0 frame 0
TX packets 141284 bytes 26146180 (24.9 MiB)
TX errors 0 dropped 0 overruns 0 carrier 0 collisions 0# ХфКУЭјТчжЎКѓ ОЭПЩвдМгШызгНкЕу
[root@k8s-node01 ~]# kubeadm join 172.129.78.136:6443 --token abcdef.0123456789abcdef \
--discovery-token-ca-cert-hash sha256:a93684cdb29000b025a9ed35054b9611bc913fe1ddbf880f8e9077b812704396
[preflight] Running pre-flight checks
[WARNING SystemVerification]: this Docker version is not on the list of validated versions: 23.0.4. Latest validated version: 18.09
[WARNING Hostname]: hostname "k8s-node01.novalocal" could not be reached
[WARNING Hostname]: hostname "k8s-node01.novalocal": lookup k8s-node01.novalocal on 223.5.5.5:53: no such host
[preflight] Reading configuration from the cluster...
[preflight] FYI: You can look at this config file with 'kubectl -n kube-system get cm kubeadm-config -oyaml'
[kubelet-start] Downloading configuration for the kubelet from the "kubelet-config-1.15" ConfigMap in the kube-system namespace
[kubelet-start] Writing kubelet configuration to file "/var/lib/kubelet/config.yaml"
[kubelet-start] Writing kubelet environment file with flags to file "/var/lib/kubelet/kubeadm-flags.env"
[kubelet-start] Activating the kubelet service
[kubelet-start] Waiting for the kubelet to perform the TLS Bootstrap...
This node has joined the cluster:
* Certificate signing request was sent to apiserver and a response was received.
* The Kubelet was informed of the new secure connection details.
Run 'kubectl get nodes' on the control-plane to see this node join the cluster.
[root@k8s-master01 ~]# kubectl get nodes
NAME STATUS ROLES AGE VERSION
k8s-master01 Ready master 19m v1.15.1
k8s-node01.novalocal NotReady <none> 13s v1.15.1
k8s-node02.novalocal NotReady <none> 6s v1.15.1
[root@k8s-master01 ~]# kubectl get pod -n kube-system -o wide
// ДЫДІВЛПЩгУЮЊдЄЦкзДЬЌ ЯТЮФЬсЙЉСЫНтОіАьЗЈ
NAME READY STATUS RESTARTS AGE IP NODE NOMINATED NODE READINESS GATES
coredns-5c98db65d4-gjnpg 0/1 ContainerCreating 0 19m <none> k8s-master01 <none> <none>
coredns-5c98db65d4-v89m2 0/1 ContainerCreating 0 19m <none> k8s-master01 <none> <none>
etcd-k8s-master01 1/1 Running 0 18m 172.129.78.136 k8s-master01 <none> <none>
kube-apiserver-k8s-master01 1/1 Running 0 18m 172.129.78.136 k8s-master01 <none> <none>
kube-controller-manager-k8s-master01 1/1 Running 0 18m 172.129.78.136 k8s-master01 <none> <none>
kube-flannel-ds-amd64-fcgkv 1/1 Running 0 35s 172.129.78.105 k8s-node01.novalocal <none> <none>
kube-flannel-ds-amd64-qmksn 1/1 Running 0 5m17s 172.129.78.136 k8s-master01 <none> <none>
kube-flannel-ds-amd64-wgjmq 1/1 Running 0 28s 172.129.78.104 k8s-node02.novalocal <none> <none>
kube-proxy-445g7 1/1 Running 0 19m 172.129.78.136 k8s-master01 <none> <none>
kube-proxy-dwljn 1/1 Running 0 35s 172.129.78.105 k8s-node01.novalocal <none> <none>
kube-proxy-wfx4j 1/1 Running 0 28s 172.129.78.104 k8s-node02.novalocal <none> <none>
kube-scheduler-k8s-master01 1/1 Running 0 18m 172.129.78.136 k8s-master01 <none> <none>
[root@k8s-master01 ~]# kubectl get nodes
NAME STATUS ROLES AGE VERSION
k8s-master01 Ready master 19m v1.15.1
k8s-node01.novalocal Ready <none> 38s v1.15.1
k8s-node02.novalocal Ready <none> 31s v1.15.1НтОіБЈДэ
CoreDNS /flannel вЛжБДІгк ContainerCreating зДЬЌ
[root@k8s-master01 ~]# kubectl get pod -n kube-system -o wide
NAME                                   READY   STATUS              RESTARTS   AGE     IP               NODE                   NOMINATED NODE   READINESS GATES
coredns-5c98db65d4-gjnpg               0/1     ContainerCreating   0          19m     <none>           k8s-master01           <none>           <none>
coredns-5c98db65d4-v89m2               0/1     ContainerCreating   0          19m     <none>           k8s-master01           <none>           <none>

[root@k8s-master01 ~]# kubectl describe pods -n kube-system  coredns-5c98db65d4-dhv4
...ВПЪ№ВтЪд
root@k8s-master01 ~]# vim nginx.yaml
apiVersion: apps/v1
kind: Deployment
metadata:
name: nginx-deployment
spec:
replicas: 1
selector:
matchLabels:
app: nginx
template:
metadata:
labels:
app: nginx
spec:
containers:
- name: nginx
image: nginx:latest
ports:
- containerPort: 80
---
apiVersion: v1
kind: Service
metadata:
name: nginx-service
spec:
selector:
app: nginx
type: NodePort
ports:
- name: http
port: 80
targetPort: 80
[root@k8s-master01 ~]# kubectl apply -f nginx.yaml
[root@k8s-master01 ~]# watch kubectl get pod -A
NAMESPACE NAME READY STATUS RESTARTS AGE
default nginx-deployment-68c7f5464c-5722g 1/1 Running 0 30m
kube-system coredns-5c98db65d4-dhv45 1/1 Running 0 4h46m
kube-system coredns-5c98db65d4-nf2xb 1/1 Running 0 4h46m
kube-system etcd-k8s-master01.novalocal 1/1 Running 0 4h53m
kube-system kube-apiserver-k8s-master01.novalocal 1/1 Running 0 4h53m
kube-system kube-controller-manager-k8s-master01.novalocal 1/1 Running 0 4h53m
kube-system kube-flannel-ds-amd64-4whrn 1/1 Running 0 35m
kube-system kube-flannel-ds-amd64-sdhf9 1/1 Running 0 35m
kube-system kube-flannel-ds-amd64-xm267 1/1 Running 0 154m
kube-system kube-proxy-cmpjd 1/1 Running 0 4h54m
kube-system kube-proxy-qcwzl 1/1 Running 0 35m
kube-system kube-proxy-sj5cm 1/1 Running 0 35m
kube-system kube-scheduler-k8s-master01.novalocal 1/1 Running 0 4h53m
[root@k8s-master01 ~]# kubectl get pod nginx-deployment-68c7f5464c-5722g
Events:
Type Reason Age From Message
---- ------ ---- ---- -------
Normal Scheduled 31m default-scheduler Successfully assigned default/nginx-deployment-68c7f5464c-5722g to k8s-node02.novalocal
Normal Pulling 31m kubelet, k8s-node02.novalocal Pulling image "nginx:latest"
Normal Pulled 30m kubelet, k8s-node02.novalocal Successfully pulled image "nginx:latest"
Normal Created 30m kubelet, k8s-node02.novalocal Created container nginx
Normal Started 30m kubelet, k8s-node02.novalocal Started container nginx
[root@k8s-master01 ~]# kubectl get svc
NAME TYPE CLUSTER-IP EXTERNAL-IP PORT(S) AGE
kubernetes ClusterIP 10.96.0.1 <none> 443/TCP 4h55m
nginx-service NodePort 10.96.196.183 <none> 80:32750/TCP 31m
[root@k8s-master01 ~]# МћЯТЭМ фЏРРЦїПЩЗГЮвИњ
- ШєЮоЗЈе§ГЃМгдиЃЌЧыЕуЛїВщПД PDF ЭјвГАцБО: 2ЁЂKubeadm ВПЪ№АВзА.pdf
Harbor - ЦѓвЕМЖ Docker ЫНгаВжПт
/[root@harbor harbor]# vi harbor.cfg
## Configuration file of Harbor
#The IP address or hostname to access admin UI and registry service.
#DO NOT use localhost or 127.0.0.1, because Harbor needs to be accessed by external clients.
hostname = 172.129.78.187
// жЛаоИФетИіМДПЩ ЪЙгУ http ВЛЪЕгУжЄЪщ
[root@harbor harbor]# ./install.sh
...
[Step 4]: starting Harbor ...
Creating network "harbor_harbor" with the default driver
Creating harbor-log ... done
Creating harbor-adminserver ... done
Creating registry ... done
Creating harbor-db ... done
Creating harbor-ui ... done
Creating harbor-jobservice ... done
Creating nginx ... done
? ----Harbor has been installed and started successfully.----
Now you should be able to visit the admin portal at http://172.129.78.187.
For more details, please visit https://github.com/vmware/harbor .
Harbor Login
User: admin
Pass: Harbor12345ХфжУ HTTP ВжПт
вЊдк Docker жаЪЙгУ HTTP ВжПтЃЌашвЊдк daemon.json ЮФМўжаНјааХфжУЁЃвдЯТЪЧЪЕЯжЗНЗЈЃК
- ЪзЯШЃЌДђПЊжеЖЫВЂЪфШывдЯТУќСюЃК
vi /etc/docker/daemon.jsonЦфжаЃЌhttp://example.com:5000 ЪЧФуЫљЪЙгУЕФ HTTP ВжПтЕФЕижЗЁЃ
- БЃДцВЂЭЫГіЮФМўЁЃ
- жиЦє Docker ЗўЮёЃК
systemctl restart dockerЯждкЃЌФувбОГЩЙІЕиХфжУСЫ Docker ЪЙгУ HTTP ВжПтЁЃПЩвдЪЙгУвдЯТУќСюМьВщЪЧЗёвбГЩЙІХфжУЃК
docker infoдкЪфГіЕФНсЙћжаЃЌгІИУФмПДЕНХфжУЕФ HTTP ВжПтЕижЗЁЃ
[root@k8s-node02 ~]# vim /etc/docker/daemon.json
{
"exec-opts": ["native.cgroupdriver=systemd"],
"log-driver": "json-file",
"log-opts": {
"max-size": "100m"
},
"insecure-registries": ["http://172.129.78.187"]
}
[root@k8s-node02 ~]# systemctl restart docker
[root@k8s-node02 ~]# docker info
...
Insecure Registries:
172.129.78.187
127.0.0.0/8
...
[root@k8s-node02 ~]# docker login http://172.129.78.187
Username: admin
Password:
Error response from daemon: Get "http://172.129.78.187/v2/": unauthorized: authentication required
[root@k8s-node02 ~]# docker login http://172.129.78.187
Username: admin
Password:
WARNING! Your password will be stored unencrypted in /root/.docker/config.json.
Configure a credential helper to remove this warning. See
https://docs.docker.com/engine/reference/commandline/login/#credentials-store
Login Succeeded
[root@k8s-node02 ~]# docker pull hello-world
Using default tag: latest
latest: Pulling from library/hello-world
2db29710123e: Pull complete
Digest: sha256:4e83453afed1b4fa1a3500525091dbfca6ce1e66903fd4c01ff015dbcb1ba33e
Status: Downloaded newer image for hello-world:latest
docker.io/library/hello-world:latest
[root@k8s-node02 ~]# docker run hello-world
Hello from Docker!
This message shows that your installation appears to be working correctly.
To generate this message, Docker took the following steps:
1. The Docker client contacted the Docker daemon.
2. The Docker daemon pulled the "hello-world" image from the Docker Hub.
(amd64)
3. The Docker daemon created a new container from that image which runs the
executable that produces the output you are currently reading.
4. The Docker daemon streamed that output to the Docker client, which sent it
to your terminal.
To try something more ambitious, you can run an Ubuntu container with:
$ docker run -it ubuntu bash
Share images, automate workflows, and more with a free Docker ID:
https://hub.docker.com/
For more examples and ideas, visit:
https://docs.docker.com/get-started/
[root@k8s-node02 ~]# docker tag hello-world:latest 172.129.78.187/library/hello-world-local:latest
[root@k8s-node02 ~]# docker push 172.129.78.187/library/hello-world-local:latest
The push refers to repository [172.129.78.187/library/hello-world-local]
e07ee1baac5f: Pushed
latest: digest: sha256:f54a58bc1aac5ea1a25d796ae155dc228b3f0e11d046ae276b39c4bf2f13d8c4 size: 525
# дкЭјвГжаВщПДвбОПЩвдПДЕН
- ШєЮоЗЈе§ГЃМгдиЃЌЧыЕуЛїВщПД PDF ЭјвГАцБО: Harbor - ЦѓвЕМЖ Docker ЫНгаВжПт.pdf
БОЮФВЮгы?ЬкбЖдЦздУНЬхЗжЯэМЦЛЎЃЌЗжЯэздзїепИіШЫеОЕу/ВЉПЭЁЃ
дЪМЗЂБэЃК2023-04-22ЃЌШчгаЧжШЈЧыСЊЯЕ cloudcommunity@tencent.com ЩОГ§
БОЮФЗжЯэзд зїепИіШЫеОЕу/ВЉПЭ?ЧАЭљВщПД
ШчгаЧжШЈЃЌЧыСЊЯЕ cloudcommunity@tencent.com ЩОГ§ЁЃ
БОЮФВЮгы?ЬкбЖдЦздУНЬхЗжЯэМЦЛЎ? ЃЌЛЖгШШАЎаДзїЕФФувЛЦ№ВЮгыЃЁ
ЦРТл
ЕЧТМКѓВЮгыЦРТл
ЭЦМідФЖС
ФПТМ
ЯрЙиВњЦЗгыЗўЮё
ШнЦїЗўЮё
ЬкбЖдЦШнЦїЗўЮёЃЈTencent Kubernetes Engine, TKEЃЉЛљгкдЩњ kubernetes ЬсЙЉвдШнЦїЮЊКЫаФЕФЁЂИпЖШПЩРЉеЙЕФИпадФмШнЦїЙмРэЗўЮёЃЌИВИЧ ServerlessЁЂБпдЕМЦЫуЁЂЗжВМЪНдЦЕШЖржжвЕЮёВПЪ№ГЁОАЃЌвЕФкЪзДДЕЅИіМЏШКМцШнЖржжМЦЫуНкЕуЕФШнЦїзЪдДЙмРэФЃЪНЁЃЭЌЪБВњЦЗзїЮЊдЦдЩњ Finops СьЯШВМЕРепЃЌжїЕМПЊдДЯюФПCraneЃЌШЋУцжњСІПЭЛЇЪЕЯжзЪдДгХЛЏЁЂГЩБОПижЦЁЃ