【腾讯云Cloud Studio实战训练营】React 快速构建点餐页面+Python中秋拼图赏月小游戏
原创【腾讯云Cloud Studio实战训练营】React 快速构建点餐页面+Python中秋拼图赏月小游戏
原创
@toc
一、腾讯云 Cloud Studio 概述
1.1 腾讯云 Cloud Studio 简介
腾讯云 Cloud Studio 是腾讯公司推出的一款集成开发环境(IDE),为开发者提供了一个能够随时随地进行工作的平台,它融合了云端编译、运行、调试、发布等功能,极大地方便了开发者的工作流程。开发者可以在浏览器中轻松地编写、运行和调试代码,同时实现代码的自动保存、版本控制和协同开发等功能。腾讯云 Cloud Studio 支持多种编程语言和框架,包括 JavaScript、Python、Java、C++、Node.js 等,满足不同开发者的需求。
1.2 腾讯云 Cloud Studio 功能特点
- 云端开发:用户
无需安装本地开发环境,只需通过浏览器即可直接访问腾讯云 Cloud Studio,实现云端开发。 - 多种开发语言支持:腾讯云 Cloud Studio 支持多种编程语言,包括 Java、Python、Node.js、PHP 等,满足不同用户的需求。
- 高效团队协作:提供团队开发功能,支持多人协同编程,便于团队成员之间的协作与沟通。
- 智能代码补全:通过自然语言处理和机器学习技术,实现智能代码补全,提高编码效率。
- 实时调试与测试:具备实时调试和测试功能,开发者可以快速定位和解决问题,提高开发质量。
- 部署与发布:腾讯云 Cloud Studio 提供一键部署功能,用户可以将开发的应用程序快速部署到腾讯云服务器上,实现应用的发布。
- 多版本控制:支持 Git、SVN 等版本控制工具,便于团队进行代码管理和版本控制。
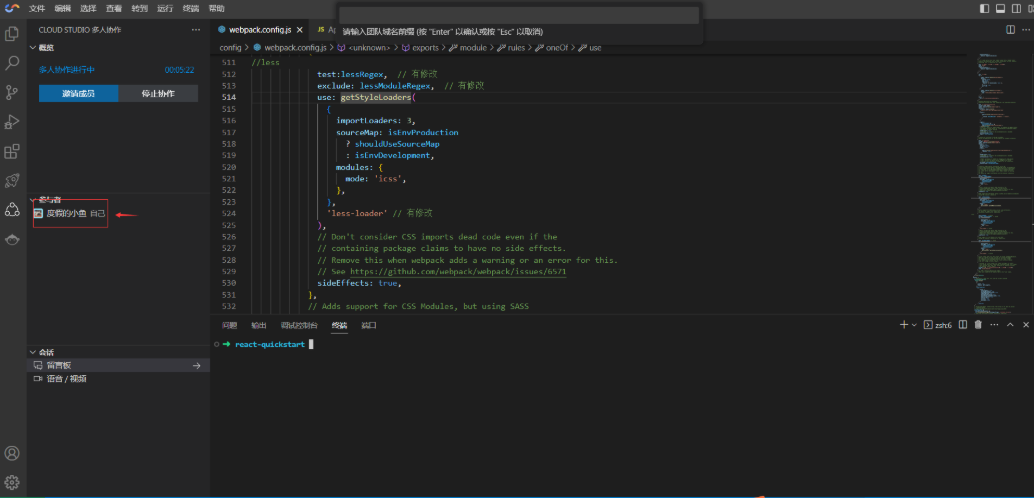
一键邀请多人协作
1.3 腾讯云 Cloud Studio 产品优势
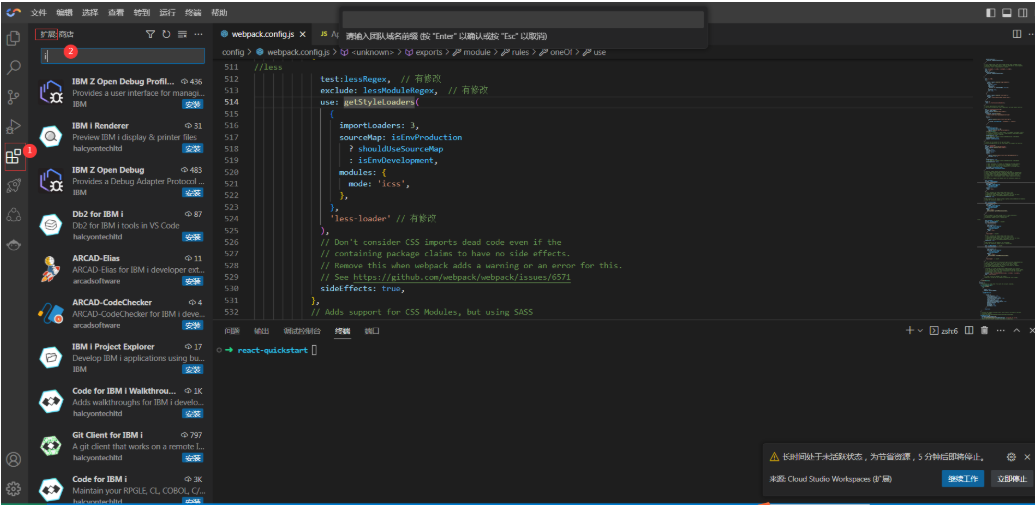
- 丰富的插件生态:腾讯云 Cloud Studio 拥有丰富的插件生态,支持各种第三方插件,帮助开发者快速扩展功能。
- 强大的技术支持:腾讯云作为国内领先的云计算服务提供商,为用户提供了强大的技术支持和服务保障。
- 易用性:腾讯云 Cloud Studio 界面简洁明了,操作简便,适合各类开发者使用。
- 安全性:腾讯云 Cloud Studio 采用了多重安全措施,确保用户数据的安全性和隐私保护。
插件丰富
二、Cloud Studio界面功能介绍
2.1 注册登录
Cloud Studio产品体验地址:https://www.cloudstudio.net/?utm=csdn
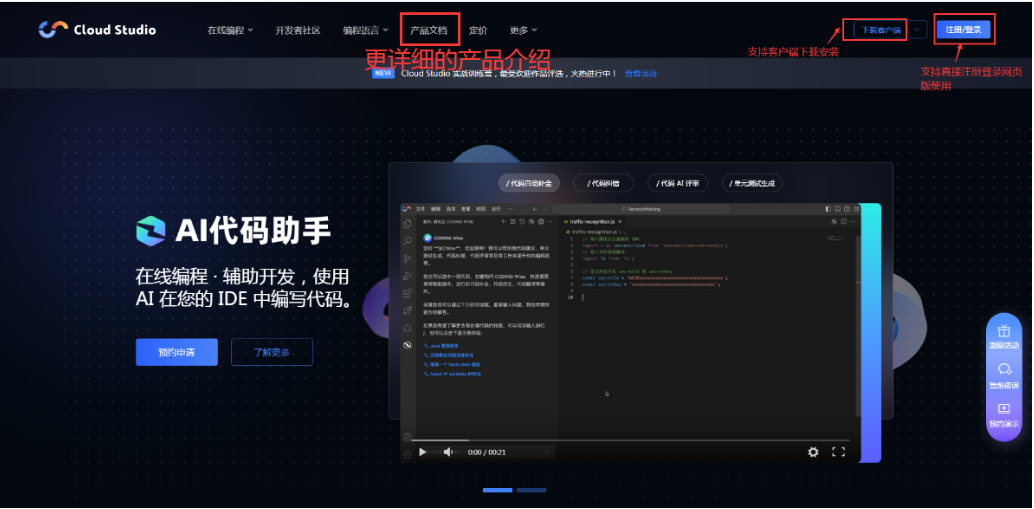
官方提供了 详细的文档
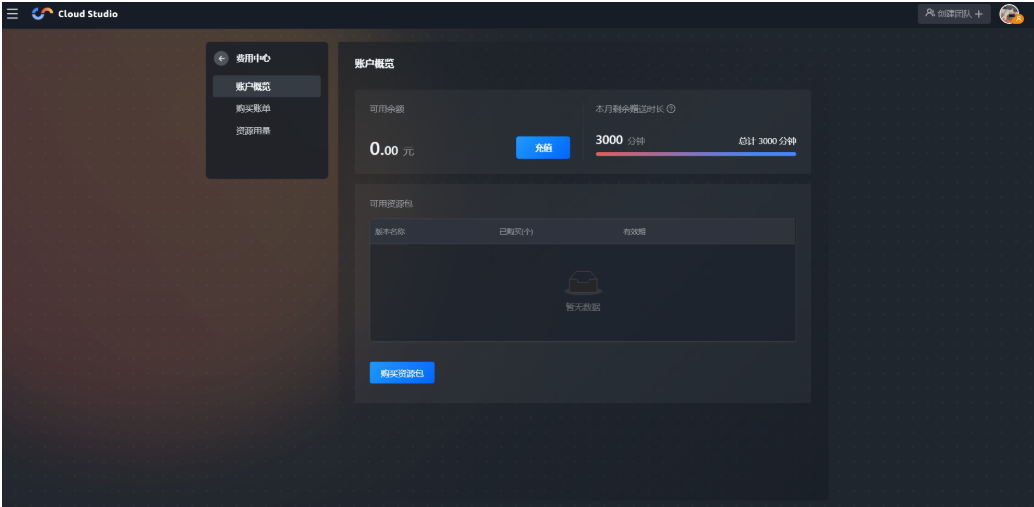
2.1.1 新注册用户有免费的3000分钟体验
头像-->费用中心-->账户概览
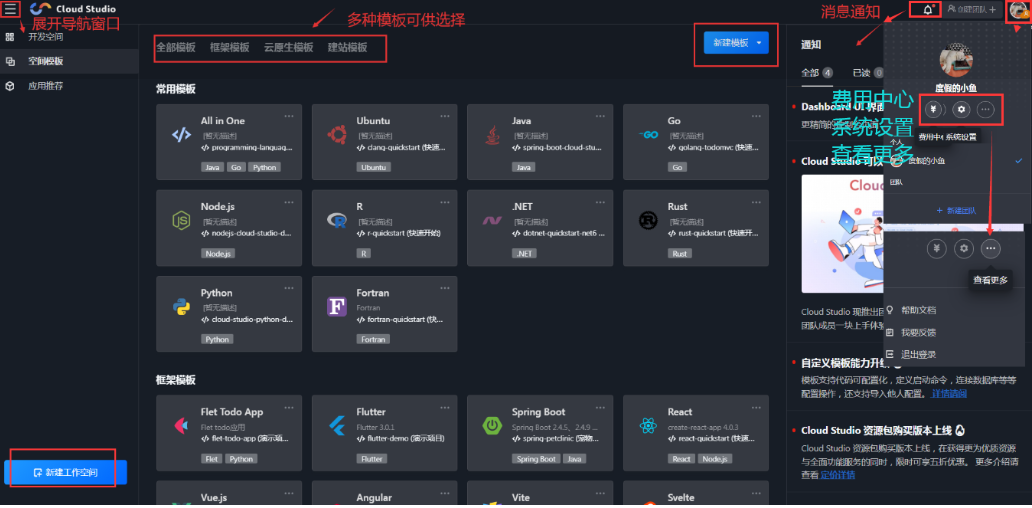
2.2 界面功能介绍
开发空间:
腾讯云 Cloud Studio 提供了一个在线的开发环境,开发者可以在其中创建和管理自己的代码、依赖项和配置。 开发空间是 Cloud Studio 中的核心概念,它包含了开发过程中所需的所有资源和环境。 开发空间可以
随时创建和删除,并且可以轻松地在不同设备之间同步。空间模板:
空间模板是 Cloud Studio 中提供的一种快速创建开发空间的工具。 通过选择不同的模板,开发者可以快速地创建适合自己的开发环境,无需手动配置。 空间模板包含了开发所需的依赖项、代码库和配置,使得开发者可以专注于编码和开发。
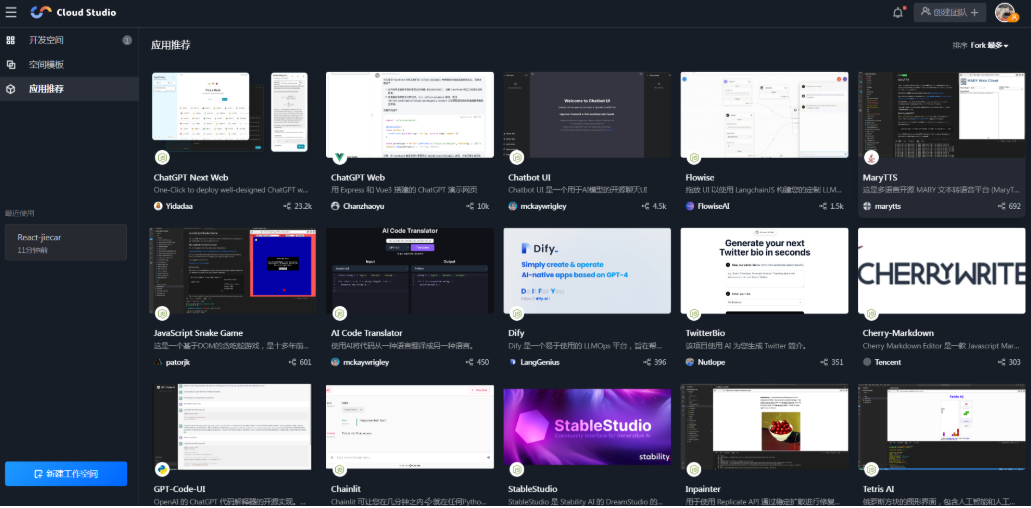
应用推荐:
腾讯云 Cloud Studio 还提供了一些应用推荐,这些应用是经过腾讯云团队筛选和测试的优质应用,可以帮助开发者提高开发效率。 应用推荐包括一些常用的开发工具、插件和库,如 Git、Node.js、Docker 等。 开发者可以根据自己的需求选择适合自己的应用,并直接在 Cloud Studio 中安装和使用。
2.2.1 空间模板
默认进来是空间模板界面
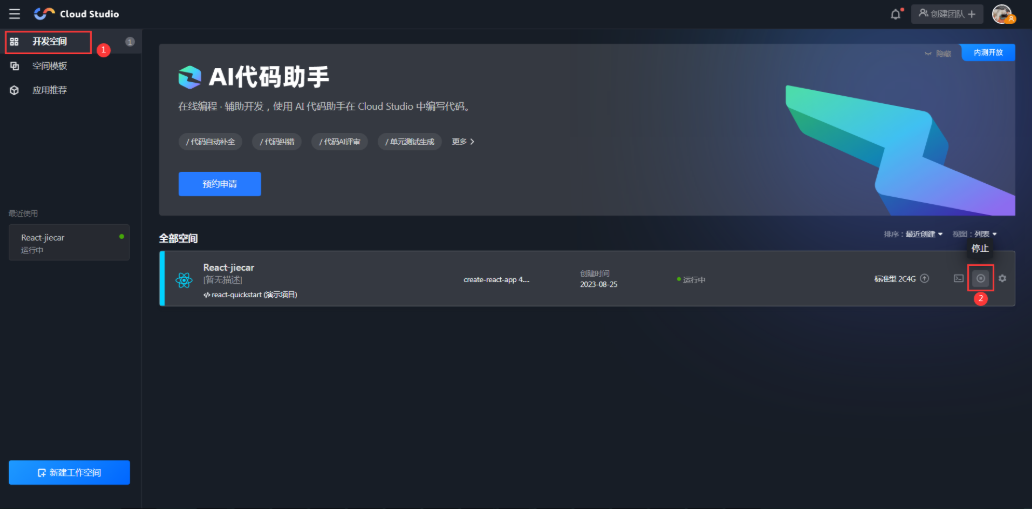
2.2.2 开发空间
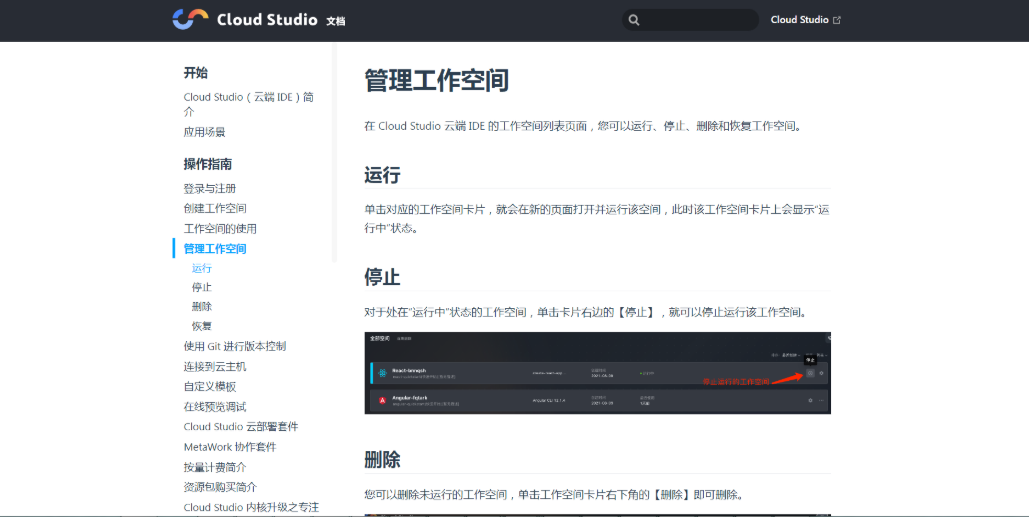
关闭空间
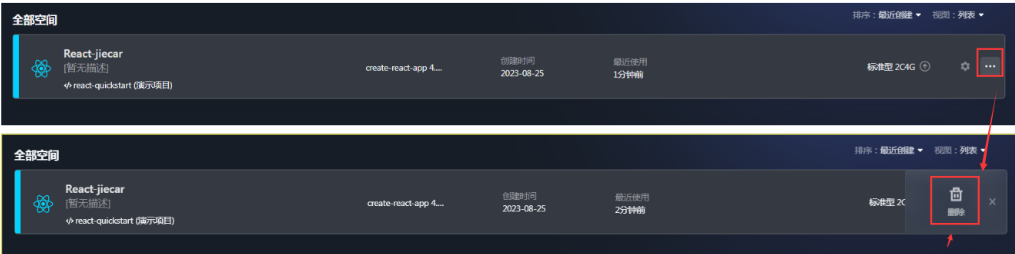
删除空间
...为什么不直接 展现删除按钮 哈哈
2.2.3 应用推荐
三、使用Cloud Studio快速构建React完成点餐H5页面还原
3.1 选择框架模板
第一步:找到React模板进行初始化操作
依次点击【空间模板】-->全部模板-->React
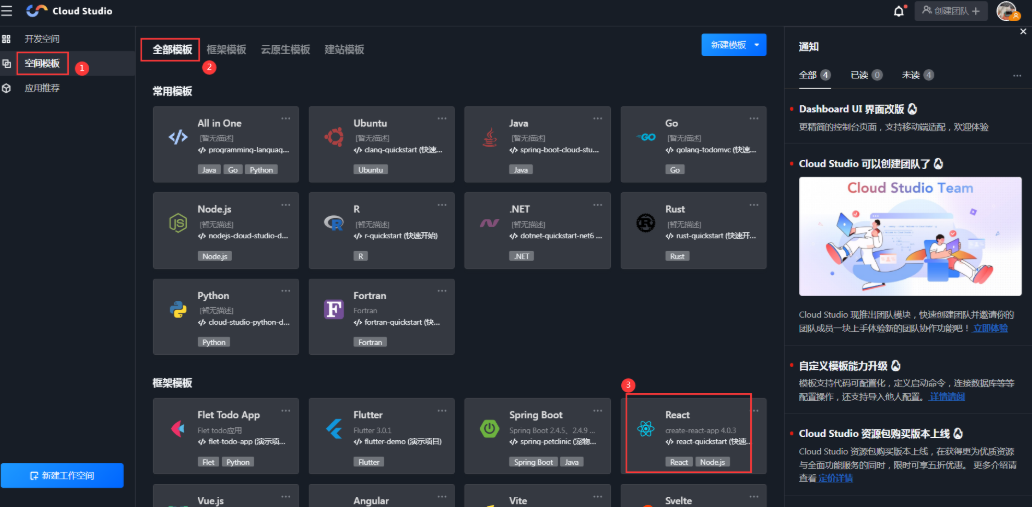
点完React 后等待初始化空间 加载完(大概不到3分钟)

初始工作空间后看整体页面操作很VSCode界面类似哈哈
第二步 打开终端命令 启动开发环境
依次点击【终端】-->新建终端
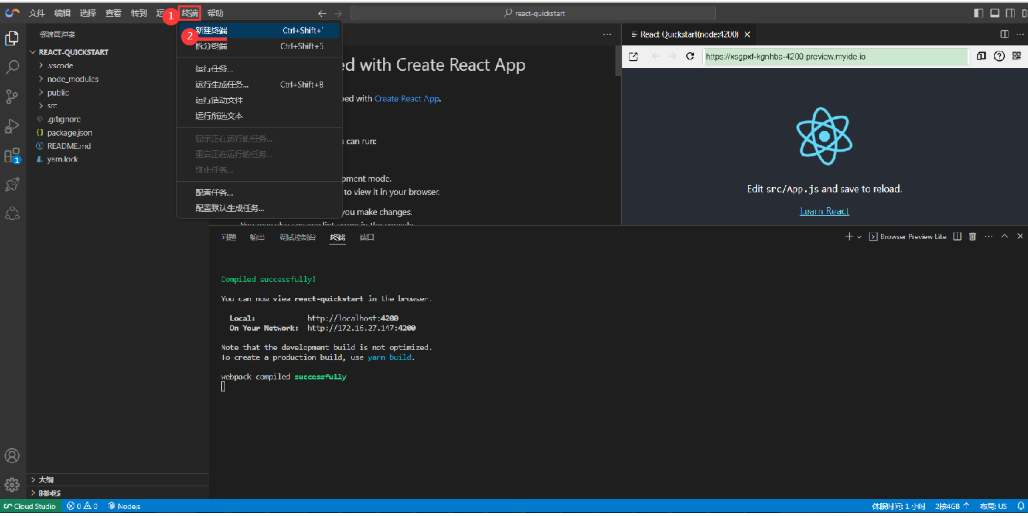
在终端命令窗口输入以下 命令 回车启动开发环境
cd ./ && set port=3000 && export PORT=3000 && yarn && yarn start --port=3000
3.2 安装依赖库
1. 安装 antd-mobile
终端执行以下命令
yarn add antd-mobile@^5.32.0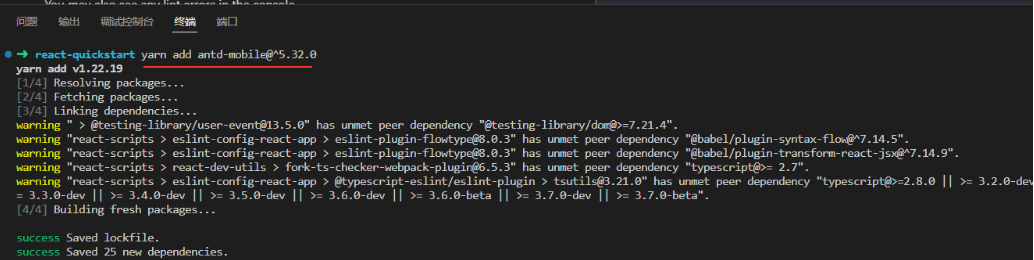
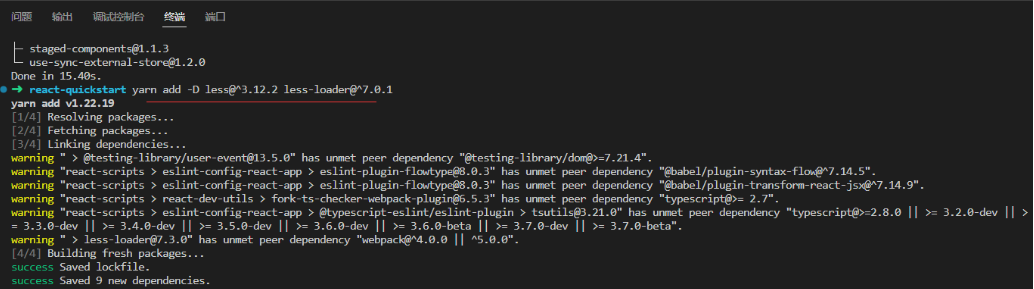
2. 安装less 和 less-loader :
终端执行以下命令
yarn add -D less@^3.12.2 less-loader@^7.0.1
修改webpack 配置文件:
终端执行以下命令
npm run eject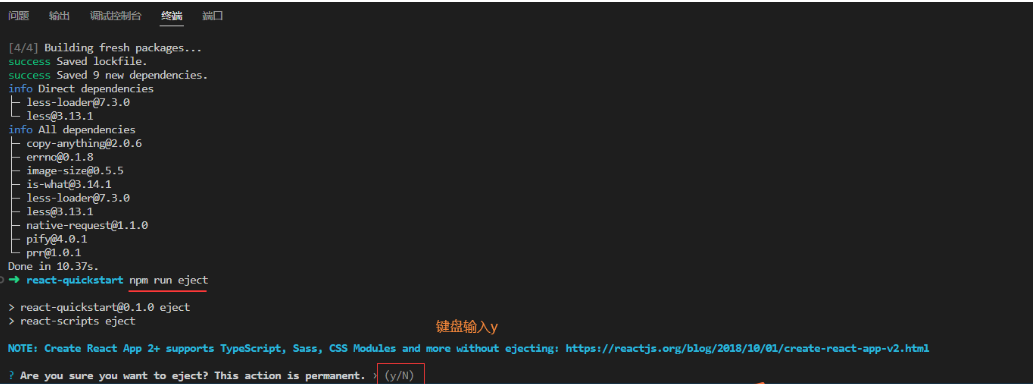
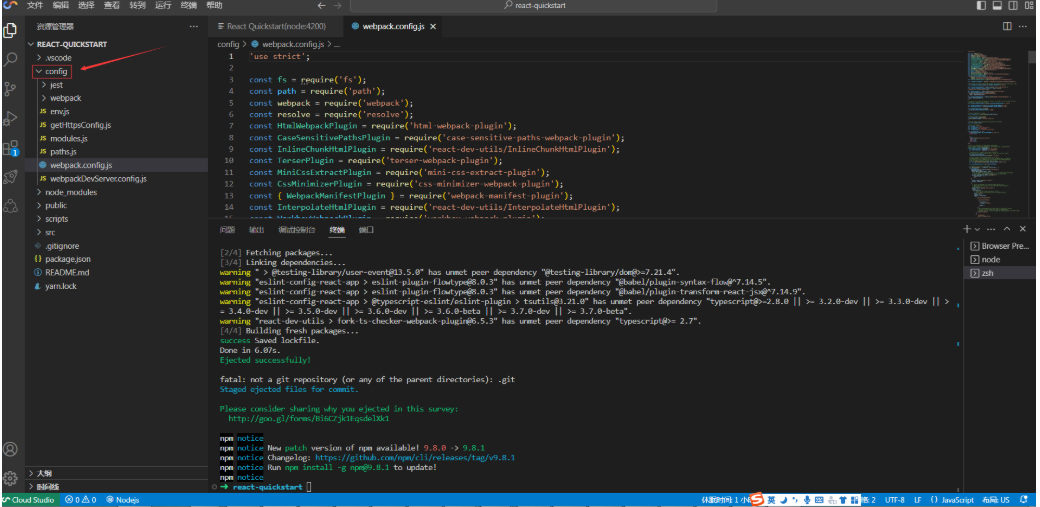
完成命令之后,项目根目录会出现一个config文件夹,里面是一些配置相关的脚本
3. 设置 css 相关的代码
1.config/webpack.config.js文件,找到// style files regexes行大概60多行,这块是设置 css 相关的代码。
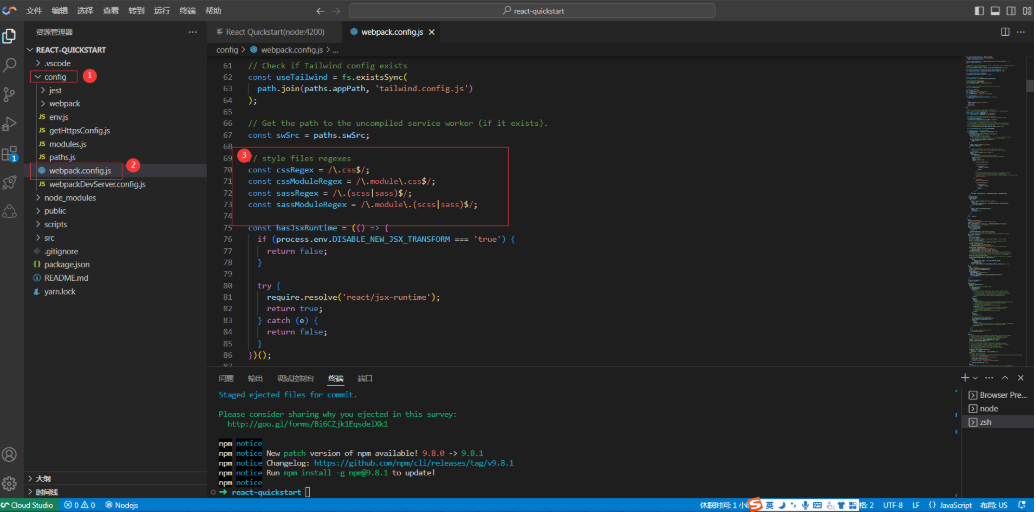
增加 Less 配置
// 新增加 Less 代码
const lessRegex = /\.(less)$/;
const lessModuleRegex = /\.module\.(less)$/;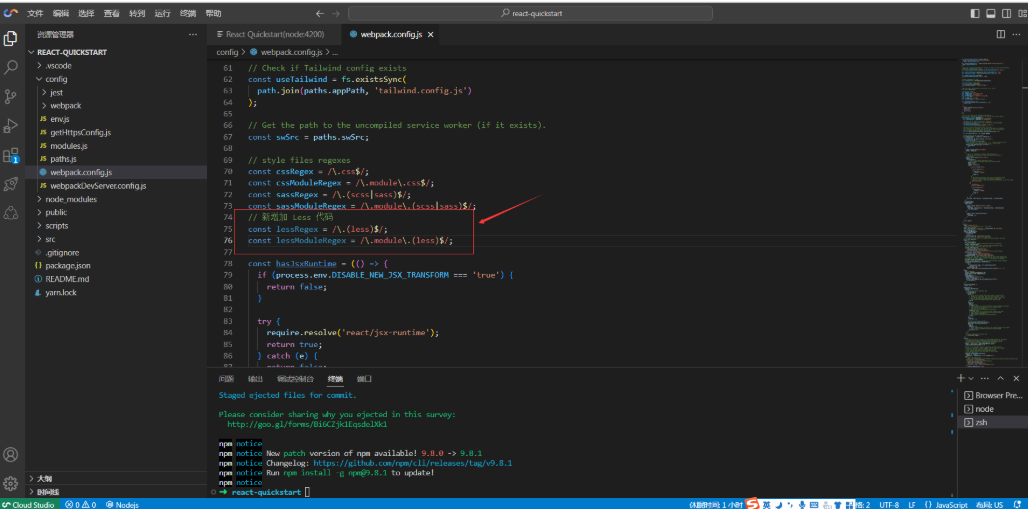
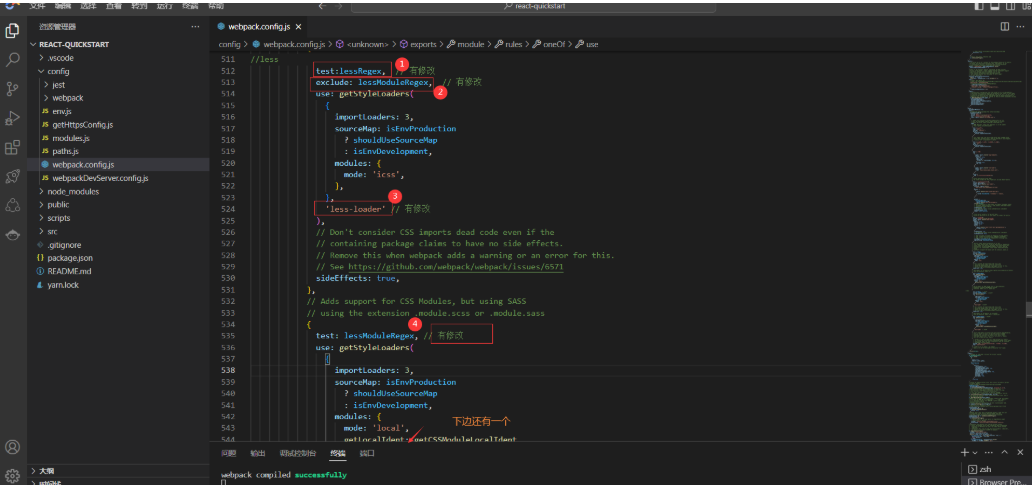
2.继续搜索sass,位置在 510 行左右,能够找到以下代码。将sass 修改为 less 一共修改5处。
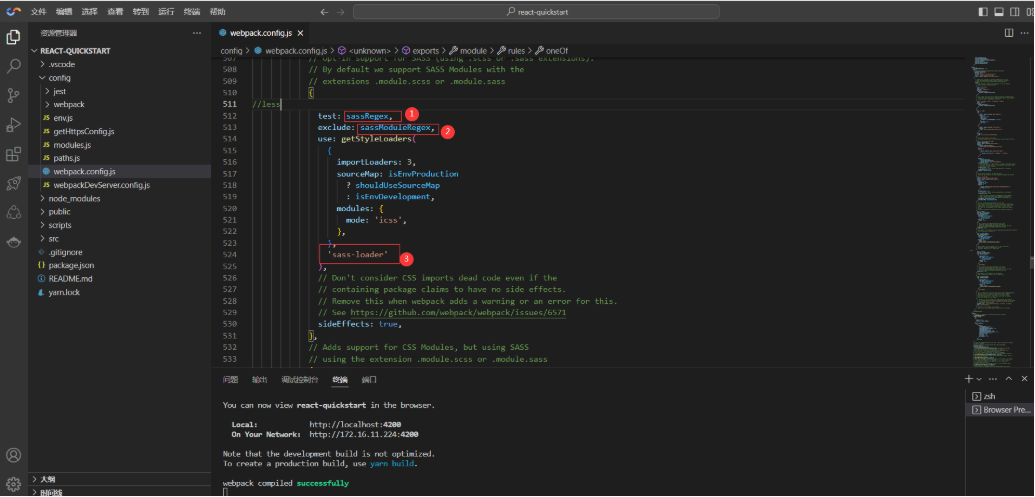
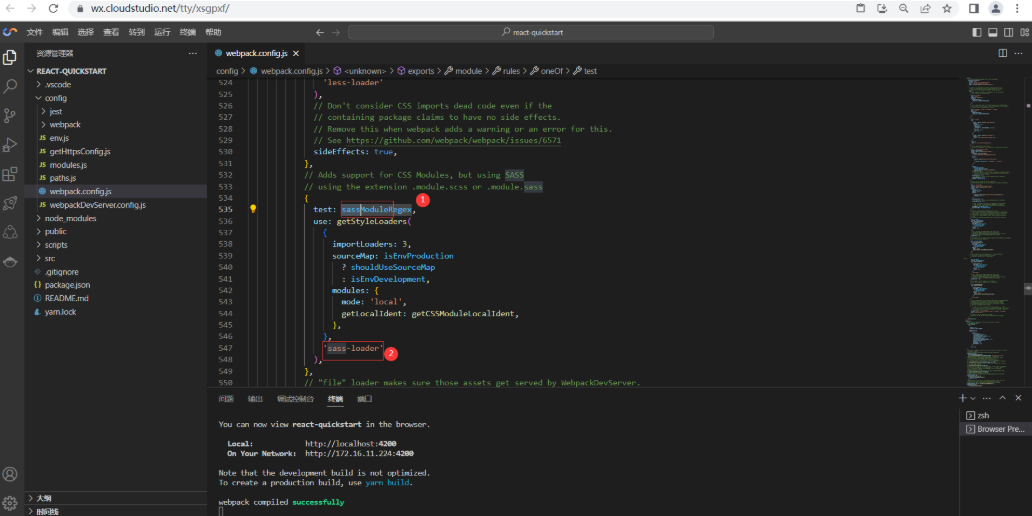
修改完成后如下图
4. 安装 normalize
终端执行以下命令
yarn add -D normalize.css@^8.0.1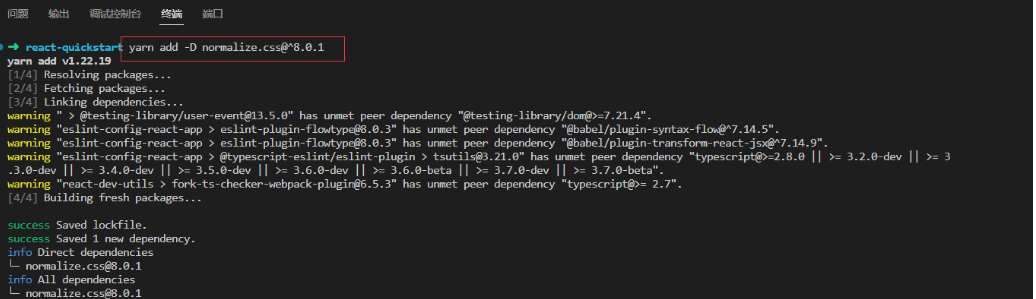
5. 上传素材
下载素材:img素材下载 解压 直接img文件夹拖到工作去src文件夹下即可
也可以在src 目录下新建文件夹img之后右击上传文件
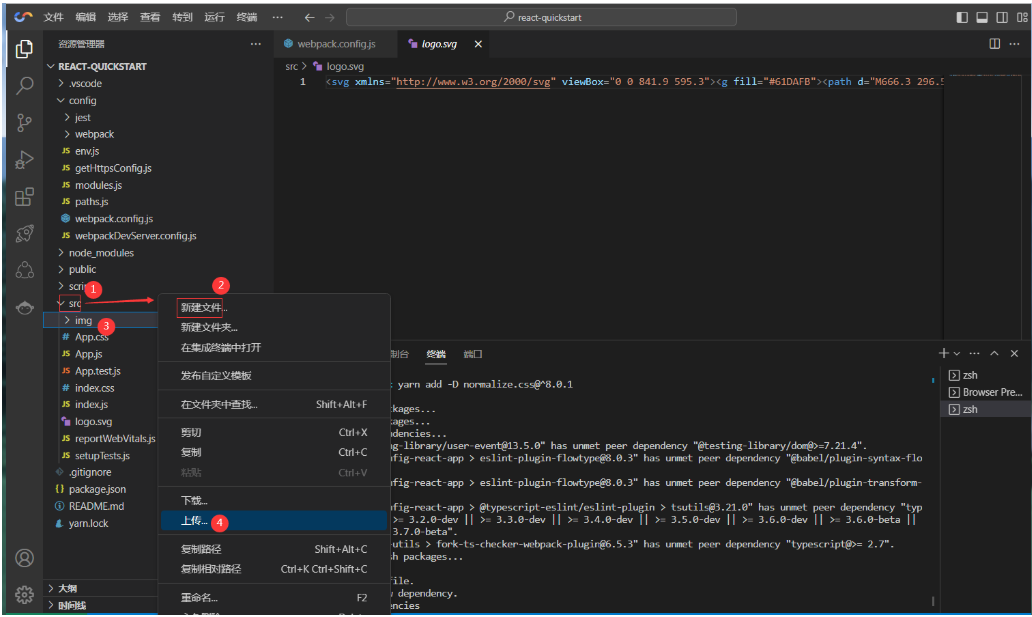
素材上传完成
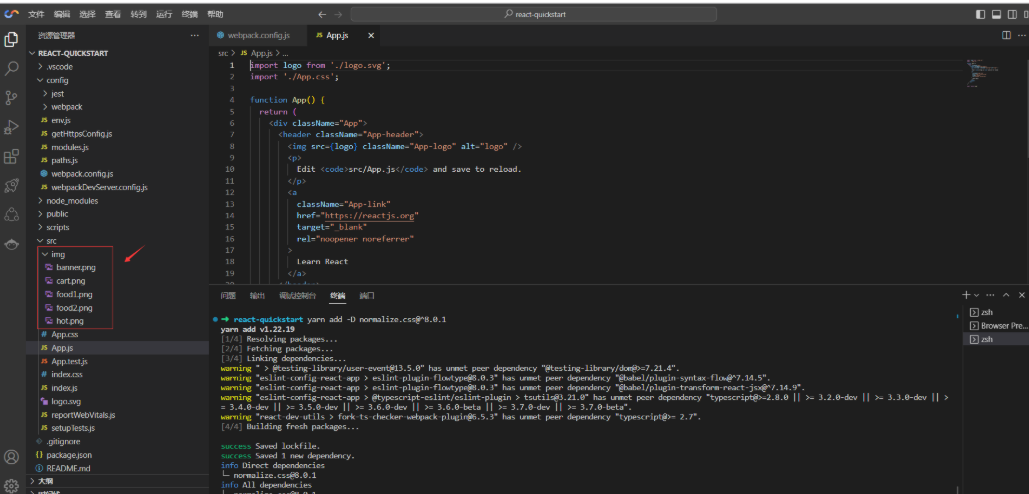
6.替换App.js主文件
import './App.css';
import React, { useState } from 'react'
import { NavBar, Toast, Swiper, SideBar, TabBar, Badge } from 'antd-mobile'
import {
  AppOutline,
  ExclamationShieldOutline,
  UnorderedListOutline,
  UserOutline,
} from 'antd-mobile-icons'
import BannerImg from './img/banner.png'
import HotImg from './img/hot.png'
import Food1Img from './img/food1.png'
import Food2Img from './img/food2.png'
import CartImg from './img/cart.png'
import './index.less'
import "normalize.css"

function App() {
  const [activeKey, setActiveKey] = useState('1')

  const tabbars = [
    {
      key: 'home',
      title: '点餐',
      icon: <AppOutline />,
    },
    {
      key: 'todo',
      title: '购物车',
      icon: <UnorderedListOutline />,
      badge: '5',
    },
    {
      key: 'sale',
      title: '餐牌预告',
      icon: <ExclamationShieldOutline />,
    },
    {
      key: '我的',
      title: '我的',
      icon: <UserOutline />,
      badge: Badge.dot,
    },
  ]

  const back = () =>
    Toast.show({
      content: '欢迎进入点餐系统',
      duration: 1000,
    })


  const items = ['', '', '', ''].map((color, index) => (
    <Swiper.Item key={index}>
      <img style={{
        width: '100%'
      }} src={ BannerImg }></img>
    </Swiper.Item>
  ))

  const tabs =  [
    { key: '1', title: '热销' },
    { key: '2', title: '套餐' },
    { key: '3', title: '米饭' },
    { key: '4', title: '烧菜' },
    { key: '5', title: '汤' },
    { key: '6', title: '主食' },
    { key: '7', title: '饮料' },
  ]

  const productName = [
    '小炒黄牛肉',
    '芹菜肉丝炒香干',
    '番茄炒鸡蛋',
    '鸡汤',
    '酸菜鱼',
    '水煮肉片',
    '土豆炒肉片',
    '孜然肉片',
    '宫保鸡丁',
    '麻辣豆腐',
    '香椿炒鸡蛋',
    '豆角炒肉'
  ]
  const productList = productName.map((item, key) => {
    return {
      name: item,
      img: key % 2 === 1 ? Food1Img : Food2Img
    }
  })

  return (
    <div className="App">
      <NavBar onBack={back} style={{
        background: '#F0F0F0',
        fontWeight: 'bold'
      }}>点餐</NavBar>

      <div className='head-card'>
        <Swiper
          style={{
            '--border-radius': '8px',
          }}
          autoplay
          defaultIndex={1}
        >
          {items}
        </Swiper>
      </div>

      <div className='product-box'>
        <SideBar activeKey={activeKey} onChange={setActiveKey}>
          {tabs.map(item => (
            <SideBar.Item key={item.key} title={
              item.key === '1' ? <div>
              <div className='flex-center'>
                <img style={{
                  display: 'block',
                  width: '16px',
                  marginRight: '5px'
                }} src={ HotImg }></img>
                <div>{ item.title }</div>
              </div>
            </div> : item.title
            } />
          ))}
        </SideBar>
        <div className='product-right'>
          <div className='product-title'>热销</div>
          <div className='product-list'>
            {
              productList.map((item, key) => {
                return (
                  <div className='product-item'>
                    <div className='product-item-left'>
                      <img style={{
                        display: 'block',
                        width: '76px',
                        marginRight: '5px'
                      }} src={ item.img }></img>
                      <div className='product-item-left-info'>
                        <div>
                          <div className='product-item-left-info-name'>{ item.name }</div>
                          <div className='product-item-left-info-number'>月售{key + 1}0 赞{key * 5}</div>
                        </div>
                        <div className='product-item-left-info-price'>?10</div>
                      </div>
                    </div>
                    <div className="cart">
                      <img style={{
                        display: 'block',
                        width: '30px',
                        marginRight: '5px'
                      }} src={ CartImg } onClick = { () =>
                        Toast.show({
                          content: '添加购物车成功'
                        }) }></img>
                    </div>
                  </div>
                )
              })
            }
          </div>
        </div>
      </div>

      <TabBar>
        {tabbars.map(item => (
          <TabBar.Item
            key={item.key}
            icon={item.icon}
            title={item.title}
            badge={item.badge}
          />
        ))}
      </TabBar>
    </div>
  );
}

export default App;
在 src 目录下,创建一个index.less 文件,将以下less 相关的代码复制到该文件中即可。
.head-card {
  padding: 10px 20px;
  box-sizing: border-box;
}

.flex-center {
  display: flex;
  align-items: center;
}

.product-box {
  display: flex;
  align-items: center;
  width: 100%;
  height: calc(100vh - 45px - 130px - 50px);
}

.product-right {
  flex: 1;
  height: 100%;
}

.product-title {
  font-family: PingFangSC-Regular;
  font-size: 14px;
  color: #000000;
  text-align: left;
  padding-bottom: 10px;
}

.product-list {
  height: calc(100% - 24px);
  overflow-y: auto;
}

.product-item {
  position: relative;
  width: 100%;
  display: flex;
  align-items: center;
  justify-content: space-between;
  padding-left: 10px;
  box-sizing: border-box;
  margin-bottom: 10px;
  &-left {
    display: flex;
    &-info {
      padding-left: 3px;
      box-sizing: border-box;
      display: flex;
      flex-direction: column;
      justify-content: space-between;
      &-name {
        font-family: PingFangSC-Regular;
        font-size: 14px;
        color: #000000;
        text-align: left;
      }
      &-number {
        padding-top: 3px;
        font-family: PingFangSC-Regular;
        font-size: 11px;
        color: #787878;
        text-align: left;
      }
      &-price {
        font-family: PingFangSC-Regular;
        font-size: 18px;
        color: #FF1800;
        text-align: left;
      }
    }
  }
}

.cart {
  position: absolute;
  right: 10px;
  bottom: 0;
}
3.3 项目启动预览
完成以上内容后 在终端输入以下命令 启动项目
yarn start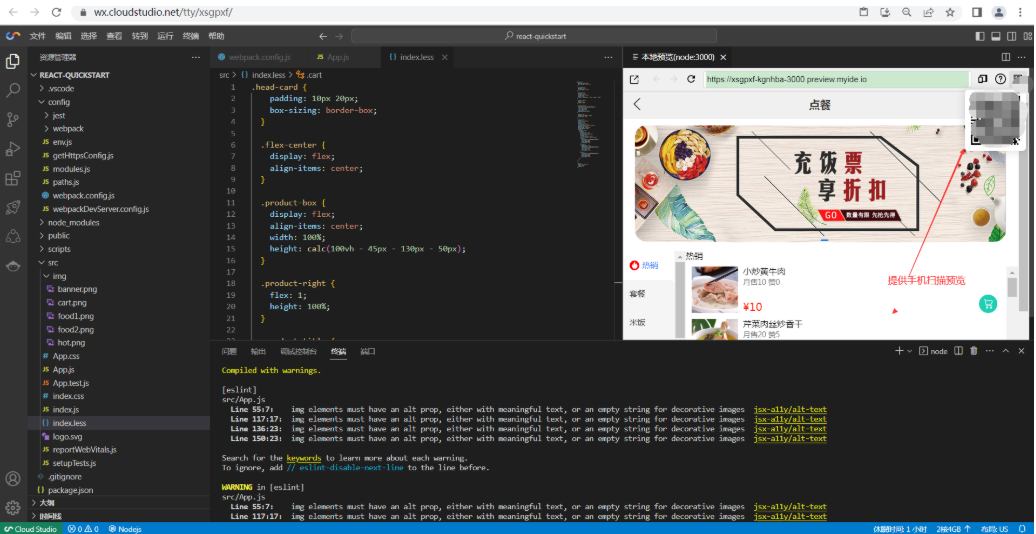
<font color=blue>这样我们的项目就算完成了,只需要安装几个库就可以快速的构建一个项目。</font>
四、使用Cloud Studio快速构建Python拼图游戏
4.1 选择框架模板
第一步:找到Python模板进行初始化操作
依次点击【空间模板】-->全部模板-->Python
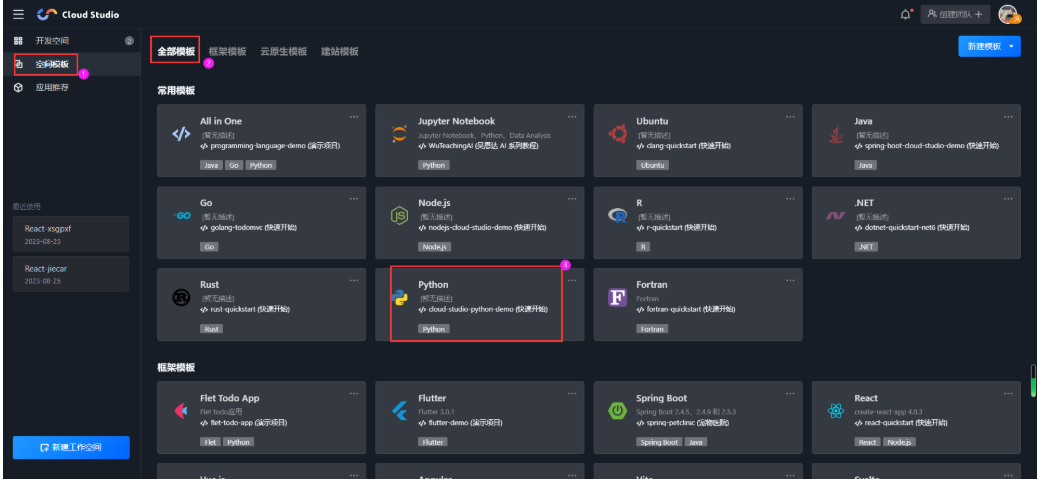
点完Python 后等待初始化空间 加载完(大概不到3分钟)
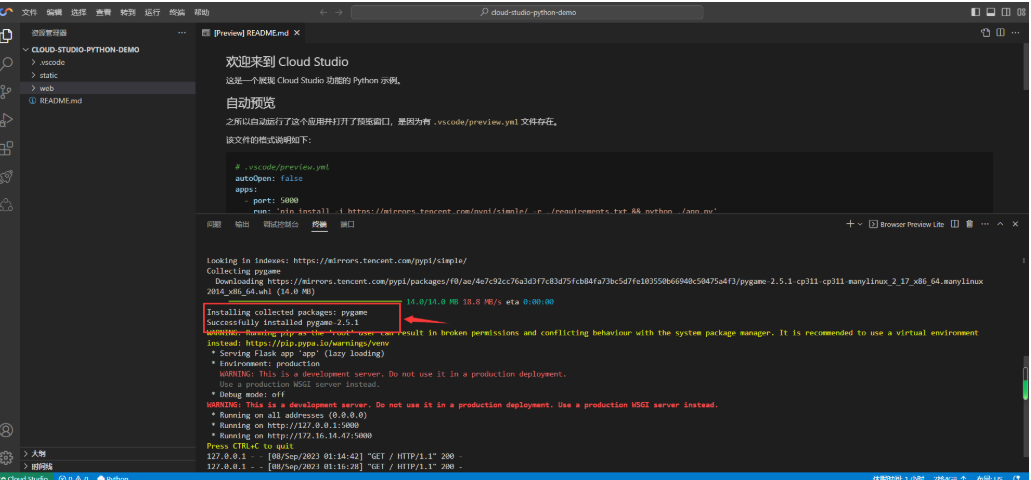
可以看到空间初始化完成后自动构建安装了 Pygame Pygame是一个专门用来开发游戏的 Python 模块
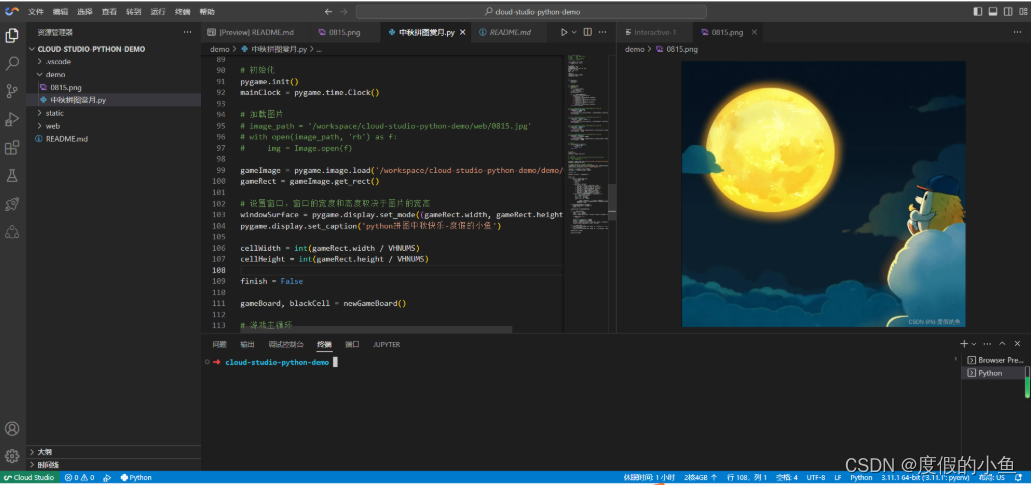
4.2 新建demo 文件夹->新建中秋拼图赏月.py 文件;直接拖图片到demo文件下

源码
# -*- coding: utf-8 -*-
# @Time     : 2023-09-08 14:03
# @Author   : hyh
# @File     : 中秋拼图赏月.py
# @Software : PyCharm

import pygame, sys, random
from pygame.locals import *

# 一些常量
WINDOWWIDTH = 500
WINDOWHEIGHT = 500
BACKGROUNDCOLOR = (255, 255, 255)
BLUE = (0, 0, 255)
BLACK = (0, 0, 0)
FPS = 40

VHNUMS = 3
CELLNUMS = VHNUMS * VHNUMS
MAXRANDTIME = 100


# 退出
def terminate():
    pygame.quit()
    sys.exit()


# 随机生成游戏盘面
def newGameBoard():
    board = []
    for i in range(CELLNUMS):
        board.append(i)
    blackCell = CELLNUMS - 1
    board[blackCell] = -1

    for i in range(MAXRANDTIME):
        direction = random.randint(0, 3)
        if (direction == 0):
            blackCell = moveLeft(board, blackCell)
        elif (direction == 1):
            blackCell = moveRight(board, blackCell)
        elif (direction == 2):
            blackCell = moveUp(board, blackCell)
        elif (direction == 3):
            blackCell = moveDown(board, blackCell)
    return board, blackCell


# 若空白图像块不在最左边,则将空白块左边的块移动到空白块位置
def moveRight(board, blackCell):
    if blackCell % VHNUMS == 0:
        return blackCell
    board[blackCell - 1], board[blackCell] = board[blackCell], board[blackCell - 1]
    return blackCell - 1


# 若空白图像块不在最右边,则将空白块右边的块移动到空白块位置
def moveLeft(board, blackCell):
    if blackCell % VHNUMS == VHNUMS - 1:
        return blackCell
    board[blackCell + 1], board[blackCell] = board[blackCell], board[blackCell + 1]
    return blackCell + 1


# 若空白图像块不在最上边,则将空白块上边的块移动到空白块位置
def moveDown(board, blackCell):
    if blackCell < VHNUMS:
        return blackCell
    board[blackCell - VHNUMS], board[blackCell] = board[blackCell], board[blackCell - VHNUMS]
    return blackCell - VHNUMS


# 若空白图像块不在最下边,则将空白块下边的块移动到空白块位置
def moveUp(board, blackCell):
    if blackCell >= CELLNUMS - VHNUMS:
        return blackCell
    board[blackCell + VHNUMS], board[blackCell] = board[blackCell], board[blackCell + VHNUMS]
    return blackCell + VHNUMS


# 是否完成
def isFinished(board, blackCell):
    for i in range(CELLNUMS - 1):
        if board[i] != i:
            return False
    return True


# 初始化
pygame.init()
mainClock = pygame.time.Clock()

# 加载图片
gameImage = pygame.image.load('/workspace/cloud-studio-python-demo/demo/0815.jpg')
gameRect = gameImage.get_rect()

# 设置窗口,窗口的宽度和高度取决于图片的宽高
windowSurface = pygame.display.set_mode((gameRect.width, gameRect.height))
pygame.display.set_caption('python拼图中秋快乐-度假的鱼')

cellWidth = int(gameRect.width / VHNUMS)
cellHeight = int(gameRect.height / VHNUMS)

finish = False

gameBoard, blackCell = newGameBoard()

# 游戏主循环
while True:
    for event in pygame.event.get():
        if event.type == QUIT:
            terminate()
        if finish:
            continue
        if event.type == KEYDOWN:
            if event.key == K_LEFT or event.key == ord('a'):
                blackCell = moveLeft(gameBoard, blackCell)
            if event.key == K_RIGHT or event.key == ord('d'):
                blackCell = moveRight(gameBoard, blackCell)
            if event.key == K_UP or event.key == ord('w'):
                blackCell = moveUp(gameBoard, blackCell)
            if event.key == K_DOWN or event.key == ord('s'):
                blackCell = moveDown(gameBoard, blackCell)
        if event.type == MOUSEBUTTONDOWN and event.button == 1:
            x, y = pygame.mouse.get_pos()
            col = int(x / cellWidth)
            row = int(y / cellHeight)
            index = col + row * VHNUMS
            if (
                    index == blackCell - 1 or index == blackCell + 1 or index == blackCell - VHNUMS or index == blackCell + VHNUMS):
                gameBoard[blackCell], gameBoard[index] = gameBoard[index], gameBoard[blackCell]
                blackCell = index

    if (isFinished(gameBoard, blackCell)):
        gameBoard[blackCell] = CELLNUMS - 1
        finish = True

    windowSurface.fill(BACKGROUNDCOLOR)

    for i in range(CELLNUMS):
        rowDst = int(i / VHNUMS)
        colDst = int(i % VHNUMS)
        rectDst = pygame.Rect(colDst * cellWidth, rowDst * cellHeight, cellWidth, cellHeight)

        if gameBoard[i] == -1:
            continue

        rowArea = int(gameBoard[i] / VHNUMS)
        colArea = int(gameBoard[i] % VHNUMS)
        rectArea = pygame.Rect(colArea * cellWidth, rowArea * cellHeight, cellWidth, cellHeight)
        windowSurface.blit(gameImage, rectDst, rectArea)

    for i in range(VHNUMS + 1):
        pygame.draw.line(windowSurface, BLACK, (i * cellWidth, 0), (i * cellWidth, gameRect.height))
    for i in range(VHNUMS + 1):
        pygame.draw.line(windowSurface, BLACK, (0, i * cellHeight), (gameRect.width, i * cellHeight))

    pygame.display.update()

    mainClock.tick(FPS)
4.3 点击运行
五、腾讯云 Cloud Studio 与其他云开发工具对比分析
5.1 Cloud Studio 与 GitHub Desktop 对比分析
腾讯云 Cloud Studio 和 GitHub Desktop 都是云端开发工具,提供了一站式的代码编辑和项目管理功能。虽然它们的功能相似,但在一些方面也存在差异。
功能对比
- 腾讯云 Cloud Studio:该工具提供了全面的开发环境,包括代码编辑、编译、调试、部署等功能。它支持多种编程语言和框架,如 Java、Python、Node.js 等。此外,Cloud Studio 还提供了版本控制、团队协作、容器化开发等高级功能。
- GitHub Desktop:该工具主要面向 Git 项目管理,提供了图形化界面来操作 Git 仓库。它支持代码的提交、推送、拉取等操作,并可以与 GitHub 网站进行同步。GitHub Desktop 也提供了一些基本的代码编辑和项目管理功能。
用户体验对比
- 腾讯云 Cloud Studio:该工具采用了类似于本地 IDE 的设计风格,用户界面较为复杂。但是,它提供了丰富的自定义选项,可以根据个人习惯进行配置。此外,Cloud Studio 还支持快捷键操作,提高了开发效率。
- GitHub Desktop:该工具的用户界面相对简洁,易于上手。它提供了直观的图形化界面,使得 Git 操作变得容易。GitHub Desktop 也支持自定义设置,但相对于 Cloud Studio 来说功能较少。
5.2 Cloud Studio 与 Jenkins 对比分析
腾讯云 Cloud Studio 和 Jenkins 都是用于构建、测试和部署应用程序的开发工具。尽管它们都能够自动化构建和测试流程,但在使用方式和目标用户上存在一些差异。
功能对比
- 腾讯云 Cloud Studio:Cloud Studio 主要面向开发者,提供了一站式的代码编辑和项目管理功能。它集成了常用的开发工具、依赖库和云服务,使得开发者可以快速构建和部署应用程序。此外,Cloud Studio 还提供了自动化测试和持续集成功能,方便开发者进行代码的质量控制和版本控制。
- Jenkins:Jenkins 是一个独立的开源平台,主要用于自动化构建、测试和部署任务。它可以与多个工具和平台集成,支持多种编程语言和操作系统。Jenkins 提供了一个强大的界面来配置和管理构建任务,同时也提供了丰富的插件生态系统,用户可以根据需要扩展其功能。
用户体验对比
- 腾讯云 Cloud Studio:Cloud Studio 的用户界面相对简洁,易于上手。它提供了直观的图形化界面和丰富的预设配置选项,使得开发者可以快速构建和部署应用程序。此外,Cloud Studio 还提供了实时预览和调试功能,方便开发者进行代码调试和优化。
- Jenkins:Jenkins 的用户界面相对复杂,需要一定的学习成本。但是,它提供了强大的配置和管理功能,使得用户可以灵活地定制构建任务和管理构建过程。Jenkins 也提供了丰富的插件生态系统,用户可以根据需要扩展其功能。
5.3 Cloud Studio 与 VSCode 扩展对比分析
腾讯云 Cloud Studio 和 VSCode 扩展都是基于云端的开发工具,提供了丰富的插件和扩展来支持多种编程语言和框架。尽管它们都可以作为本地 IDE 的扩展来使用,但在使用方式和功能上存在一些差异。
功能对比
- 腾讯云 Cloud Studio:Cloud Studio 提供了一站式的开发环境,包括代码编辑、编译、调试、部署等功能。它支持多种编程语言和框架,并集成了常用的开发工具、依赖库和云服务。此外,Cloud Studio 还提供了团队协作、版本控制、自动化测试等高级功能。
- VSCode 扩展:VSCode 扩展是基于微软开发的跨平台代码编辑器 VSCode 的插件。它支持多种编程语言和框架,并提供了丰富的插件生态系统来扩展其功能。VSCode 扩展还支持自定义配置和快捷键操作,提高了开发效率。
用户体验对比
- 腾讯云 Cloud Studio:Cloud Studio 的用户界面相对简洁,易于上手。它提供了一站式的开发环境,使得开发者可以快速开始开发工作。此外,Cloud Studio 还提供了实时预览和调试功能,方便开发者进行代码调试和优化。
- VSCode 扩展:VSCode 是一款轻量级的代码编辑器,用户界面相对简洁且易于上手。它支持自定义配置和快捷键操作,提高了开发效率。VSCode 扩展还提供了丰富的插件生态系统来扩展其功能,用户可以根据需要选择适合的插件来满足不同的开发需求。
六、总结与展望
6.1 总结
腾讯云Cloud Studio项目在多年的发展过程中,积累了丰富的实践经验和技术积累,为云开发领域提供了一套完整的解决方案。在产品设计、技术实现、服务质量等方面都具有出色的表现,展现了行业领先的技术水平。
6.2 展望腾讯云 Cloud Studio 的未来发展
腾讯云Cloud Studio项目的未来发展方向将继续聚焦于云计算、大数据、人工智能等领域,致力于为企业和开发者提供更加高效、便捷的云服务。同时,腾讯云Cloud Studio项目将不断优化产品功能,提高用户体验,以满足日益增长的市场需求。此外,腾讯云Cloud Studio项目还将与其他云服务商加强合作,共同推动云计算行业的持续创新与发展。
6.3 对云开发领域的启示与展望
腾讯云Cloud Studio项目在云开发领域的实践和发展,为其他云服务商提供了宝贵的借鉴经验。未来,云开发领域将持续保持高速增长,各大云服务商需要不断创新和优化产品,以满足市场对于云计算、大数据、人工智能等领域的旺盛需求。同时,云开发领域还将持续推动云服务商之间的竞争与合作,共同推动云计算行业的繁荣发展。
原创声明:本文系作者授权腾讯云开发者社区发表,未经许可,不得转载。
如有侵权,请联系 cloudcommunity@tencent.com 删除。
原创声明:本文系作者授权腾讯云开发者社区发表,未经许可,不得转载。
如有侵权,请联系 cloudcommunity@tencent.com 删除。