【Django | allauth】useprofile 用户模型扩展
原创【Django | allauth】useprofile 用户模型扩展
原创
计算机魔术师
发布于 2023-11-20 19:58:16
发布于 2023-11-20 19:58:16
在这里插入图片描述
??♂? 个人主页: @计算机魔术师
??? 作者简介:CSDN内容合伙人,全栈领域优质创作者。
? 推荐一款找工作神器网站: 牛客网??|笔试题库|面试经验|实习招聘内推
还没账户的小伙伴 速速点击链接跳转牛客网登录注册 开始刷爆题库,速速通关面试吧??♂?
该文章收录专栏
?[---【Django | 项目开发】从入门到上线 专栏---](https://blog.csdn.net/weixin_66526635/category_11905572.html)?
一、配置项目& 创建文件
创建应用users
python manage.pu statrapp userprofile在项目setting 文件加上app
...
    'allauth',
    'allauth.account',
    'allauth.socialaccount',
    "userprofile"
]- 注意!!!: 在 引入 扩展模型应用路由时 allauth应用 和 userprofile 谁在上方一定要考虑好,不然路由覆盖等会出现页面失效或者报错的情况!!(一般默认allauth在上方)
项目 urls.py
from django.contrib import admin
from django.urls import path, include

urlpatterns = [
    path('admin/', admin.site.urls),
    path('', userprofile.views.profile),  # 首页 则为信息页(当未登录 自动跳转到login页)
    path('accounts/', include('allauth.urls')),
    path('accounts/', include('userprofile.urls'))
]在userprofile应用的models.py 创建扩展模型(添加字段)
from django.contrib.auth.models import User
from django.db import models


# Create your models here.

class UserProfile(models.Model):
    user = models.OneToOneField(User, on_delete=models.CASCADE, related_name="profile")
    CAMPUS_CHOICE = (
        ('江湾', '江湾'),
        ('河滨', '河滨'),
        ('仙溪', '仙溪')
    )

    campus = models.CharField(choices=CAMPUS_CHOICE, max_length=10, verbose_name='campus', blank=True)
    tel = models.CharField(max_length=20, verbose_name='telephone', blank=True)

    class Meta:
        # admin 名称
        verbose_name = 'userProfile'
        db_table = 'userprofile'

    def __str__(self):
return '{}'.format(self.user.__str__())- 在
admin文件 注册UseProfile模型
from django.contrib import admin
from userprofile.models import UserProfile
# Register your models here.

# 原生注册
admin.site.register(UserProfile)- 三板斧启动服务器(现使用sqlite 数据库,后面再迁移至mysql)python manage.py makmigrations python manage.py migrate python manage.py runserver
- 注册成功
用下建立文件
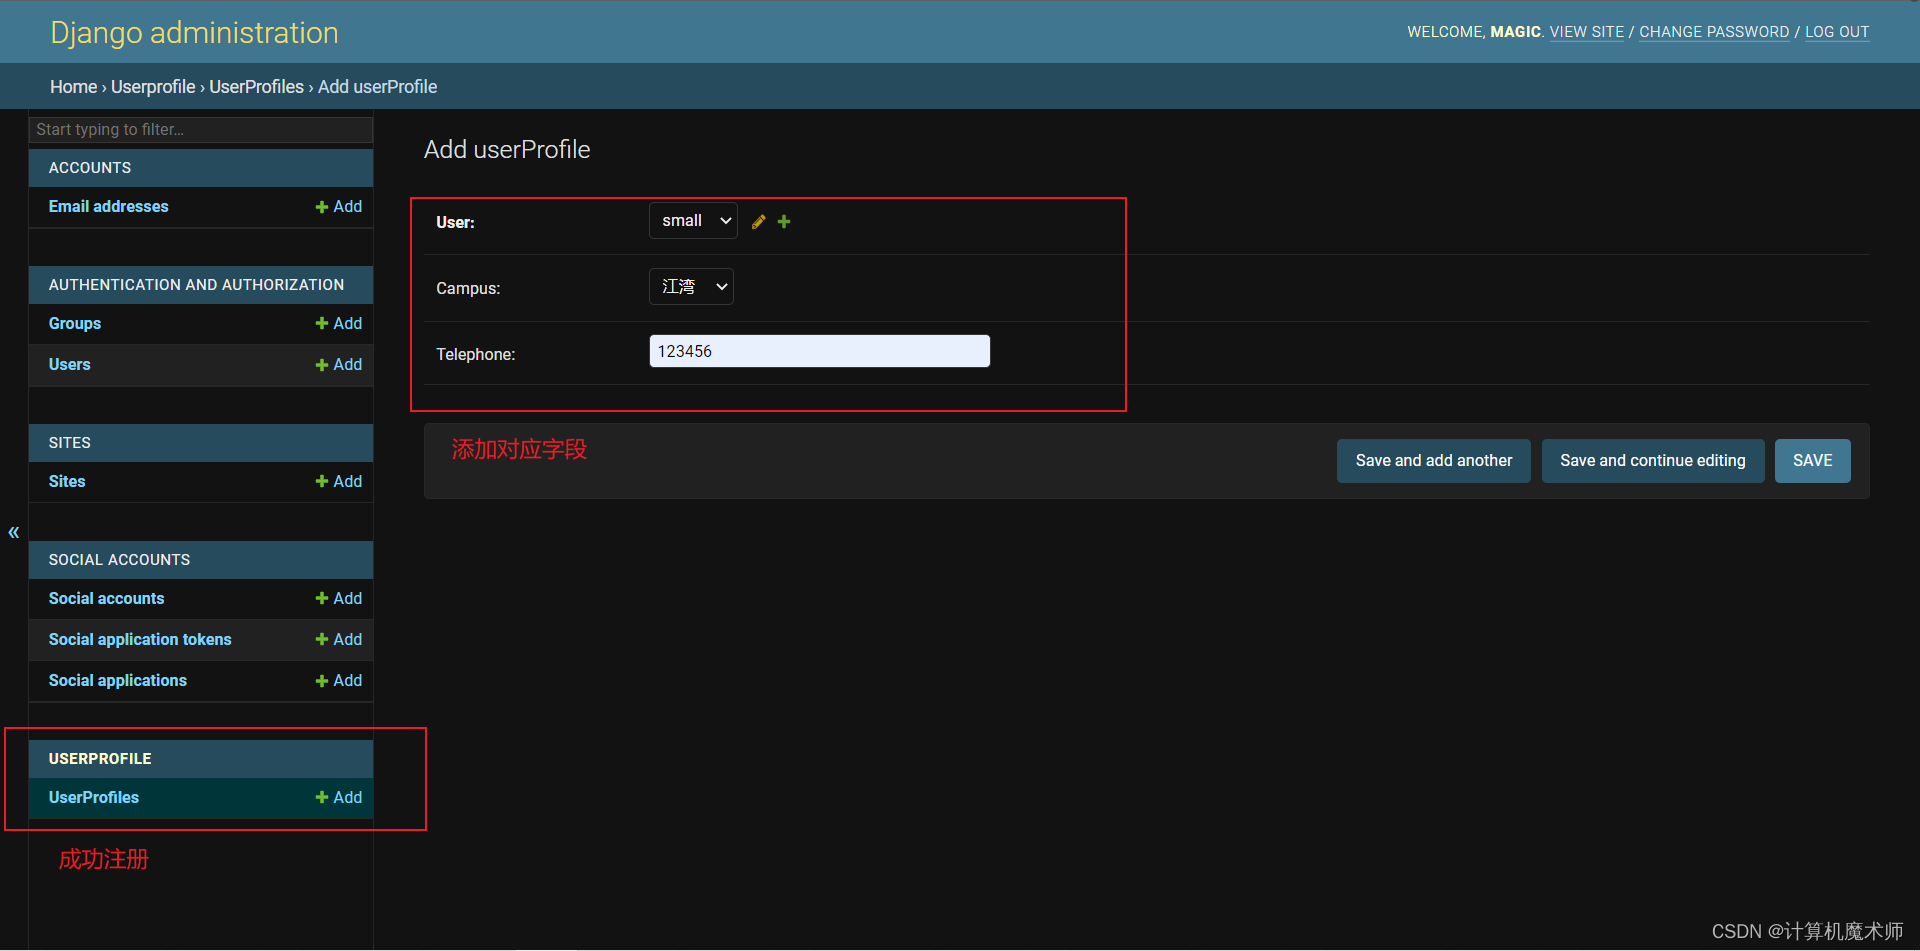 在这里插入图片描述
forms.py,并重写表单,由于注册表单时,只会自定创建user对象,并没有创建userprofile并自动与扩展模型userprofile 进行关联,所以需要重写注册表单,并修改默认注册表单配置,注册时两个对象一起被创建,并存储到数据库中。这点非常重要。通过重写表单,你还可以很容易添加其它字段。
from django import forms

from userprofile.models import UserProfile


class UseProfileForm(forms.Form):
    CAMPUS_CHOICE = (
        ('江湾', '江湾'),
        ('河滨', '河滨'),
        ('仙溪', '仙溪')
    )
    tel = forms.CharField(label='Your telephone', max_length=20, strip=True, required=False)
    campus = forms.ChoiceField(label='Your campus', choices=CAMPUS_CHOICE, required=False)
2.1 重写注册表单
有两种方法实现
1)自定义表单类 (这里的需求是需要附加输入,建议使用这种方法)
注意!!! : 自定义表单 在配置好之后,是直接引入到allauth.account,forms的,这个时候是不能使用 重写的继承方法的!,不然引入父类的操作会陷入调用循环!
在这里插入图片描述

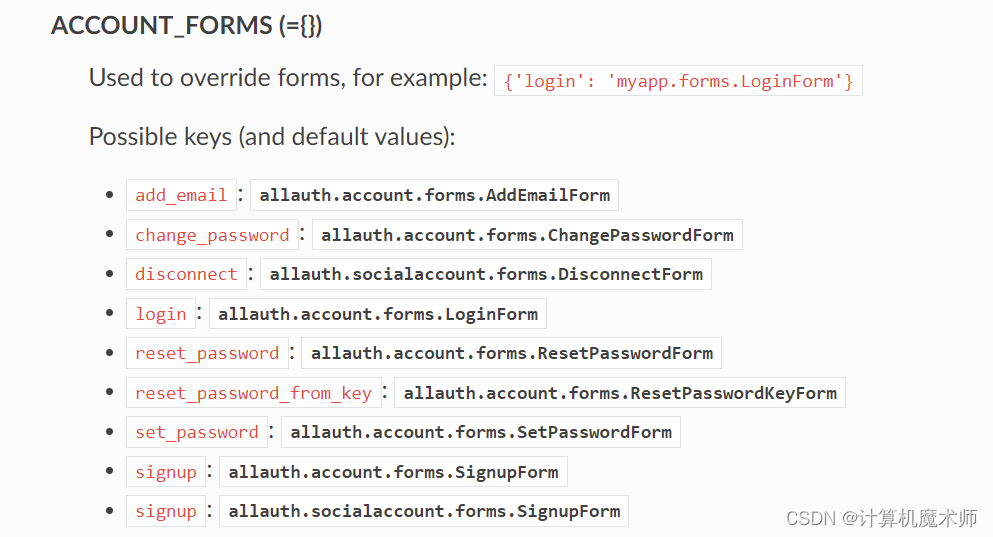
- 原理: allauth应用 根据setting中的
account_signup_form_class的值(路由)引入该表单类,将该表单类的方法siginup替换掉原生注册表单# 自定义表单 class SignupForm(forms.Form): # 对某方法进行重写,注意名字 def signup(self, request, user): user_profile = UserProfile() user_profile.user = user user.save() user_profile.save() - 在
setting加上表单配置
ACCOUNT_SIGNUP_FORM_CLASS = 'userprofile.forms.SignupForm'2)重写表单( 继承表单类)
在这里插入图片描述
- 不需要和自定义一样引入表单,直接定向到该表单(所以不会出现引用循环)
# 继承(继承用法,保证其 重写注册表单,重联系二者
class CustomSignupForm(SignupForm):
    # 对某方法进行重写,注意名字
    def custom_signup(self, request, user):
        user_profile = UserProfile()
        user_profile.user = user
        user.save()
user_profile.save()- 在
setting加上表单配置ACCOUNT_FORMS = ({ 'reset_password': 'userprofile.forms.ResetPasswordForm', 'signup': 'userprofile.forms.CustomSignupForm' })
三、 view 视图函数与 URLs
- userprofile 的
urls.pyfrom django.urls import re_path from userprofile import views urlpatterns = [ re_path(r'^profile', views.profile, name='profile'), re_path(r'^profile/update', views.profile_update, name='profile_update') ] views.py
from django.contrib.auth.decorators import login_required
from django.shortcuts import render, redirect, get_object_or_404,HttpResponseRedirect

from userprofile.forms import UseProfileForm
from userprofile.models import UserProfile


# Create your views here.

@login_required()
def profile(request):
    user = request.user
    return render(request, 'account/profile.html', {'user': user})


@login_required()
def profile_update(request):
    user = request.user
    user_profile = get_object_or_404(UserProfile, user=user)

    if request.method == 'POST':
        # 得到表单数据
        form = UseProfileForm(request.POST)

        if form.is_valid():
            user_profile.tel = form.cleaned_data['tel']
            user_profile.campus = form.cleaned_data['campus']
            user_profile.save()

              return HttpResponseRedirect(reverse('PetProfile:profile'))

    else:
        default_data = {
            'tel': user_profile.tel, 'campus': userprofile.campus
        }

        form = UseProfileForm(default_data)
    # 如果时get 返回查看
return render('account/profile_update.html', {'form': form, 'user': user})- 特别注意!!: 之前文章所注册的用户,在注册时没有生成
userprofile对象,在user_profile = get_object_or_404(UserProfile, user=user)这里会报错,所以我们得先注册一个新用户。(修改了注册表单)
四、 创建proflie模板和proflie_update模板
在allauth 包中复制粘贴templates 的account包到该项目的templates的account下,原因:
- 便于模板覆盖
- 便于修改表单
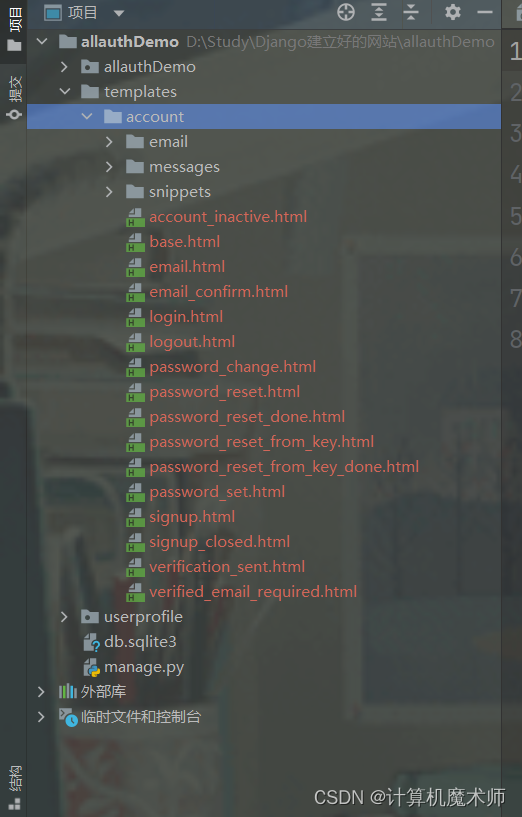 在这里插入图片描述
- 添加
profile.html文件{% block content %} {% if user.is_authenticated %} <a href="{% url 'userprofile:profile_update' %}">Update Profile</a> | <a href="{% url 'account_email' %}">Manage Email</a> | <a href="{% url 'account_change_password' %}">Change Password</a> | <a href="{% url 'account_logout' %}">Logout</a> {% endif %} <p>Welcome,{{ user }}</p> <ul> <li>name:{{ user.first_name }}</li> <li>telephone:{{ user.profile.tel }}</li> <li>campus:{{ user.profile.campus }}</li> </ul> {% endblock %} profile_update.html
{%  block content %}
{% if user.is_authenticated %}
<a href="{% url 'userprofile:profile_update' %}">Update Profile</a> | <a href="{% url 'account_email' %}">Manage
    Email</a>  | <a href="{% url 'account_change_password' %}">Change Password</a> |
<a href="{% url 'account_logout' %}">Logout</a>
{% endif  %}
<p>Welcome,{{ user }}</p>

<div class="form_container">
    <form method="post" action="" enctype="multipart/form-data">
        {% csrf_token %}
        {% for field in form %}
        <div class="form-item">
            {{ field.errors }}
            {{ field.label_tag }} {{ field }}
            {% if field.help_text %}
            <p class="help">{{ field.help_text|safe }}</p>
            {% endif %}
        </div>
        {% endfor %}
        <div class="button-submit">
            <input type="submit" value="Update"/>
        </div>
    </form>

</div>
{%  endblock %}
我们也可以看看
form表单直接渲染得源代码
		{{ field.errors }}
			{{  field.label_tag }} {{ field }}
			{% if field.help_text %}
			<p class="help">{{ field.help_text|safe }}</p>
			{% endif %}
五、登入admin管理系统
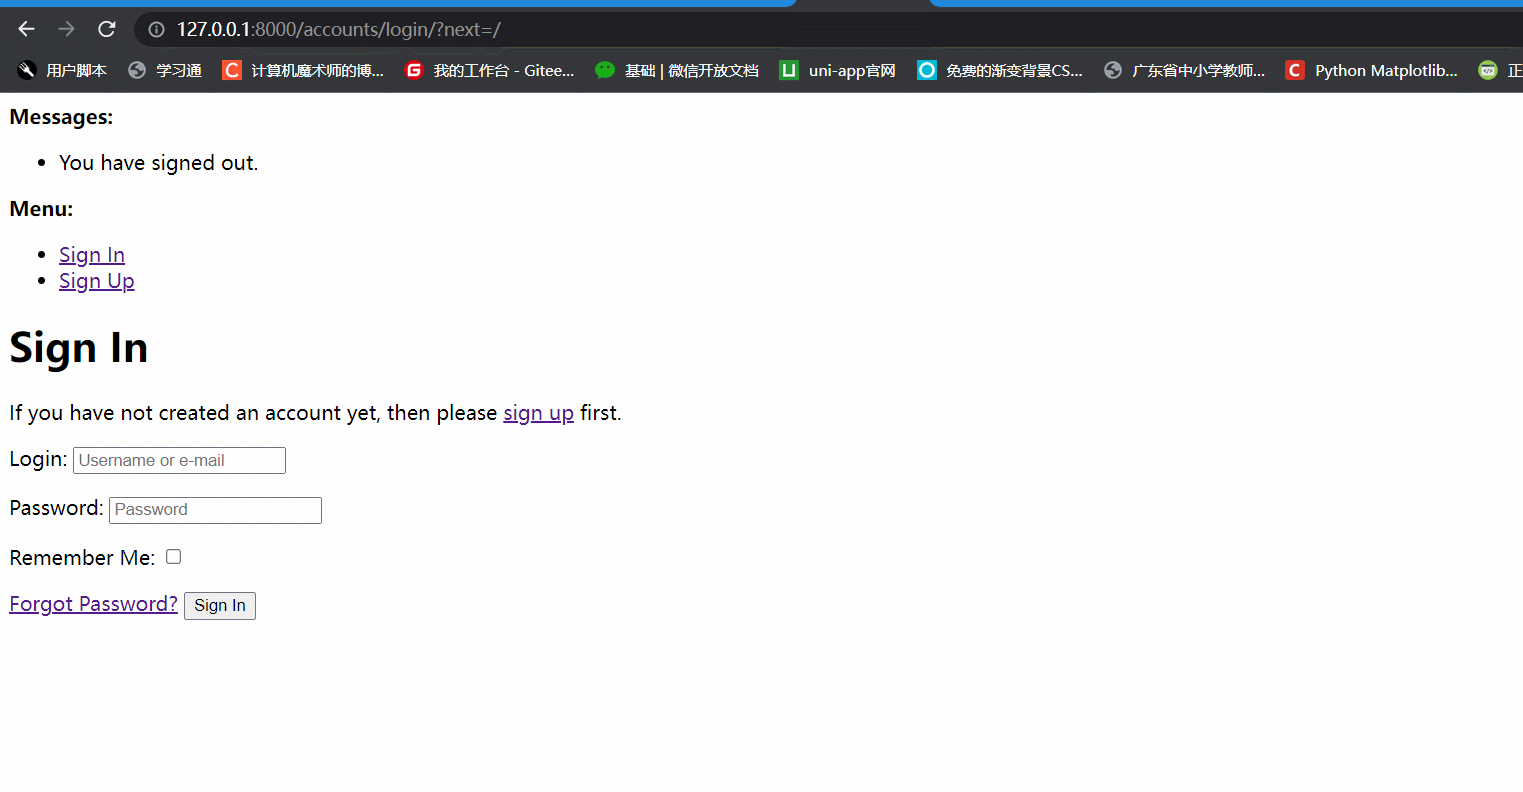
- 特别注意!!:
我们在登录用户之后,此时系统是记录我们的用户信息的,而此时如果我们更改路径到admin中,输入我们的管理员账号会报 提供了两个参数的信息,这是因为管理员的用户信息和当前用户信息冲突了,需要
signout当前用户
当输入密码错误时也会报和上面一样的错误(当时调试了好久?)
在这里插入图片描述
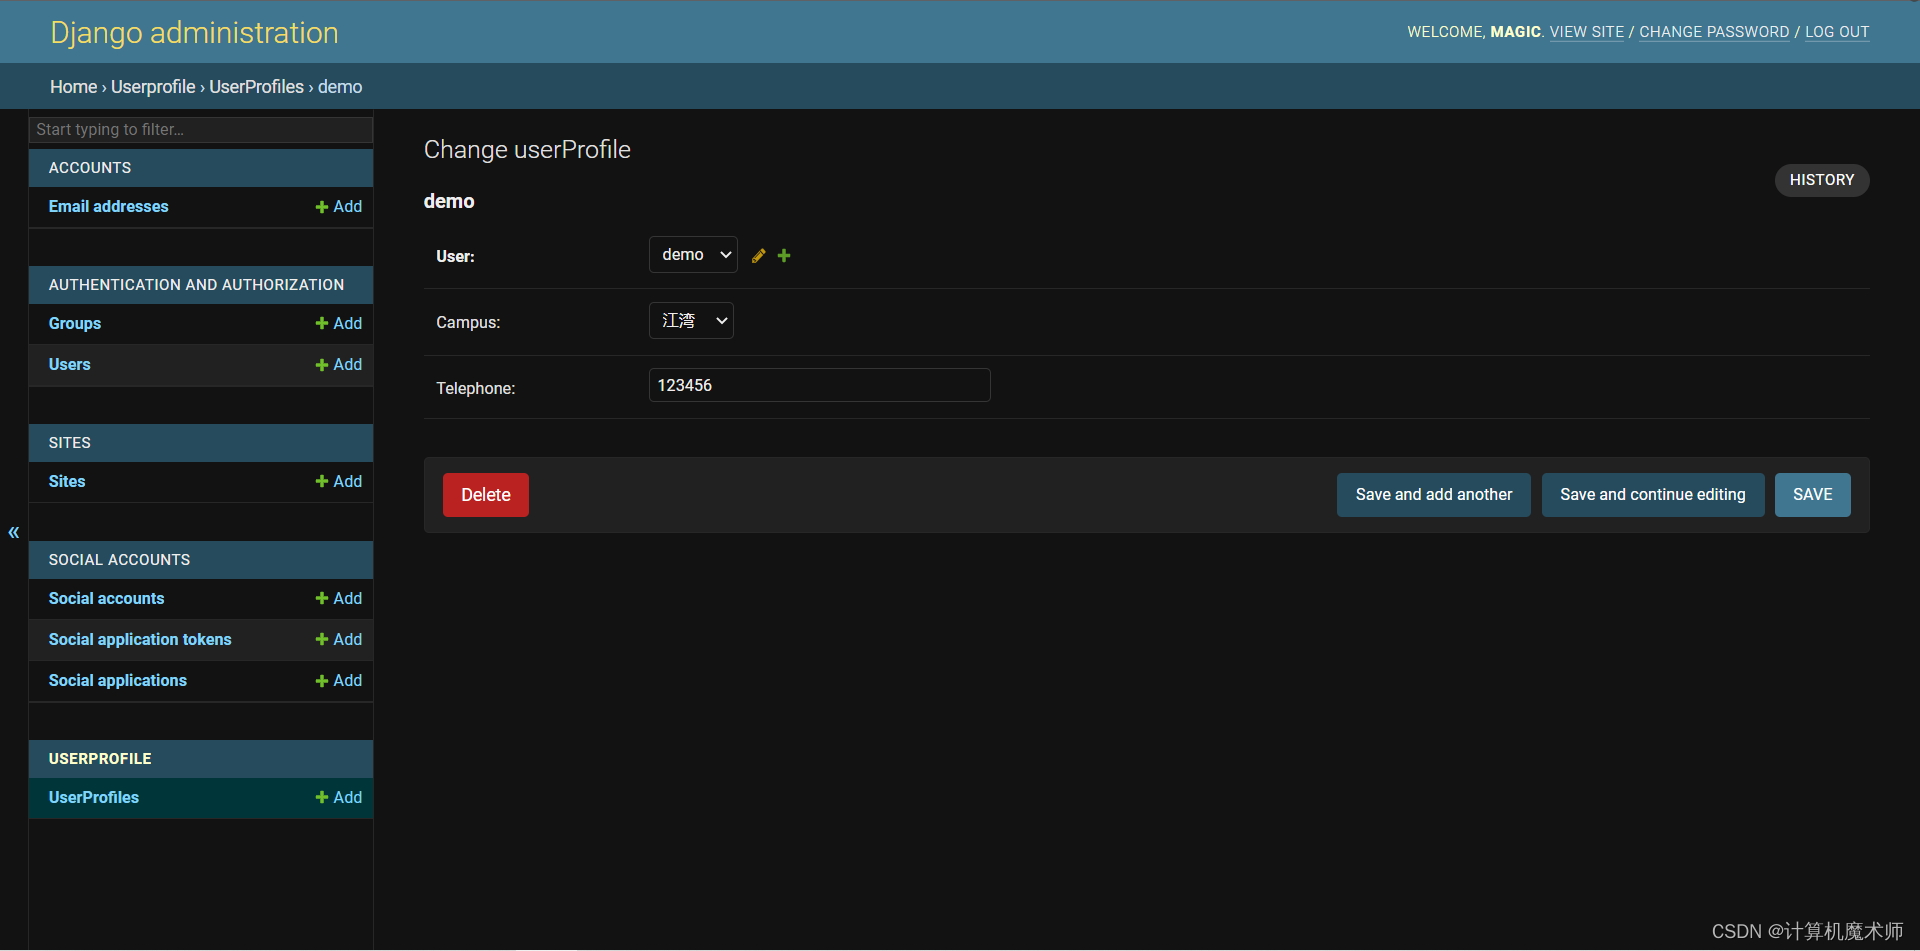
- 效果:
 在这里插入图片描述
参考文献:
?谢谢你的阅读,你的点赞和收藏是我创作的最大动力?我正在参与2023腾讯技术创作特训营第三期有奖征文,组队打卡瓜分大奖!
原创声明:本文系作者授权腾讯云开发者社区发表,未经许可,不得转载。
如有侵权,请联系 cloudcommunity@tencent.com 删除。
原创声明:本文系作者授权腾讯云开发者社区发表,未经许可,不得转载。
如有侵权,请联系 cloudcommunity@tencent.com 删除。
评论
登录后参与评论
推荐阅读
目录