JAVA Spring Boot快速开始

实践环境
Spring Boot 3.2.1
Maven 3.8.8
JDK 1.8.0_331
创建项目
通过http://start.spring.io/网站创建包含Spring Boot的项目,具体如下:
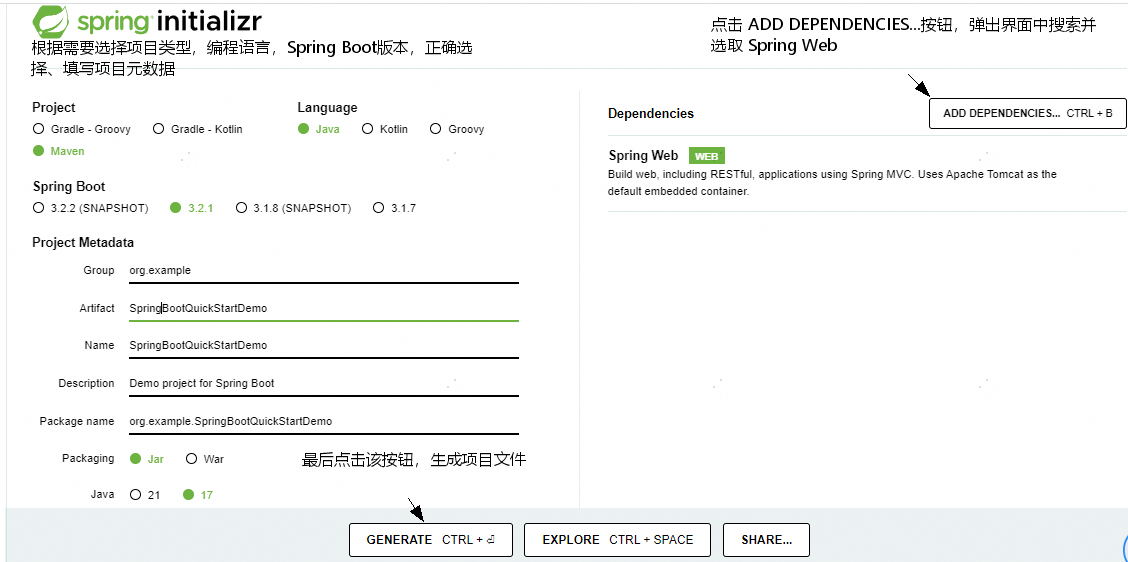
点击 GENERATE 按钮后,会自动生成并下载 SpringBootQuickStartDemo.zip
导入项目
解压述下载的项目压缩包,解压后的项目文件结构如下:
E:codeProjects\SpringBootQuickStartDemo>tree /f
.
│  .gitignore
│  HELP.md
│  mvnw
│  mvnw.cmd
│  pom.xml
│
├─.mvn
│  └─wrapper
│          maven-wrapper.jar
│          maven-wrapper.properties
│
└─src
    ├─main
    │  ├─java
    │  │  └─org
    │  │      └─example
    │  │          └─SpringBootQuickStartDemo
    │  │                  SpringBootQuickStartDemoApplication.java
    │  │
    │  └─resources
    │      │  application.properties
    │      │
    │      ├─static
    │      └─templates
    └─test
        └─java
            └─org
                └─example
                    └─SpringBootQuickStartDemo
SpringBootQuickStartDemoApplicationTests.java其中,pom.xml文件内容如下:
<?xml version="1.0" encoding="UTF-8"?>
<project xmlns="http://maven.apache.org/POM/4.0.0" xmlns:xsi="http://www.w3.org/2001/XMLSchema-instance"
	xsi:schemaLocation="http://maven.apache.org/POM/4.0.0 https://maven.apache.org/xsd/maven-4.0.0.xsd">
	<modelVersion>4.0.0</modelVersion>
	<parent>
		<groupId>org.springframework.boot</groupId>
		<artifactId>spring-boot-starter-parent</artifactId>
		<version>3.2.1</version>
		<relativePath/> <!-- lookup parent from repository -->
	</parent>
	<groupId>org.example</groupId>
	<artifactId>SpringBootQuickStartDemo</artifactId>
	<version>0.0.1-SNAPSHOT</version>
	<name>SpringBootQuickStartDemo</name>
	<description>Demo project for Spring Boot</description>
	<properties>
		<java.version>17</java.version>
	</properties>
	<dependencies>
		<dependency>
			<groupId>org.springframework.boot</groupId>
			<artifactId>spring-boot-starter-web</artifactId>
		</dependency>

		<dependency>
			<groupId>org.springframework.boot</groupId>
			<artifactId>spring-boot-starter-test</artifactId>
			<scope>test</scope>
		</dependency>
	</dependencies>

	<build>
		<plugins>
			<plugin>
				<groupId>org.springframework.boot</groupId>
				<artifactId>spring-boot-maven-plugin</artifactId>
			</plugin>
		</plugins>
	</build>

</project>
注意:不同版本的Spring Boot对JAVA JDK有不同的要求,所以需要根据实际配置考虑是否修改上述pom.xml,具体有哪些系统要求,可以参考以下链接
https://docs.spring.io/spring-boot/docs/{SpringBootVersion}/reference/html/getting-started.html#getting-started.system-requirements访问上述链接之前,修改 {SpringBootVersion}为具体版本号,比如 2.7.9
修改Spring Boot版本为2.7.9
<parent>
    <groupId>org.springframework.boot</groupId>
    <artifactId>spring-boot-starter-parent</artifactId>
    <version>2.7.9</version>
    <relativePath/> <!-- lookup parent from repository -->
</parent>
修改JAVA版本
<java.version>8</java.version>说明:笔者本机安装JDK1.8,如果不修改pom.xml配置,运行时会报类似如下错误:
Error:(2, 32) java: 无法访问org.springframework.boot.SpringApplication
  错误的类文件: /D:/maven-repo/org/springframework/boot/spring-boot/3.2.1/spring-boot-3.2.1.jar!/org/springframework/boot/SpringApplication.class
    类文件具有错误的版本 61.0, 应为 52.0
    请删除该文件或确保该文件位于正确的类路径子目录中。
接着,使用IDEA打开该项目
添加代码
修改SpringBootQuickStartDemoApplication.java,该文件默认生成的内容如下
package org.example.SpringBootQuickStartDemo;

import org.springframework.boot.SpringApplication;
import org.springframework.boot.autoconfigure.SpringBootApplication;

@SpringBootApplication
public class SpringBootQuickStartDemoApplication {

	public static void main(String[] args) {
		SpringApplication.run(SpringBootQuickStartDemoApplication.class, args);
	}

}
修改文件内容为如下:
package org.example.SpringBootQuickStartDemo;
import org.springframework.boot.SpringApplication;
import org.springframework.boot.autoconfigure.SpringBootApplication;
import org.springframework.web.bind.annotation.GetMapping;
import org.springframework.web.bind.annotation.RequestParam;
import org.springframework.web.bind.annotation.RestController;

@SpringBootApplication
@RestController
public class SpringBootQuickStartDemoApplication {
	public static void main(String[] args) {
		SpringApplication.run(SpringBootQuickStartDemoApplication.class, args);
	}

	@GetMapping("/hello")
	public String hello(@RequestParam(value = "name", defaultValue = "World") String name) {
		return String.format("Hello %s!", name);
	}
}
这就是在Spring Boot中创建一个简单的“Hello World”web服务所需的所有代码。
添加的hello()方法接收一个名为name的String参数,返回"Hello " 与name参数的字符串拼接。这意味着,如果在请求中将name参数值设置为“Amy”,则响应将为“Hello Amy”。
@RestController注释告诉Spring,这段代码描述了一个应该可通过web访问的端点(endpoint)。@GetMapping("/hello")告诉Spring使用我们的hello()方法来响应访问http://localhost:8080/hello的请求。最后@RequestParam告诉Spring请求需要提供一个name值,如果未提供的话,它将默认使用单词World。
测试
IDEA中打开SpringBootQuickStartDemoApplication.java文件,右键 -> Run 'SpringBookQuic....main()' ,控制台输出类似如下内容:
...略
  .   ____          _            __ _ _
 /\\ / ___'_ __ _ _(_)_ __  __ _ \ \ \ \
( ( )\___ | '_ | '_| | '_ \/ _` | \ \ \ \
 \\/  ___)| |_)| | | | | || (_| |  ) ) ) )
  '  |____| .__|_| |_|_| |_\__, | / / / /
 =========|_|==============|___/=/_/_/_/
 :: Spring Boot ::                (v2.7.9)

2024-01-02 00:14:28.051  INFO 19408 --- [           main] .e.S.SpringBootQuickStartDemoApplication : Starting SpringBootQuickStartDemoApplication using Java 1.8.0_331 on SF0001420551A with PID 19408 (E:\codeProjects\SpringBootQuickStartDemo\target\classes started by 01367599 in E:\codeProjects\SpringBootQuickStartDemo)
2024-01-02 00:14:28.055  INFO 19408 --- [           main] .e.S.SpringBootQuickStartDemoApplication : No active profile set, falling back to 1 default profile: "default"
2024-01-02 00:14:29.778  INFO 19408 --- [           main] o.s.b.w.embedded.tomcat.TomcatWebServer  : Tomcat initialized with port(s): 8080 (http)
2024-01-02 00:14:29.792  INFO 19408 --- [           main] o.apache.catalina.core.StandardService   : Starting service [Tomcat]
2024-01-02 00:14:29.792  INFO 19408 --- [           main] org.apache.catalina.core.StandardEngine  : Starting Servlet engine: [Apache Tomcat/9.0.71]
2024-01-02 00:14:30.146  INFO 19408 --- [           main] o.a.c.c.C.[Tomcat].[localhost].[/]       : Initializing Spring embedded WebApplicationContext
2024-01-02 00:14:30.146  INFO 19408 --- [           main] w.s.c.ServletWebServerApplicationContext : Root WebApplicationContext: initialization completed in 2034 ms
2024-01-02 00:14:30.573  INFO 19408 --- [           main] o.s.b.w.embedded.tomcat.TomcatWebServer  : Tomcat started on port(s): 8080 (http) with context path ''
2024-01-02 00:14:30.583  INFO 19408 --- [           main] .e.S.SpringBootQuickStartDemoApplication : Started SpringBootQuickStartDemoApplication in 3.071 seconds (JVM running for 3.784)
最后两行告诉我们Spring Boot已启动。Spring Boot的内置Apache Tomcat服务器充当Web服务器,监听本地8080端口。
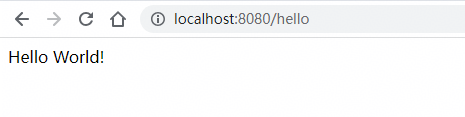
浏览地址栏中输入并访问http://localhost:8080/hello
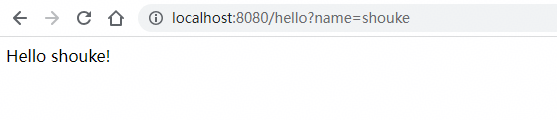
输入并访问http://localhost:8080/hello?name=shouke