【Linux】《how linux work》第二章 基本命令和目录层次结构(3)
原创【Linux】《how linux work》第二章 基本命令和目录层次结构(3)
原创
2.17 File Modes and Permissions(文件模式和权限)
Every Unix file has a set of permissions that determine whether you can read, write, or run the file. Running ls -l displays the permissions. Here’s an example of such a display:
每个Unix文件都有一组权限,确定您是否可以读取、写入或运行该文件。
运行ls -l命令显示权限。以下是一个示例显示:
-rw-r--r--? 1 juser somegroup 7041 Mar 26 19:34 endnotes.htmlThe file’s mode ? represents the file’s permissions and some extra information. There are four parts to the mode, as illustrated in Figure 2-1.
文件的模式 ? 表示文件的权限和一些额外信息。模式有四个部分,如图2-1所示。
The first character of the mode is the file type. A dash (-) in this position, as in the example, denotes a regular file, meaning that there’s nothing special about the file. This is by far the most common kind of file. Directories are also common and are indicated by a d in the file type slot. (3.1 Device Files lists the remaining file types.)
模式的第一个字符是文件类型。
在这个位置上的短横线(-),如示例中所示,表示普通文件,意味着该文件没有任何特殊之处。
这是最常见的文件类型。目录也很常见,通过文件类型位置上的d来表示。
(3.1 设备文件列出了其他文件类型。)
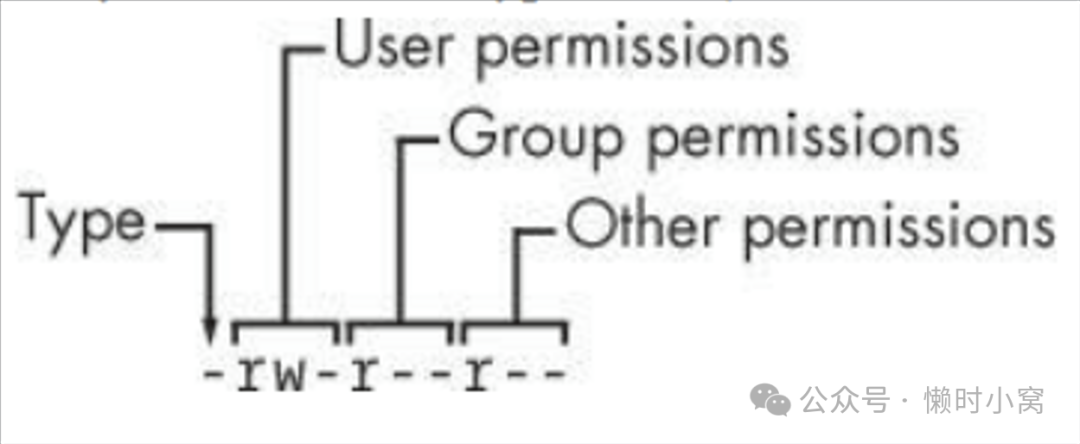
image.png
The rest of a file’s mode contains the permissions, which break down into three sets: user, group, and other, in that order. For example, the rw- characters in the example are the user permissions, the r-- characters that follow are the group permissions, and the final r-- characters are the other permissions.
文件的其余部分包含权限信息,这些权限可以分为三个集合:用户、组和其他,按照这个顺序。
例如,在示例中,rw-字符是用户权限,后面的r--字符是组权限,最后的r--字符是其他权限。
每个权限集合可以包含四种基本表示方式。
Each permission set can contain four basic representations:
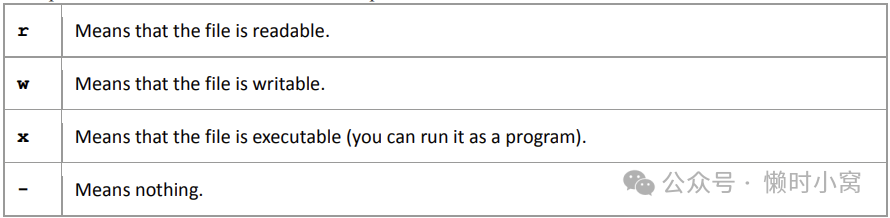
image.png
The user permissions (the first set) pertain to the user who owns the file. In the preceding example, that’s juser. The second set, group permissions, are for the file’s group (somegroup in the example). Any user in that group can take advantage of these permissions. (Use the groups command to see what group you’re in, and see 7.3.5 Working with Groups for more information.)
用户权限(第一组)适用于拥有该文件的用户。
在上面的例子中,这个用户是juser。
第二组,组权限,适用于文件所属的组(在例子中是somegroup)。
该组中的任何用户都可以利用这些权限。
(使用groups命令查看您所在的组,并参阅7.3.5“与组一起使用”了解更多信息。)
Everyone else on the system has access according to the third set, the other permissions, which are sometimes called world permissions.
系统中的其他所有用户根据第三组权限,也就是其他权限,来进行访问,有时也称为全局权限。
NOTE Each read, write, and execute permission slot is sometimes called a permission bit. Therefore, you may hear people refer to parts of the permissions as “the read bits.” 注意:每个读取、写入和执行权限位有时被称为权限位。 因此,您可能会听到人们将权限的部分称为“读取位”。
Some executable files have an s in the user permissions listing instead of an x. This indicates that the executable is setuid, meaning that when you execute the program, it runs as though the file owner is the user instead of you. Many programs use this setuid bit to run as root in order to get the privileges they need to change system files. One example is the passwd program, which needs to change the /etc/passwd file.
某些可执行文件在用户权限列表中使用s而不是x。
这表示可执行文件是设置了setuid位,意味着当您执行该程序时,它将以文件所有者而不是您的身份运行。
许多程序使用这个setuid位以root身份运行,以获取它们需要更改系统文件的特权。
一个例子是passwd程序,它需要更改/etc/passwd文件。
2.17.1 Modifying Permissions 修改权限
To change permissions, use the chmod command. First, pick the set of permissions that you want to change, and then pick the bit to change. For example, to add group (g) and world (o, for “other”) read (r) permissions to file, you could run these two commands:
要修改权限,使用chmod命令。首先,选择要更改的权限集,然后选择要更改的位。
例如,要将组(g)和其他(o,表示“其他人”)的读取(r)权限添加到文件中,可以运行以下两个命令:
$ chmod g+r file
$ chmod o+r file
Or you could do it all in one shot:
或者您也可以一次完成所有操作:
$ chmod go+r fileTo remove these permissions, use go-r instead of go+r.
要删除这些权限,使用go-r而不是go+r。
NOTE Obviously, you shouldn’t make files world-writable because doing so gives anyone on your system the ability to change them. But would this allow anyone connected to the Internet to change your files? Probably not, unless your system has a network security hole. In that case, file permissions won’t help you anyway. 注意 显然,您不应该将文件设置为全局可写,因为这样做会使系统上的任何人都能够更改它们。但是,这样做是否允许连接到互联网的任何人更改您的文件呢?可能不会,除非您的系统存在网络安全漏洞。在这种情况下,文件权限也无法帮助您。
You may sometimes see people changing permissions with numbers, for example:
有时您会看到人们使用数字来更改权限,例如:
$ chmod 644 fileThis is called an absolute change because it sets all permission bits at once. To understand how this works, you need to know how to represent the permission bits in octal form (each numeral represents a number in base 8 and corresponds to a permission set). See the chmod(1) manual page or info manual for more.
这被称为绝对更改,因为它一次设置了所有权限位。
要理解其工作原理,您需要知道如何以八进制形式表示权限位(每个数字代表8进制中的一个数字,并对应一个权限集)。
有关更多信息,请参阅chmod(1)手册页或info手册。
You don’t really need to know how to construct absolute modes; just memorize the modes that you use most often. Table 2-4 lists the most common ones.
您实际上不需要知道如何构造绝对模式;只需记住您经常使用的模式即可。表2-4列出了最常见的模式。
Table 2-4. Absolute Permission Modes
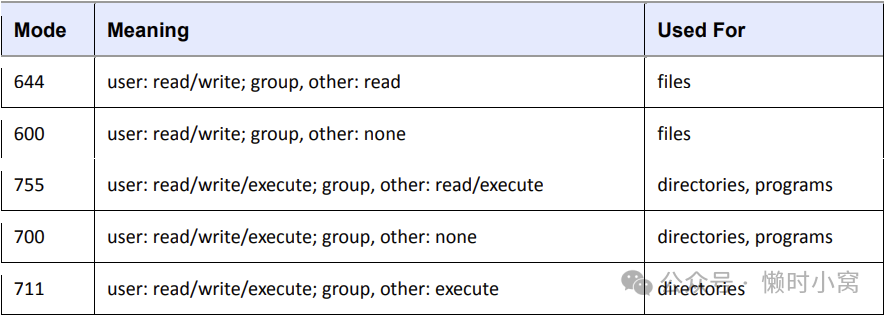
image.png
Directories also have permissions. You can list the contents of a directory if it’s readable, but you can only access a file in a directory if the directory is executable. (One common mistake people make when setting the permissions of directories is to accidentally remove the execute permission when using absolute modes.)
目录也有权限。
如果目录可读,你可以列出目录的内容;但只有当目录可执行时,你才能访问目录中的文件。
(设置目录权限时,人们常犯的一个错误是在使用绝对模式时意外删除了执行权限。)
Finally, you can specify a set of default permissions with the umask shell command, which applies a predefined set of permissions to any new file you create. In general, use umask 022 if you want everyone to be able to see all of the files and directories that you create, and use umask 077 if you don’t. (You’ll need to put the umask command with the desired mode in one of your startup files to make your new default permissions apply to later sessions, as discussed in Chapter 13.)
最后,你可以使用umask shell命令指定一组默认权限,该命令会将预定义的权限应用于你创建的任何新文件。
一般来说,如果你希望每个人都能看到你创建的所有文件和目录,请使用umask 022;如果不希望每个人都能看到,请使用umask 077。
(你需要将umask命令与所需模式放在其中一个启动文件中,以使新的默认权限适用于后续会话,如第13章所讨论的。)
2.17.2 Symbolic Links(符号链接)
A symbolic link is a file that points to another file or a directory, effectively creating an alias (like a shortcut in Windows). Symbolic links offer quick access to obscure directory paths.
符号链接是一个指向另一个文件或目录的文件,实际上创建了一个别名(类似于Windows中的快捷方式)。
符号链接可以快速访问晦涩的目录路径。
In a long directory listing, symbolic links look like this (notice the l as the file type in the file mode):
在长目录列表中,符号链接看起来像这样(注意文件模式中的l作为文件类型):
lrwxrwxrwx 1 ruser users 11 Feb 27 13:52 somedir -> /home/origdirIf you try to access somedir in this directory, the system gives you /home/origdir instead. Symbolic links are simply names that point to other names. Their names and the paths to which they point don’t have to mean anything. For example, /home/origdir doesn’t even need to exist.
如果您尝试在此目录中访问somedir,系统会给您提供/home/origdir。
符号链接只是指向其他名称的名称。它们的名称和指向的路径不必有任何意义。
例如,/home/origdir甚至不需要存在。
In fact, if /home/origdir does not exist, any program that accesses somedir reports that somedir doesn’t exist (except for ls somedir, a command that stupidly informs you that somedir is somedir). This can be baffling because you can see something named somedir right in front of your eyes.
实际上,如果/home/origdir不存在,访问somedir的任何程序都会报告somedir不存在(除了ls somedir,这个命令愚蠢地告诉您somedir是somedir)。
这可能会令人困惑,因为你可以看到眼前就有一个名为somedir的东西。
This is not the only way that symbolic links can be confusing. Another problem is that you can’t identify the characteristics of a link target just by looking at the name of the link; you must follow the link to see if it goes to a file or directory. Your system may also have links that point to other links, which are called chained symbolic links.
这不是符号链接可能令人困惑的唯一方式。
另一个问题是,仅仅通过查看链接的名称,您无法确定链接目标的特性;您必须跟随链接以查看它指向的是文件还是目录。
您的系统还可能存在指向其他链接的链接,这被称为链接链。
2.17.3 Creating Symbolic Links(创建符号链接)
To create a symbolic link from target to linkname, use ln -s:
要从目标到链接名创建符号链接,请使用ln -s命令:
$ ln -s target linknameThe linkname argument is the name of the symbolic link, the target argument is the path of the file or directory that the link points to, and the -s flag specifies a symbolic link (see the warning that follows).
链接名参数是符号链接的名称,目标参数是链接指向的文件或目录的路径,-s选项指定了一个符号链接(请参阅后面的警告)。
When making a symbolic link, check the command twice before you run it because several things can go wrong. For example, if you reverse the order of the arguments (ln -s linkname target), you’re in for some fun if linkname is a directory that already exists. If this is the case (and it quite often is), ln creates a link named target inside linkname, and the link will point to itself unless linkname is a full path. If something goes wrong when you create a symbolic link to a directory, check that directory for errant symbolic links and remove them.
在创建符号链接时,请在运行之前仔细检查命令,因为可能会出现多种问题。
例如,如果您颠倒了参数的顺序(ln -s 链接名 目标),如果链接名是一个已经存在的目录,那么您就会遇到一些麻烦。
如果是这种情况(而且这种情况经常发生),ln会在链接名内部创建一个名为目标的链接,并且该链接将指向自身,除非链接名是一个完整路径。
如果在创建指向目录的符号链接时出现问题,请检查该目录是否存在错误的符号链接并将其删除。
Symbolic links can also cause headaches when you don’t know that they exist. For example, you can easily edit what you think is a copy of a file but is actually a symbolic link to the original.
当您不知道符号链接存在时,它们也可能引起麻烦。
例如,您可能会轻易地编辑您认为是文件副本的东西,但实际上它是指向原始文件的符号链接。
WARNING Don’t forget the -s option when creating a symbolic link. Without it, ln creates a hard link, giving an additional real filename to a single file. The new filename has the status of the old one; it points (links) directly to the file data instead of to another filename as a symbolic link does. Hard links can be even more confusing than symbolic links. Unless you understand the material in 4.5 Inside a Traditional Filesystem, avoid using them. 注意 在创建符号链接时,不要忘记使用“-s”选项。 如果没有使用该选项,ln命令会创建一个硬链接,为单个文件提供一个额外的真实文件名。 新的文件名具有旧文件名的状态;它直接指向文件数据,而不像符号链接那样指向另一个文件名。 硬链接可能比符号链接更令人困惑。 除非你理解4.5节“传统文件系统内部”的内容,否则请避免使用硬链接。
With all of these warnings regarding symbolic links, why would anyone bother to use them? Because they offer a convenient way to organize and share files, as well as patch up small problems.
鉴于所有这些关于符号链接的警告,为什么还有人会费心去使用它们呢?
因为它们提供了一种方便的方式来组织和共享文件,以及修复小问题。
2.18 Archiving and Compressing Files(归档和压缩文件)
Now that you’ve learned about files, permissions, and possible errors, you need to master gzip and tar.
现在你已经学会了关于文件、权限和可能的错误,你需要掌握gzip和tar。
2.18.1 gzip
The program gzip (GNU Zip) is one of the current standard Unix compression programs. A file that ends with .gz is a GNU Zip archive. Use gunzip file.gz to uncompress .gz and remove the suffix; to compress it again, use gzip file.
gzip(GNU Zip)是当前标准的Unix压缩程序之一。
以.gz结尾的文件是GNU Zip归档文件。使用gunzip file.gz来解压缩< file>.gz并移除后缀;要再次压缩它,使用gzip file。
2.18.2 tar
Unlike the zip programs for other operating systems, gzip does not create archives of files; that is, it doesn’t pack multiple files and directories into one file. To create an archive, use tar instead:
与其他操作系统的zip程序不同,gzip不会创建文件的归档;
也就是说,它不会将多个文件和目录打包成一个文件。要创建一个归档文件,使用tar:
$ tar cvf archive.tar file1 file2 ...Archives created by tar usually have a .tar suffix (this is by convention; it isn’t required). For example, in the command above, file1, file2, and so on are the names of the files and directories that you wish to archive in .tar. The c flag activates create mode. The r and f flags have more specific roles.
由tar创建的归档文件通常具有.tar后缀(这是按照约定,不是必需的)。
例如,在上述命令中,file1、file2等是您希望在< archive>.tar中归档的文件和目录的名称。
c标志激活创建模式。r和f标志具有更具体的作用。
The v flag activates verbose diagnostic output, causing tar to print the names of the files and directories in the archive when it encounters them. Adding another v causes tar to print details such as file size and permissions. If you don’t want tar to tell you what it’s doing, omit the v flag.
v标志激活详细诊断输出,当tar遇到文件和目录时,它会打印归档中的文件和目录的名称。
添加另一个v会导致tar打印诸如文件大小和权限之类的详细信息。如果您不想让tar告诉您它在做什么,省略v标志。
The f flag denotes the file option. The next argument on the command line after the f flag must be the archive file for tar to create (in the preceding example, it is .tar). You must use this option followed by a filename at all times, except with tape drives. To use standard input or output, enter a dash (-) instead of the filename.
f标志表示文件选项。f标志后的命令行参数必须是tar要创建的归档文件(在上面的例子中,它是< archive>.tar)。
除了磁带驱动器外,您必须始终使用此选项后跟文件名。
要使用标准输入或输出,请在文件名处输入破折号(-)。
Unpacking tar files(解压tar文件)
To unpack a .tar file with tar use the x flag:
要使用tar解压缩.tar文件,请使用x标志:
$ tar xvf archive.tarIn this command, the x flag puts tar into extract (unpack) mode. You can extract individual parts of the archive by entering the names of the parts at the end of the command line, but you must know their exact names. (To find out for sure, see the table-of-contents mode described shortly.)
在此命令中,x标志将tar置于提取(解压缩)模式。
您可以通过在命令行的末尾输入部分的名称来提取归档的各个部分,但必须知道它们的确切名称。
(要确切了解,请参见后面描述的目录结构模式。)
NOTE When using extract mode, remember that tar does not remove the archived .tar file after extracting its contents. 注意 在使用提取模式时,请记住tar在提取内容后不会删除归档的.tar文件。
Table-of-Contents Mode(目录结构模式)
Before unpacking, it’s usually a good idea to check the contents of a .tar file with the table-of-contents mode by using the t flag instead of the x flag. This mode verifies the archive’s basic integrity and prints the names of all files inside. If you don’t test an archive before unpacking it, you can end up dumping a huge mess of files into the current directory, which can be really difficult to clean up.
在解压缩之前,通常最好使用t标志而不是x标志来检查.tar文件的内容。
此模式验证归档的基本完整性并打印所有文件的名称。
如果在解压缩之前不测试归档文件,可能会导致将大量文件倾倒到当前目录中,这可能非常难以清理。
When you check an archive with the t mode, verify that everything is in a rational directory structure; that is, all file pathnames in the archive should start with the same directory. If you’re unsure, create a temporary directory, change to it, and then extract. (You can always use mv * .. if the archive didn’t create a mess.)
在使用t模式检查归档文件时,请验证所有文件路径名是否以相同目录开头,即归档中的所有文件路径名都应该以相同的目录开头。
如果不确定,请创建一个临时目录,切换到该目录,然后进行提取。
(如果归档没有创建混乱,您始终可以使用mv * ..命令。)
When unpacking, consider using the p option to preserve permissions. Use this in extract mode to override your umask and get the exact permissions specified in the archive. The p option is the default when working as the superuser. If you’re having trouble with permissions and ownership when unpacking an archive as the superuser, make sure that you are waiting until the command terminates and you get the shell prompt back. Although you may only want to extract a small part of an archive, tar must run through the whole thing, and you must not interrupt the process because it sets the permissions only after checking the entire archive
在解压缩时,考虑使用p选项来保留权限。
在提取模式下使用此选项可以覆盖您的umask并获得归档中指定的确切权限。
当以超级用户身份工作时,p选项是默认选项。
如果在以超级用户身份解压缩归档时遇到权限和所有权问题,请确保等待命令终止并获得shell提示符。
尽管您可能只想提取归档的一小部分,但tar必须运行整个过程,您不能中断该过程,因为它仅在检查完整个归档后才设置权限。
Commit all of the tar options and modes in this section to memory. If you’re having trouble, make some flash cards. This may sound like grade-school, but it’s very important to avoid careless mistakes with this command.
请牢记本节中的所有tar选项和模式。
如果遇到问题,请制作一些记忆卡。
这听起来可能像小学生,但避免在此命令中出现粗心错误非常重要。
2.18.3 Compressed Archives (.tar.gz) (压缩归档文件 (.tar.gz))
Many beginners find it confusing that archives are normally found compressed, with filenames ending in .tar.gz. To unpack a compressed archive, work from the right side to the left; get rid of the .gz first and then worry about the .tar. For example, these two commands decompress and unpack .tar.gz:
许多初学者对于归档文件通常是以压缩形式出现,并以.tar.gz作为文件扩展名感到困惑。
要解压缩压缩的归档文件,从右到左进行操作;首先去掉.gz,然后再处理.tar。
例如,以下两个命令可以解压缩并解包< file>.tar.gz:
$ gunzip file.tar.gz
$ tar xvf file.tar
When starting out, you can do this one step at a time, first running gunzip to decompress and then tar to verify and unpack. To create a compressed archive, do the reverse; run tar first and gzip second. Do this frequently enough, and you’ll soon memorize how the archiving and compression process works. You’ll also get tired of all of the typing and start to look for shortcuts. Let’s take a look at those now.
刚开始时,你可以一步一步地进行操作,先运行gunzip进行解压缩,然后再运行tar进行验证和解包。
要创建一个压缩的归档文件,反过来操作;先运行tar,然后再运行gzip。
经常这样操作,你很快就会记住归档和压缩的过程是如何工作的。
你也会厌倦输入这么多命令,开始寻找快捷方式。
现在让我们来看看这些快捷方式。
2.18.4 zcat
The method shown above isn’t the fastest or most efficient way to invoke tar on a compressed archive, and it wastes disk space and kernel I/O time. A better way is to combine archival and compression functions with a pipeline. For example, this command pipeline unpacks .tar.gz:
上述方法不是调用压缩归档文件最快、最高效的方式,而且会浪费磁盘空间和内核I/O时间。
更好的方式是将归档和压缩功能结合起来使用管道。
例如,以下命令通过管道解包< file>.tar.gz:
$ zcat file.tar.gz | tar xvf -The zcat command is the same as gunzip -dc. The -d option decompresses and the -c option sends the result to standard output (in this case, to the tar command).
zcat命令与gunzip -dc命令相同。
-d选项用于解压缩,-c选项将结果发送到标准输出(在这种情况下是tar命令)。
Because it’s so common to use zcat, the version of tar that comes with Linux has a shortcut. You can use z as an option to automatically invoke gzip on the archive; this works both for extracting an archive (with the x or t modes in tar) and creating one (with c). For example, use the following to verify a compressed archive:
由于使用zcat非常常见,Linux自带的tar版本提供了一个快捷方式。
你可以使用z作为选项来自动调用gzip对归档文件进行处理;
对于解压缩归档文件(使用tar的x或t模式)和创建归档文件(使用c模式),这都适用。
例如,使用以下命令验证一个压缩的归档文件:
$ tar ztvf file.tar.gzHowever, you should try to master the longer form before taking the shortcut
然而,在使用快捷方式之前,你应该尽量掌握更长的形式。
NOTE A .tgz file is the same as a .tar.gz file. The suffix is meant to fit into FAT (MS-DOS-based) filesystems. 注意 tgz文件与.tar.gz文件相同。后缀是为了适应FAT(基于MS-DOS的)文件系统。
2.18.5 Other Compression Utilities(其他压缩工具)
Another compression program in Unix is bzip2, whose compressed files end with .bz2. While marginally slower than gzip, bzip2 often compacts text files a little more, and it is therefore increasingly popular in the distribution of source code. The decompressing program to use is bunzip2, and the options of both components are close enough to those of gzip that you don’t need to learn anything new. The bzip2 compression/decompression option for tar is j.
Unix中的另一个压缩程序是bzip2,其压缩文件的扩展名为.bz2。
虽然比gzip稍慢,但bzip2通常可以更好地压缩文本文件,因此在源代码的分发中越来越受欢迎。
用于解压缩的程序是bunzip2,两个组件的选项与gzip的选项非常接近,所以你不需要学习任何新知识。
tar的bzip2压缩/解压缩选项是j。
另一个名为xz的压缩程序也越来越受欢迎。相应的解压缩程序是unxz,其参数与gzip的参数类似。
A new compression program named xz is also gaining popularity. The corresponding decompression program is unxz, and the arguments are similar to those of gzip. Most Linux distributions come with zip and unzip programs that are compatible with the zip archives on Windows systems. They work on the usual .zip files as well as self-extracting archives ending in .exe. But if you encounter a file that ends in .Z, you have found a relic created by the compress program, which was once the Unix standard. The gunzip program can unpack these files, but gzip won’t create them.
大多数Linux发行版都配备了与Windows系统上的zip存档兼容的zip和unzip程序。
它们可以处理通常的.zip文件,也可以处理以.exe结尾的自解压存档。
但是,如果你遇到以.Z结尾的文件,那么你找到的是由compress程序创建的遗留文件,这曾经是Unix的标准。
gunzip程序可以解压这些文件,但gzip不能创建它们。
2.19 Linux Directory Hierarchy Essentials(Linux目录层次结构基础)
Now that you know how to examine files, change directories, and read manual pages, you’re ready to start exploring your system files. The details of the Linux directory structure are outlined in the Filesystem Hierarchy Standard, or FHS (http://www.pathname.com/fhs/), but a brief walkthrough should suffice for now
现在你已经知道如何查看文件、更改目录和阅读手册页,你可以开始探索系统文件了。
Linux目录结构的详细信息在文件系统层次结构标准(Filesystem Hierarchy Standard,简称FHS)中有介绍(http://www.pathname.com/fhs/),但是简要的概述现在应该足够了。
Figure 2-2 offers a simplified overview of the hierarchy, showing some of the directories under /, /usr, and /var. Notice that the directory structure under /usr contains some of the same directory names as /.
图2-2提供了层次结构的简化概述,显示了/、/usr和/var下的一些目录。
请注意,/usr下的目录结构包含了与/下相同的目录名。
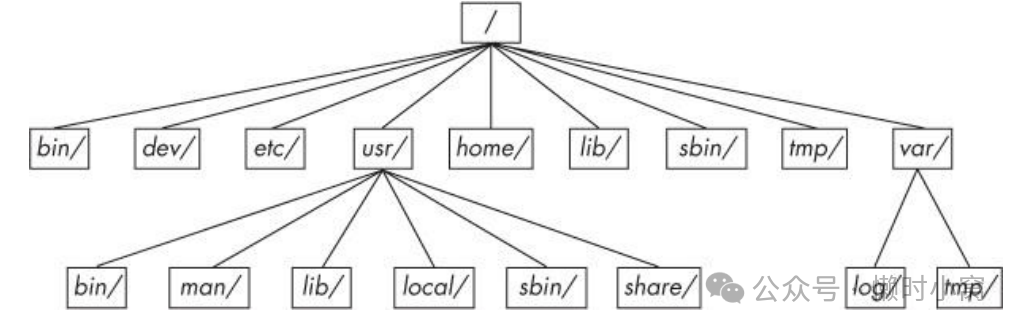
Figure 2-2. Linux directory hierarchy
Figure 2-2. Linux directory hierarchy
Here are the most important subdirectories in root:
以下是根目录中最重要的子目录:
o /bin Contains ready-to-run programs (also known as an executables), including most of the basic Unix commands such as ls and cp. Most of the programs in /bin are in binary format, having been created by a C compiler, but some are shell scripts in modern systems.
o /dev Contains device files. You’ll learn more about these in Chapter 3.
o /etc This core system configuration directory (pronounced EHT-see) contains the user password, boot, device, networking, and other setup files. Many items in /etc are specific to the machine’s hardware. For example, the /etc/X11 directory contains graphics card and window system configurations.
o /home Holds personal directories for regular users. Most Unix installations conform to this standard.
o /lib An abbreviation for library, this directory holds library files containing code that executables can use. There are two types of libraries: static and shared. The /lib directory should contain only shared libraries, but other lib directories, such as /usr/lib, contain both varieties as well as other auxiliary files. (We’ll discuss shared libraries in more detail in Chapter 15.)
o /proc Provides system statistics through a browsable directory-and-file interface. Much of the /proc subdirectory structure on Linux is unique, but many other Unix variants have similar features. The /proc directory contains information about currently running processes as well as some kernel parameters.
o /sys This directory is similar to /proc in that it provides a device and system interface. You’ll read more about /sys in Chapter 3.
o /sbin The place for system executables. Programs in /sbin directories relate to system management, so regular users usually do not have /sbin components in their command paths. Many of the utilities found here will not work if you’re not running them as root.
o /tmp A storage area for smaller, temporary files that you don’t care much about. Any user may read to and write from /tmp, but the user may not have permission to access another user’s files there. Many programs use this directory as a workspace. If something is extremely important, don’t put it in /tmp because most distributions clear /tmp when the machine boots and some even remove its old files periodically. Also, don’t let /tmp fill up with garbage because its space is usually shared with something critical (like the rest of /, for example).
o /usr Although pronounced “user,” this subdirectory has no user files. Instead, it contains a large directory hierarchy, including the bulk of the Linux system. Many of the directory names in /usr are the same as those in the root directory (like /usr/bin and /usr/lib), and they hold the same type of files. (The reason that the root directory does not contain the complete system is primarily historic—in the past, it was to keep space requirements low for the root.)
o /var The variable subdirectory, where programs record runtime information. System logging, user tracking, caches, and other files that system programs create and manage are here. (You’ll notice a /var/tmp directory here, but the system doesn’t wipe it on boot.
o /bin:包含可直接运行的程序(也称为可执行文件),包括大多数基本的Unix命令,如ls和cp。/bin目录中的大多数程序都是以二进制格式创建的,由C编译器生成,但在现代系统中也有一些shell脚本。
o /dev:包含设备文件。您将在第3章中了解更多相关信息。
o /etc:这是核心系统配置目录(发音为EHT-see),包含用户密码、引导、设备、网络和其他设置文件。/etc目录中的许多项目都是特定于机器硬件的。例如,/etc/X11目录包含图形卡和窗口系统的配置。
o /home:为普通用户提供个人目录。大多数Unix安装都符合这个标准。
o /lib:缩写为库,该目录包含包含可执行文件可以使用的代码的库文件。有两种类型的库:静态库和共享库。/lib目录只应包含共享库,但其他lib目录(例如/usr/lib)也包含两种类型的库以及其他辅助文件。(我们将在第15章中更详细地讨论共享库。) o /proc:通过可浏览的目录和文件接口提供系统统计信息。Linux上的/proc子目录结构很独特,但许多其他Unix变种也具有类似的功能。/proc目录包含有关当前运行的进程以及一些内核参数的信息。
o /sys:此目录类似于/proc目录,提供设备和系统接口。您将在第3章中了解更多关于/sys目录的信息。
o /sbin:系统可执行文件的位置。/sbin目录中的程序与系统管理相关,因此普通用户通常不会在其命令路径中包含/sbin组件。这里找到的许多实用程序如果不以root身份运行,则无法工作。
o /tmp是一个存储较小、临时文件的区域,你对它并不太在意。任何用户都可以读取和写入/tmp,但用户可能没有权限访问其他用户在此处的文件。许多程序将此目录用作工作空间。如果某个文件非常重要,不要放在/tmp中,因为大多数发行版在机器启动时会清除/tmp,有些甚至会定期删除其旧文件。此外,不要让/tmp充满垃圾,因为它的空间通常与某些关键内容(例如根目录的其他部分)共享。
o /usr虽然发音为“user”,但这个子目录没有用户文件。相反,它包含一个大型的目录层次结构,包括大部分Linux系统。/usr中的许多目录名与根目录中的目录名相同(如/usr/bin和/usr/lib),并且它们保存着相同类型的文件。(根目录不包含完整的系统的原因主要是历史原因——过去为了使根目录的空间要求较低。)
o /var是变量子目录,程序在此记录运行时信息。系统日志、用户跟踪、缓存和其他系统程序创建和管理的文件都在这里。(你会注意到这里有一个/var/tmp目录,但系统不会在启动时清除它。)
2.19.1 Other Root Subdirectories(其他根目录的子目录)
There are a few other interesting subdirectories in the root directory:
根目录中还有一些其他有趣的子目录:
o /boot Contains kernel boot loader files. These files pertain only to the very first stage of the Linux startup procedure; you won’t find information about how Linux starts up its services in this directory. See Chapter 5 for more about this. o /media A base attachment point for removable media such as flash drives that is found in many distributions. o /opt This may contain additional third-party software. Many systems don’t use /opt.
/boot包含内核引导加载程序文件。
这些文件只与Linux启动过程的最初阶段有关;你在这个目录中找不到关于Linux如何启动服务的信息。
有关此内容的更多信息,请参见第5章。
/media是可移动介质的基本附加点,如闪存驱动器,它在许多发行版中都存在。
/opt可能包含额外的第三方软件。许多系统不使用/opt。
2.19.2 The /usr Directory(/usr目录)
The /usr directory may look relatively clean at first glance, but a quick look at /usr/bin and /usr/lib reveals that there’s a lot here; /usr is where most of the user-space programs and data reside. In addition to /usr/bin, /usr/sbin, and /usr/lib, /usr contains the following:
/ usr目录乍一看可能相对干净,但快速查看/usr/bin和/usr/lib会发现这里有很多内容;
/usr是大多数用户空间程序和数据所在的地方。
除了/usr/bin、/usr/sbin和/usr/lib之外,/usr还包含以下内容:
o /include Holds header files used by the C compiler. o /info Contains GNU info manuals (see 2.13 Getting Online Help). o /local Is where administrators can install their own software. Its structure should look like that of / and /usr. o /man Contains manual pages. o /share Contains files that should work on other kinds of Unix machines with no loss of functionality. In the past, networks of machines would share this directory, but a true /share directory is becoming rare because there are no space issues on modern disks. Maintaining a /share directory is often just a pain. In any case, /man, /info, and some other subdirectories are often found here.
- /include保存C编译器使用的头文件。
- /info包含GNU info手册(见2.13 获取在线帮助)。
- /local是管理员可以安装自己软件的地方。它的结构应该类似于/和/usr。
- /man包含手册页。
- /share包含应该在其他类型的Unix机器上正常工作的文件,而不会丧失功能。过去,机器网络会共享此目录,但真正的/share目录变得越来越少,因为现代磁盘没有空间问题。维护/share目录通常只是一种麻烦。无论如何,/man、/info和其他一些子目录通常在这里找到。
2.19.3 Kernel Location(内核位置)
On Linux systems, the kernel is normally in /vmlinuz or /boot/vmlinuz. A boot loader loads this file into memory and sets it in motion when the system boots. (You’ll find details on the boot loader in Chapter 5.)
在Linux系统中,内核通常位于/vmlinuz或/boot/vmlinuz。
引导加载程序会将此文件加载到内存中,并在系统启动时启动它。(有关引导加载程序的详细信息,请参见第5章。)
Once the boot loader runs and sets the kernel in motion, the main kernel file is no longer used by the running system. However, you’ll find many modules that the kernel can load and unload on demand during the course of normal system operation. Called loadable kernel modules, they are located under /lib/modules.
一旦引导加载程序运行并启动内核,运行中的系统就不再使用主内核文件。
但是,在正常系统操作过程中,您会发现许多内核可以根据需要加载和卸载的模块。
这些称为可加载内核模块,它们位于/lib/modules下。
2.20 Running Commands as the Superuser(以超级用户身份运行命令)
Before going any further, you should learn how to run commands as the superuser. You probably already know that you can run the su command and enter the root password to start a root shell. This practice works, but it has certain disadvantages:
在进一步操作之前,您应该学会如何以超级用户身份运行命令。
您可能已经知道可以运行su命令并输入root密码来启动root shell。这种做法是可行的,但也存在一些缺点:
o You have no record of system-altering commands. o You have no record of the users who performed system-altering commands. o You don’t have access to your normal shell environment. o You have to enter the root password.
- 您无法记录修改系统的命令。
- 您无法记录执行修改系统命令的用户。
- 您无法访问正常的shell环境。
- 您需要输入root密码。
2.20.1 sudo
Most larger distributions use a package called sudo to allow administrators to run commands as root when they are logged in as themselves. For example, in Chapter 7, you’ll learn about using vipw to edit the /etc/passwd file. You could do it like this:
大多数较大的发行版使用一个名为sudo的软件包,允许管理员在以自己的身份登录时以root身份运行命令。例如,在第7章中,您将学习使用vipw编辑/etc/passwd文件。您可以像这样执行:
$ sudo vipwWhen you run this command, sudo logs this action with the syslog service under the local2 facility. You’ll also learn more about system logs in Chapter 7.
运行此命令时,sudo会将此操作记录在syslog服务的local2设施下。
在第7章中,您还将学习更多关于系统日志的内容。
2.20.2 /etc/sudoers
Of course, the system doesn’t let just any user run commands as the superuser; you must configure the privileged users in your /etc/sudoers file. The sudo package has many options (that you’ll probably never use), which makes the syntax in /etc/sudoers somewhat complicated. For example, this file gives user1 and user2 the power to run any command as root without having to enter a password:
当然,系统不允许任何用户都以超级用户身份运行命令;您必须在/etc/sudoers文件中配置特权用户。
sudo软件包有许多选项(您可能永远不会使用),这使得/etc/sudoers的语法有些复杂。
例如,此文件允许user1和user2以root身份运行任何命令而无需输入密码:
User_Alias ADMINS = user1, user2
ADMINS ALL = NOPASSWD: ALL
root ALL=(ALL) ALL
The first line defines an ADMINS user alias with the two users, and the second line grants the privileges. The ALL = NOPASSWD: ALL part means that the users in the ADMINS alias can use sudo to execute commands as root. The second ALL means “any command.” The first ALL means “any host.” (If you have more than one machine, you can set different kinds of access for each machine or group of machines, but we won’t cover that feature.)
第一行定义了一个名为ADMINS的用户别名,其中包含两个用户,第二行授予了特权。
ALL = NOPASSWD: ALL部分表示ADMINS别名中的用户可以使用sudo以root身份执行命令。
第二个ALL表示“任何命令”。
第一个ALL表示“任何主机”。(如果您有多台机器,可以为每台机器或一组机器设置不同的访问权限,但我们不会涉及该功能。)
The root ALL=(ALL) ALL simply means that the superuser may also use sudo to run any command on any host. The extra (ALL) means that the superuser may also run commands as any other user. You can extend this privilege to the ADMINS users by adding (ALL) to the /etc/sudoers line, as shown at ?: ADMINS ALL = (ALL)? NOPASSWD: ALL
root ALL=(ALL) ALL简单地表示超级用户也可以使用sudo在任何主机上运行任何命令。
额外的(ALL)表示超级用户也可以以任何其他用户的身份运行命令。
您可以通过在/etc/sudoers行中添加(ALL)来将此特权扩展给ADMINS用户,如?所示: ADMINS ALL = (ALL)? NOPASSWD: ALL
NOTE Use the visudo command to edit /etc/sudoers. This command checks for file syntax errors after you save the file. That’s it for sudo for now. If you need to use its more advanced features, see the sudoers(5) and sudo(8) manual pages. (The actual mechanics of user switching are covered in Chapter 7.) 注意 使用visudo命令编辑/etc/sudoers文件。此命令在保存文件后会检查文件语法错误。 目前关于sudo的介绍就到这里了。 如果你需要使用它的更高级功能,请参阅sudoers(5)和sudo(8)的手册页面。 (有关用户切换的实际机制将在第7章中介绍。)
2.21 Looking Forward(展望未来)
You should now know how to do the following at the command line: run programs, redirect output, interact with files and directories, view process listings, view manual pages, and generally make your way around the user space of a Linux system. You should also be able to run commands as the superuser. You may not yet know much about the internal details of user-space components or what goes on in the kernel, but with the basics of files and processes under your belt, you’re on your way. In the next few chapters, you’ll be working with both kernel and user-space system components using the command-line tools that you just learned.
您现在应该知道如何在命令行中执行以下操作:运行程序、重定向输出、与文件和目录交互、查看进程列表、查看手册页面,并且可以在Linux系统的用户空间中自如地操作。
您还应该能够以超级用户身份运行命令。
也许您对用户空间组件的内部细节或内核中发生的情况还不太了解,但是掌握了文件和进程的基础知识后,您已经迈出了第一步。
在接下来的几章中,您将使用刚刚学到的命令行工具来处理内核和用户空间系统组件。
回顾
原创声明:本文系作者授权腾讯云开发者社区发表,未经许可,不得转载。
如有侵权,请联系 cloudcommunity@tencent.com 删除。
原创声明:本文系作者授权腾讯云开发者社区发表,未经许可,不得转载。
如有侵权,请联系 cloudcommunity@tencent.com 删除。