实验 | 利用华为eNSP进行防火墙主备配置

一、概述
在使用华为防火墙USG6000进行网络架构设计时,我们必须意识到生产网络环境中的关键位置通常需要两台网络设备才能实现高可用性。
在本文中,我们将在华为防火墙型号 USG6000 上配置主备,这样的话,当一个防火墙单元发生故障时,另一个防火墙单元将接管服务来确保服务的连续性。
二、先决条件
- 电脑上安装了华为 eNSP。
- 掌握在华为防火墙USG6000上配置NAT。
三、实验室场景设置
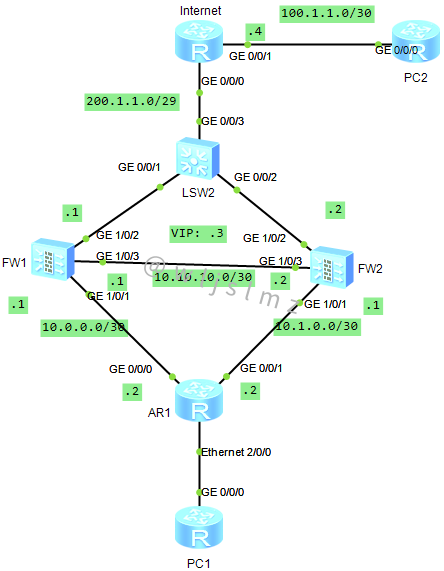
我们将在华为防火墙型号 USG6000 上建立一个实验室来配置主备,如下图所示。
局域网中有一台主机名为“PC1”的路由器,充当局域网内的客户端计算机,主机名为“AR1”的路由器充当客户端计算机的网关,FW1 为活动防火墙,F2 为备用防火墙,公共网络中有一台路由器充当互联网,另一台主机名为“PC2”的路由器充当计算机,FW1的接口GE1/0/3与FW2的接口GE1/0/3相连,用于心跳链路。
以下是各设备的基本配置。
在 PC 1上
首先,我们可以如下配置主机名和IP。
] sysname PC1
] int g0/0/0
    ip add 20.0.0.10 255.255.255.0
] ip route-static 0.0.0.0 0.0.0.0 20.0.0.1
在 AR1 上
然后,让我们如下配置 IP 和 OSPF 路由协议。
] int Ethernet2/0/0
     ip add 20.0.0.1 255.255.255.0
] int g0/0/0
     ip add 10.0.0.2 255.255.255.252
     ospf network-type p2p

] int g0/0/1
     ip add 10.1.0.2 255.255.255.252
     ospf network-type p2p

] ospf 10 router-id 172.16.0.3
    area 0.0.0.0
      network 10.0.0.0 0.0.0.3
      network 10.1.0.0 0.0.0.3
      network 20.0.0.0 0.0.0.255
在 FW1
在 FW1 上,让我们为每个接口配置 IP 地址,如下所示:
] sysname FW1
] int g1/0/1
       undo shutdown
       ip address 10.0.0.1 255.255.255.252
       ospf network-type p2p
       undo service-manage enable
] int g1/0/2
       undo shutdown
       ip address 200.1.1.1 255.255.255.248
       undo service-manage enable
] int g1/0/3
      undo shutdown
      ip address 10.10.10.1 255.255.255.252
将接口接口添加到安全区域如下:
] firewall zone trust
     add int g1/0/1
] firewall zone untrust
  add int g1/0/2
] firewall zone dmz
  add int g1/0/3
配置OSPF和默认路由如下:
] ospf 10 router-id 172.16.0.1
    default-route-advertise type 1
    area 0.0.0.0
       network 10.0.0.0 0.0.0.3
] ip route-static 0.0.0.0 0.0.0.0 200.1.1.4
在 FW2
在 FW2 上,让我们为每个接口配置 IP 地址,如下所示:
] sysname FW2
] int g1/0/1
       undo shutdown
       ip address 10.1.0.1 255.255.255.252
       ospf network-type p2p
       undo service-manage enable
] int g1/0/2
       undo shutdown
       ip address 200.1.1.2 255.255.255.248
       undo service-manage enable
] int g1/0/3
      undo shutdown
      ip address 10.10.10.2 255.255.255.252
将接口接口添加到安全区域如下:
] firewall zone trust
     add int g1/0/1
] firewall zone untrust
  add int g1/0/2
] firewall zone dmz
  add int g1/0/3
配置OSPF和默认路由如下:
] ospf 10 router-id 172.16.0.2
    default-route-advertise type 1
    area 0.0.0.0
       network 10.1.0.0 0.0.0.3
] ip route-static 0.0.0.0 0.0.0.0 200.1.1.4
在路由器上充当互联网
我们只需要在 Internet 路由器的每个接口上配置 IP 地址。
] sysname Internet
] int g0/0/0
      ip add 200.1.1.4 255.255.255.248
] int g0/0/1
      ip add 100.1.1.1 255.255.255.252
在路由器上充当公共网络中的计算机
在 PC 路由器上,让我们配置基本配置如下:
] sysname PC2
] int g0/0/0
      ip add 100.1.1.2 255.255.255.252
] ip route-static 0.0.0.0 0.0.0.0 100.1.1.1
四、配置防火墙USG6000主备
在 FW1 上如下配置主备 HRP
] hrp enable
] hrp interface GigabitEthernet1/0/3 remote 10.10.10.2
] undo hrp adjust ospfv3-cost enable
] undo hrp adjust bgp-cost enable
] hrp track interface GigabitEthernet1/0/1
在 FW2 上如下配置主备 HRP
] hrp enable
] hrp standby-device
] hrp interface GigabitEthernet1/0/3 remote 10.10.10.1
] undo hrp adjust ospfv3-cost enable
] undo hrp adjust bgp-cost enable
] hrp track interface GigabitEthernet1/0/1
在 FW1 上,将防火墙规则配置为允许流量,如下所示,我们不需要在 FW2 上配置此规则,此规则会自动从 FW1 复制到 FW2。
] security-policy
  rule name rule_ospf
   source-zone local
   action permit
  rule name rule_public
   source-zone trust
   destination-zone untrust
   action permit
  rule name acl_trushlocal
   source-zone trust
   destination-zone local
   action permit
现在在 FW1 上,让我们为客户端 Internet 访问配置 NAT 策略,如下所示。我们不需要在 FW2 上配置此策略,此规则会自动从 FW1 复制到 FW2。
] nat-policy
    rule name nat_internet
      source-zone trust
      destination-zone untrust
      action nat easy-ip
五、验证和测试
华为防火墙型号 USG6000 的主备配置应已准备就绪,让我们验证配置为以下 FW1
>dis hrp state ver
  Role: active, peer: standby
  Running priority: 45000, peer: 45000
  Core state: normal, peer: normal
  Backup channel usage: 0.00%
  Stable time: 0 days, 2 hours, 26 minutes
  Last state change information: 2019-02-26 2:32:01 HRP core state changed, old_s
 tate = abnormal(active), new_state = normal, local_priority = 45000, peer_priori
 ty = 45000.
 Configuration:
  hello interval:              1000ms
  preempt:                     60s
  mirror configuration:        off
  mirror session:              off
  track trunk member:          on
  auto-sync configuration:     on
  auto-sync connection-status: on
  adjust ospf-cost:            on
  adjust ospfv3-cost:          off
  adjust bgp-cost:             off
  nat resource:                off
 Detail information:
                        GigabitEthernet1/0/1: up
                                   ospf-cost: +0
并验证配置为以下 FW2
] dis hrp state
  Role: standby, peer: active
  Running priority: 45000, peer: 45000
  Core state: normal, peer: normal
  Backup channel usage: 0.00%
  Stable time: 0 days, 2 hours, 30 minutes
  Last state change information: 2019-02-26 2:29:56 HRP core state changed, old_s
 tate = abnormal(active), new_state = normal, local_priority = 45000, peer_priori
 ty = 45000.
 HRP_Sdis hrp state ver
  Role: standby, peer: active
  Running priority: 45000, peer: 45000
  Core state: normal, peer: normal
  Backup channel usage: 0.00%
  Stable time: 0 days, 2 hours, 30 minutes
  Last state change information: 2019-02-26 2:29:56 HRP core state changed, old_s
 tate = abnormal(active), new_state = normal, local_priority = 45000, peer_priori
 ty = 45000.
 Configuration:
  hello interval:              1000ms
  preempt:                     60s
  mirror configuration:        off
  mirror session:              off
  track trunk member:          on
  auto-sync configuration:     on
  auto-sync connection-status: on
  adjust ospf-cost:            on
  adjust ospfv3-cost:          off
  adjust bgp-cost:             off
  nat resource:                off
 Detail information:
                        GigabitEthernet1/0/1: up
                                   ospf-cost: +65500
现在,让我们在互联网上测试从 PC1 路由器到 PC2 路由器的 ping,如下所示。
ping 100.1.1.2
   PING 100.1.1.2: 56  data bytes, press CTRL_C to break
     Request time out
     Reply from 100.1.1.2: bytes=56 Sequence=2 ttl=252 time=50 ms
     Reply from 100.1.1.2: bytes=56 Sequence=3 ttl=252 time=60 ms
     Reply from 100.1.1.2: bytes=56 Sequence=4 ttl=252 time=50 ms
     Reply from 100.1.1.2: bytes=56 Sequence=5 ttl=252 time=40 ms
 --- 100.1.1.2 ping statistics ---
     5 packet(s) transmitted
     4 packet(s) received
     20.00% packet loss
     round-trip min/avg/max = 40/50/60 ms
现在我们可以测试关闭FW1,当尝试从局域网中的PC1路由器尝试在互联网上ping PC2时,我们仍然应该得到以下成功结果。
<PC1>ping 100.1.1.2
   PING 100.1.1.2: 56  data bytes, press CTRL_C to break
     Reply from 100.1.1.2: bytes=56 Sequence=1 ttl=252 time=40 ms
     Reply from 100.1.1.2: bytes=56 Sequence=2 ttl=252 time=50 ms
     Reply from 100.1.1.2: bytes=56 Sequence=3 ttl=252 time=40 ms
     Reply from 100.1.1.2: bytes=56 Sequence=4 ttl=252 time=50 ms
     Reply from 100.1.1.2: bytes=56 Sequence=5 ttl=252 time=50 ms
 --- 100.1.1.2 ping statistics ---
     5 packet(s) transmitted
     5 packet(s) received
     0.00% packet loss
     round-trip min/avg/max = 40/46/50 ms
六,结论
本文通过实验给大家讲解了华为防火墙USG6000命令行模式配置主备,希望本文能够给您带来帮助,有任何问题可以在下方评论区进行讨论。