【Flutter】Flutter 布局组件 ( FractionallySizedBox 组件 | Stack 布局组件 | Positioned 组件 )
【Flutter】Flutter 布局组件 ( FractionallySizedBox 组件 | Stack 布局组件 | Positioned 组件 )

韩曙亮
发布于 2023-03-28 21:39:19
发布于 2023-03-28 21:39:19
文章目录
一、FractionallySizedBox 组件
FractionallySizedBox 组件 : 可控制组件在水平/垂直方向上填充满父容器 ;
class FractionallySizedBox extends SingleChildRenderObjectWidget {
  const FractionallySizedBox({
    Key key,
    this.alignment = Alignment.center,
    this.widthFactor,
    this.heightFactor,
    Widget child,
  }) : assert(alignment != null),
       assert(widthFactor == null || widthFactor >= 0.0),
       assert(heightFactor == null || heightFactor >= 0.0),
       super(key: key, child: child);
}
FractionallySizedBox 组件用法 :
- 设置宽度充满父容器 : widthFactor 字段设置 ;
- 设置高度填充满父容器 : heightFactor 字段设置 ;
- 设置平铺的组件 : child 字段设置 Widget 组件 ;
// 水平/垂直方向平铺组件
FractionallySizedBox(
  // 设置宽度充满父容器
  widthFactor: 1,
  // 设置高度填充满父容器
  heightFactor: 1,
  // 要设置的水平 / 垂直方向的平铺操作的组件
  child: 要控制平铺的组件 ( Widget 类型 ),
  ),
)
代码示例 :
// 水平/垂直方向平铺组件
FractionallySizedBox(
  // 设置宽度充满父容器
  widthFactor: 1,
  // 要设置的水平 / 垂直方向的平铺操作的组件
  child: Container(
    decoration: BoxDecoration(color: Colors.black),
    child: Text(
      "高度自适应, 宽度充满父容器",
      style: TextStyle(color: Colors.amberAccent),
    ),
  ),
)
二、Stack 布局组件
Stack 布局组件 : 相当于帧布局 ;
class Stack extends MultiChildRenderObjectWidget {
  /// Creates a stack layout widget.
  ///
  /// By default, the non-positioned children of the stack are aligned by their
  /// top left corners.
  Stack({
    Key key,
    this.alignment = AlignmentDirectional.topStart,
    this.textDirection,
    this.fit = StackFit.loose,
    this.overflow = Overflow.clip,
    List<Widget> children = const <Widget>[],
  }) : super(key: key, children: children);
}
Stack 布局组件用法 : 在 children 字段设置若干 Widget 组件 , 最后一个组件在最顶端显示 , 覆盖前面的组件 ;
代码示例 :
// 帧布局
Stack(
  children: <Widget>[
    Image.network("https://img-blog.csdnimg.cn/20210301145757946.png",
      width: 100,
      height: 100,
    ),

    Image.network("https://img-blog.csdnimg.cn/20210228180808133.png",
        width: 25,
        height: 25,
      ),
  ],
),
三、Positioned 组件
Positioned 组件 : 用于在 Stack 布局中指定某个组件的位置
class Positioned extends ParentDataWidget<Stack> {
  /// Creates a widget that controls where a child of a [Stack] is positioned.
  ///
  /// Only two out of the three horizontal values ([left], [right],
  /// [width]), and only two out of the three vertical values ([top],
  /// [bottom], [height]), can be set. In each case, at least one of
  /// the three must be null.
  ///
  /// See also:
  ///
  ///  * [Positioned.directional], which specifies the widget's horizontal
  ///    position using `start` and `end` rather than `left` and `right`.
  ///  * [PositionedDirectional], which is similar to [Positioned.directional]
  ///    but adapts to the ambient [Directionality].
  const Positioned({
    Key key,
    this.left, // 设置组件距离左侧距离
    this.top, // 设置组件距离顶部距离
    this.right, // 设置组件距离右侧距离
    this.bottom, // 设置组件距离底部距离
    this.width, // 设置组件宽度
    this.height, // 设置组件高度
    @required Widget child,
  }) : assert(left == null || right == null || width == null),
       assert(top == null || bottom == null || height == null),
       super(key: key, child: child);
}
Positioned 组件用法 :
- 设置组件宽度 : width 字段 ;
- 设置组件高度 : height 字段 ;
- 设置组件距离左侧距离 : left 字段 ;
- 设置组件距离顶部距离 : top 字段 ;
- 设置组件距离右侧距离 : right 字段 ;
- 设置组件距离底部距离 : bottom 字段 ;
代码示例 :
// 帧布局
Stack(
  children: <Widget>[
    Image.network("https://img-blog.csdnimg.cn/20210301145757946.png",
      width: 100,
      height: 100,
    ),
    // 设置组件位置在 Stack 的相对位置
    Positioned(
      right: 0, // 距离右侧 0 距离
      bottom: 0, // 距离底部 0 距离
      // 设置约束的组件位置
      child: Image.network("https://img-blog.csdnimg.cn/20210228180808133.png",
        width: 25,
        height: 25,
      ),
    ),
  ],
),
四、 完整代码示例
完整代码示例 :
import 'package:flutter/material.dart';

class LayoutPage extends StatefulWidget {
  @override
  _LayoutPageState createState() => _LayoutPageState();
}

class _LayoutPageState extends State<LayoutPage> {

  /// 当前被选中的底部导航栏索引
  int _currentSelectedIndex = 0;

  // This widget is the root of your application.
  @override
  Widget build(BuildContext context) {

    // 文本组件样式 , 可以设置给 Text 文本组件
    // 设置字体大小 20, 颜色红色
    TextStyle textStyle = TextStyle(fontSize: 20, color: Colors.red);

    return MaterialApp(
      title: '布局组件示例',
      theme: ThemeData(
        primarySwatch: Colors.blue,
      ),
      home: Scaffold(
        // 顶部标题栏
        appBar: AppBar(title: Text('布局组件示例'),),

        // 底部导航栏 BottomNavigationBar 设置
        // items 可以设置多个 BottomNavigationBarItem
        bottomNavigationBar: BottomNavigationBar(

          // 设置当前选中的底部导航索引
          currentIndex: _currentSelectedIndex,

          // 设置点击底部导航栏的回调事件 , index 参数是点击的索引值
          onTap: (index){
            // 回调 StatefulWidget 组件的 setState 设置状态的方法 , 修改当前选中索引
            // 之后 BottomNavigationBar 组件会自动更新当前选中的选项卡
            setState(() {
              // 改变 int _currentSelectedIndex 变量的状态
              _currentSelectedIndex = index;
            });
          },

          // 条目
          items: [

          // 设置底部导航栏条目, 每个条目可以设置一个图标
          BottomNavigationBarItem(
            // 默认状态下的图标
            icon: Icon(Icons.home, color: Colors.grey,),

            // 激活状态下的图标
            activeIcon: Icon(Icons.home, color: Colors.red,),

            // 设置标题
            title: Text("主页")
          ),

          // 设置底部导航栏条目, 每个条目可以设置一个图标
          BottomNavigationBarItem(
            // 默认状态下的图标
            icon: Icon(Icons.settings, color: Colors.grey,),

            // 激活状态下的图标
            activeIcon: Icon(Icons.settings, color: Colors.red,),

              // 设置标题
              title: Text("设置")
          )

        ],),

        // 设置悬浮按钮
        floatingActionButton: FloatingActionButton(
          onPressed: (){
            print("悬浮按钮点击");
          },
          child: Text("悬浮按钮组件"),
        ),

        // Container 容器使用
        body:
        _currentSelectedIndex == 0 ?

        // 刷新指示器组件
        RefreshIndicator(
          // 显示的内容
          child: ListView(
            children: <Widget>[
              Container( // 对应底部导航栏设置选项卡
                // 设置容器的装饰器 , BoxDecoration 是最常用的装饰器
                // 可以自行查看 BoxDecoration 中可以设置的属性
                decoration: BoxDecoration(color: Colors.white),

                // 设置 child 子组件居中方式, 居中放置
                alignment: Alignment.center,

                // 子组件, 子组件设置为一个 Column 组件
                child: Column(
                  // Column 子组件, 这里设置 Text 文本组件
                  children: <Widget>[
                    Text("主页面选项卡, 下拉刷新"),

                    // 水平方向排列的线性布局
                    Row(
                      children: <Widget>[

                        // 原始图片, 用于对比
                        Image.network("https://img-blog.csdnimg.cn/20210301145757946.png",
                          width: 100,
                          height: 100,
                        ),

                        // 圆形裁剪组件 , 将 child 布局裁剪成圆形
                        ClipOval(
                          // 使用 SizedBox 组件约束布局大小
                          child: SizedBox(
                            width: 100,
                            height: 100,
                            // 使用 SizedBox 约束该 Image 组件大小
                            child: Image.network("https://img-blog.csdnimg.cn/20210301145757946.png"),
                          ),
                        ),

                        Padding(
                          // 设置内边距 5
                          padding: EdgeInsets.all(15),

                          // 方形裁剪组件 , 将组件裁剪成方形
                          child: ClipRRect(
                            // 设置裁剪圆角, 四个角设置半径为 10 的圆角
                            borderRadius: BorderRadius.all(Radius.circular(10)),

                            // 修改透明度组件 , 这里设置 50% 透明度
                            child: Opacity(
                                opacity: 0.5,
                                // 设置 100x100 大小的图片组件
                                child: Image.network("https://img-blog.csdnimg.cn/20210301145757946.png",
                                  width: 100,
                                  height: 100,
                                ),
                            ),
                          ),
                        ),

                      ],
                    ),

                    // 设置一个布局容器 , 用于封装 PageView 组件
                    Container(
                      // 设置高度
                      height: 200,
                      // 设置边距
                      margin: EdgeInsets.all(15),
                      // 设置装饰, 背景深橙色
                      decoration: BoxDecoration(
                          color: Colors.white
                      ),
                      // 设置子组件 PageView 的裁剪组件
                      child:
                      PhysicalModel(
                        color: Colors.transparent,

                        // 设置圆角半径 15
                        borderRadius: BorderRadius.circular(50),

                        // 设置裁剪行为 , 抗锯齿
                        clipBehavior: Clip.antiAlias,

                        // 设置 PageView 组件
                        child:
                        PageView(
                          // 设置 PageView 中封装的若干组件
                          children: <Widget>[
                            // 第一个页面组件
                            Container(
                              // 设置居中方式 , 居中显示
                              alignment:Alignment.center,
                              // 设置装饰器 , 绿色背景
                              decoration: BoxDecoration(color: Colors.green),
                              // 显示的主要文字
                              child: Text("页面 0", style: TextStyle(fontSize: 20, color: Colors.black),),
                            ),

                            // 第二个页面组件
                            Container(
                              // 设置居中方式 , 居中显示
                              alignment:Alignment.center,
                              // 设置装饰器 , 绿色背景
                              decoration: BoxDecoration(color: Colors.red),
                              // 显示的主要文字
                              child: Text("页面 1", style: TextStyle(fontSize: 20, color: Colors.white),),
                            ),

                            // 第三个页面组件
                            Container(
                              // 设置居中方式 , 居中显示
                              alignment:Alignment.center,
                              // 设置装饰器 , 绿色背景
                              decoration: BoxDecoration(color: Colors.black),
                              // 显示的主要文字
                              child: Text("页面 2", style: TextStyle(fontSize: 20, color: Colors.yellow),),
                            ),

                          ],
                        ),
                      ),
                    ),


                    Container(
                      child: Column(
                        children: <Widget>[
                          // 水平/垂直方向平铺组件
                          FractionallySizedBox(
                            // 设置宽度充满父容器
                            widthFactor: 1,

                            // 要设置的水平 / 垂直方向的平铺操作的组件
                            child: Container(
                              decoration: BoxDecoration(color: Colors.black),
                              child: Text(
                                "高度自适应, 宽度充满父容器",
                                style: TextStyle(color: Colors.amberAccent),
                              ),
                            ),
                          )
                        ],
                      ),
                    ),

                    // 帧布局
                    Stack(
                      children: <Widget>[
                        Image.network("https://img-blog.csdnimg.cn/20210301145757946.png",
                          width: 100,
                          height: 100,
                        ),

                        // 设置组件位置在 Stack 的相对位置
                        Positioned(
                          right: 0, // 距离右侧 0 距离
                          bottom: 0, // 距离底部 0 距离

                          // 设置约束的组件位置
                          child: Image.network("https://img-blog.csdnimg.cn/20210228180808133.png",
                            width: 25,
                            height: 25,
                          ),
                        ),
                      ],
                    ),


                  ],
                ),
              ),
            ],
          ),

          // 刷新时回调的方法
          // 列表发生下拉操作时, 回调该方法
          // 该回调是 Future 类型的
          onRefresh: _refreshIndicatorOnRefresh,
        )
        :
        Container( // 对应底部导航栏设置选项卡
          // 设置容器的装饰器 , BoxDecoration 是最常用的装饰器
          // 可以自行查看 BoxDecoration 中可以设置的属性
          decoration: BoxDecoration(color: Colors.white),

          // 设置 child 子组件居中方式, 居中放置
          alignment: Alignment.center,

          // 子组件, 子组件设置为一个 Column 组件
          child: Column(
            // Column 子组件, 这里设置 Text 文本组件
            children: <Widget>[
              Text("设置页面选项卡")


            ],
          ),

        ) , // 该设置与 _currentSelectedIndex == 0? 相对应, ?: 三目运算符
      ),
    );
  }

  /// RefreshIndicator 发生下拉操作时, 回调该方法
  /// 该方啊是一个异步方法 , 在方法体前添加 async 关键字
  Future<Null> _refreshIndicatorOnRefresh() async{
    // 暂停 500 ms , 使用 await 关键字实现
    // 在这 500 ms 之间 , 列表处于刷新状态
    // 500 ms 之后 , 列表变为非刷新状态
    await Future.delayed(Duration(milliseconds: 500));
    return null;
  }

}
运行效果展示 :
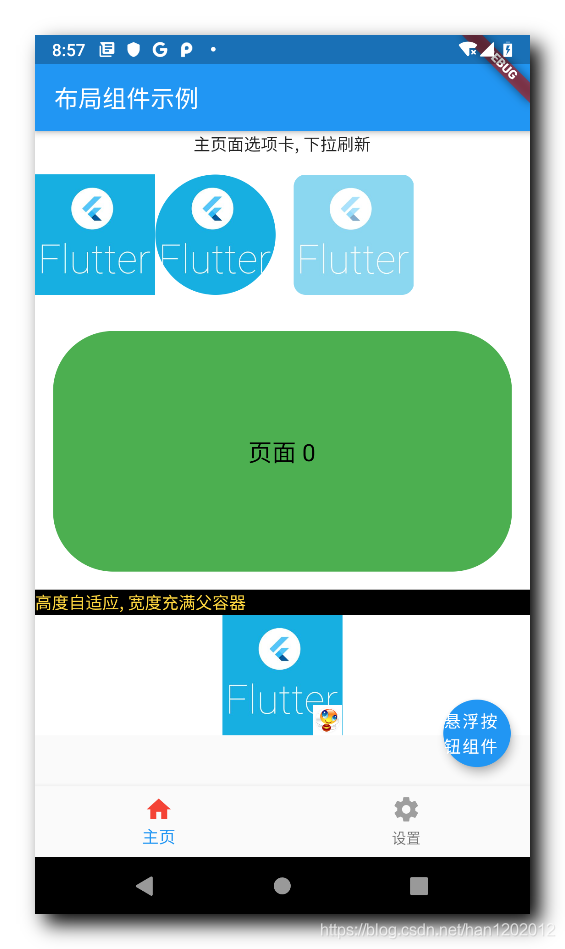
在这里插入图片描述
五、 相关资源
参考资料 :
- Flutter 官网 : https://flutter.dev/
- Flutter 开发文档 : https://flutter.cn/docs ( 强烈推荐 )
- 官方 GitHub 地址 : https://github.com/flutter
- Flutter 中文社区 : https://flutter.cn/
- Flutter 实用教程 : https://flutter.cn/docs/cookbook
- Flutter CodeLab : https://codelabs.flutter-io.cn/
- Dart 中文文档 : https://dart.cn/
- Dart 开发者官网 : https://api.dart.dev/
- Flutter 中文网 ( 非官方 , 翻译的很好 ) : https://flutterchina.club/ , http://flutter.axuer.com/docs/
- Flutter 相关问题 : https://flutterchina.club/faq/ ( 入门阶段推荐看一遍 )
博客源码下载 :
- GitHub 地址 : https://github.com/han1202012/flutter_cmd ( 随博客进度一直更新 , 有可能没有本博客的源码 )
- 博客源码快照 : https://download.csdn.net/download/han1202012/15484718 ( 本篇博客的源码快照 , 可以找到本博客的源码 )
本文参与?腾讯云自媒体分享计划,分享自作者个人站点/博客。
原始发表:2021-03-01,如有侵权请联系 cloudcommunity@tencent.com 删除
评论
登录后参与评论
推荐阅读