Elasticsearch readonlyrest
Elasticsearch readonlyrest

For Elasticsearch
Overview: The ReadonlyREST Suite
ReadonlyREST is a light weight Elasticsearch plugin that adds encryption, authentication, authorization and access control capabilities to Elasticsearch embedded REST API. The core of this plugin is an ACL engine that checks each incoming request through a sequence of rules a bit like a firewall. There are a dozen rules that can be grouped in sequences of blocks and form a powerful representation of a logic chain.
The Elasticsearch plugin known as ReadonlyREST Free is released under the GPLv3 license, or alternatively, a commercial license (see ReadonlyREST Embedded) and lays the technological foundations for the companion Kibana plugin which is released in two versions: ReadonlyREST PRO and ReadonlyREST Enterprise.
Unlike the Elasticsearch plugin, the Kibana plugins are commercial only. But rely on the Elasticsearch plugin in order to work.
For a description of the Kibana plugins, skip to the dedicated documentation page instead.
ReadonlyREST Free plugin for Elasticsearch
In this document we are going to describe how to operate the Elasticsearch plugin in all its features. Once installed, this plugin will greatly extend the Elasticsearch HTTP API (port 9200), adding numerous extra capabilities:
- Encryption: transform the Elasticsearch API from HTTP to HTTPS
- Authentication: require credentials
- Authorization: declare groups of users, permissions and partial access to indices.
- Access control: complex logic can be modeled using an ACL (access control list) written in YAML.
- Audit logs: a trace of the access requests can be logged to file or index (or both).
Flow of a Search Request
The following diagram models an instance of Elasticsearch with the ReadonlyREST plugin installed, and configured with SSL encryption and an ACL with at least one "allow" type ACL block.
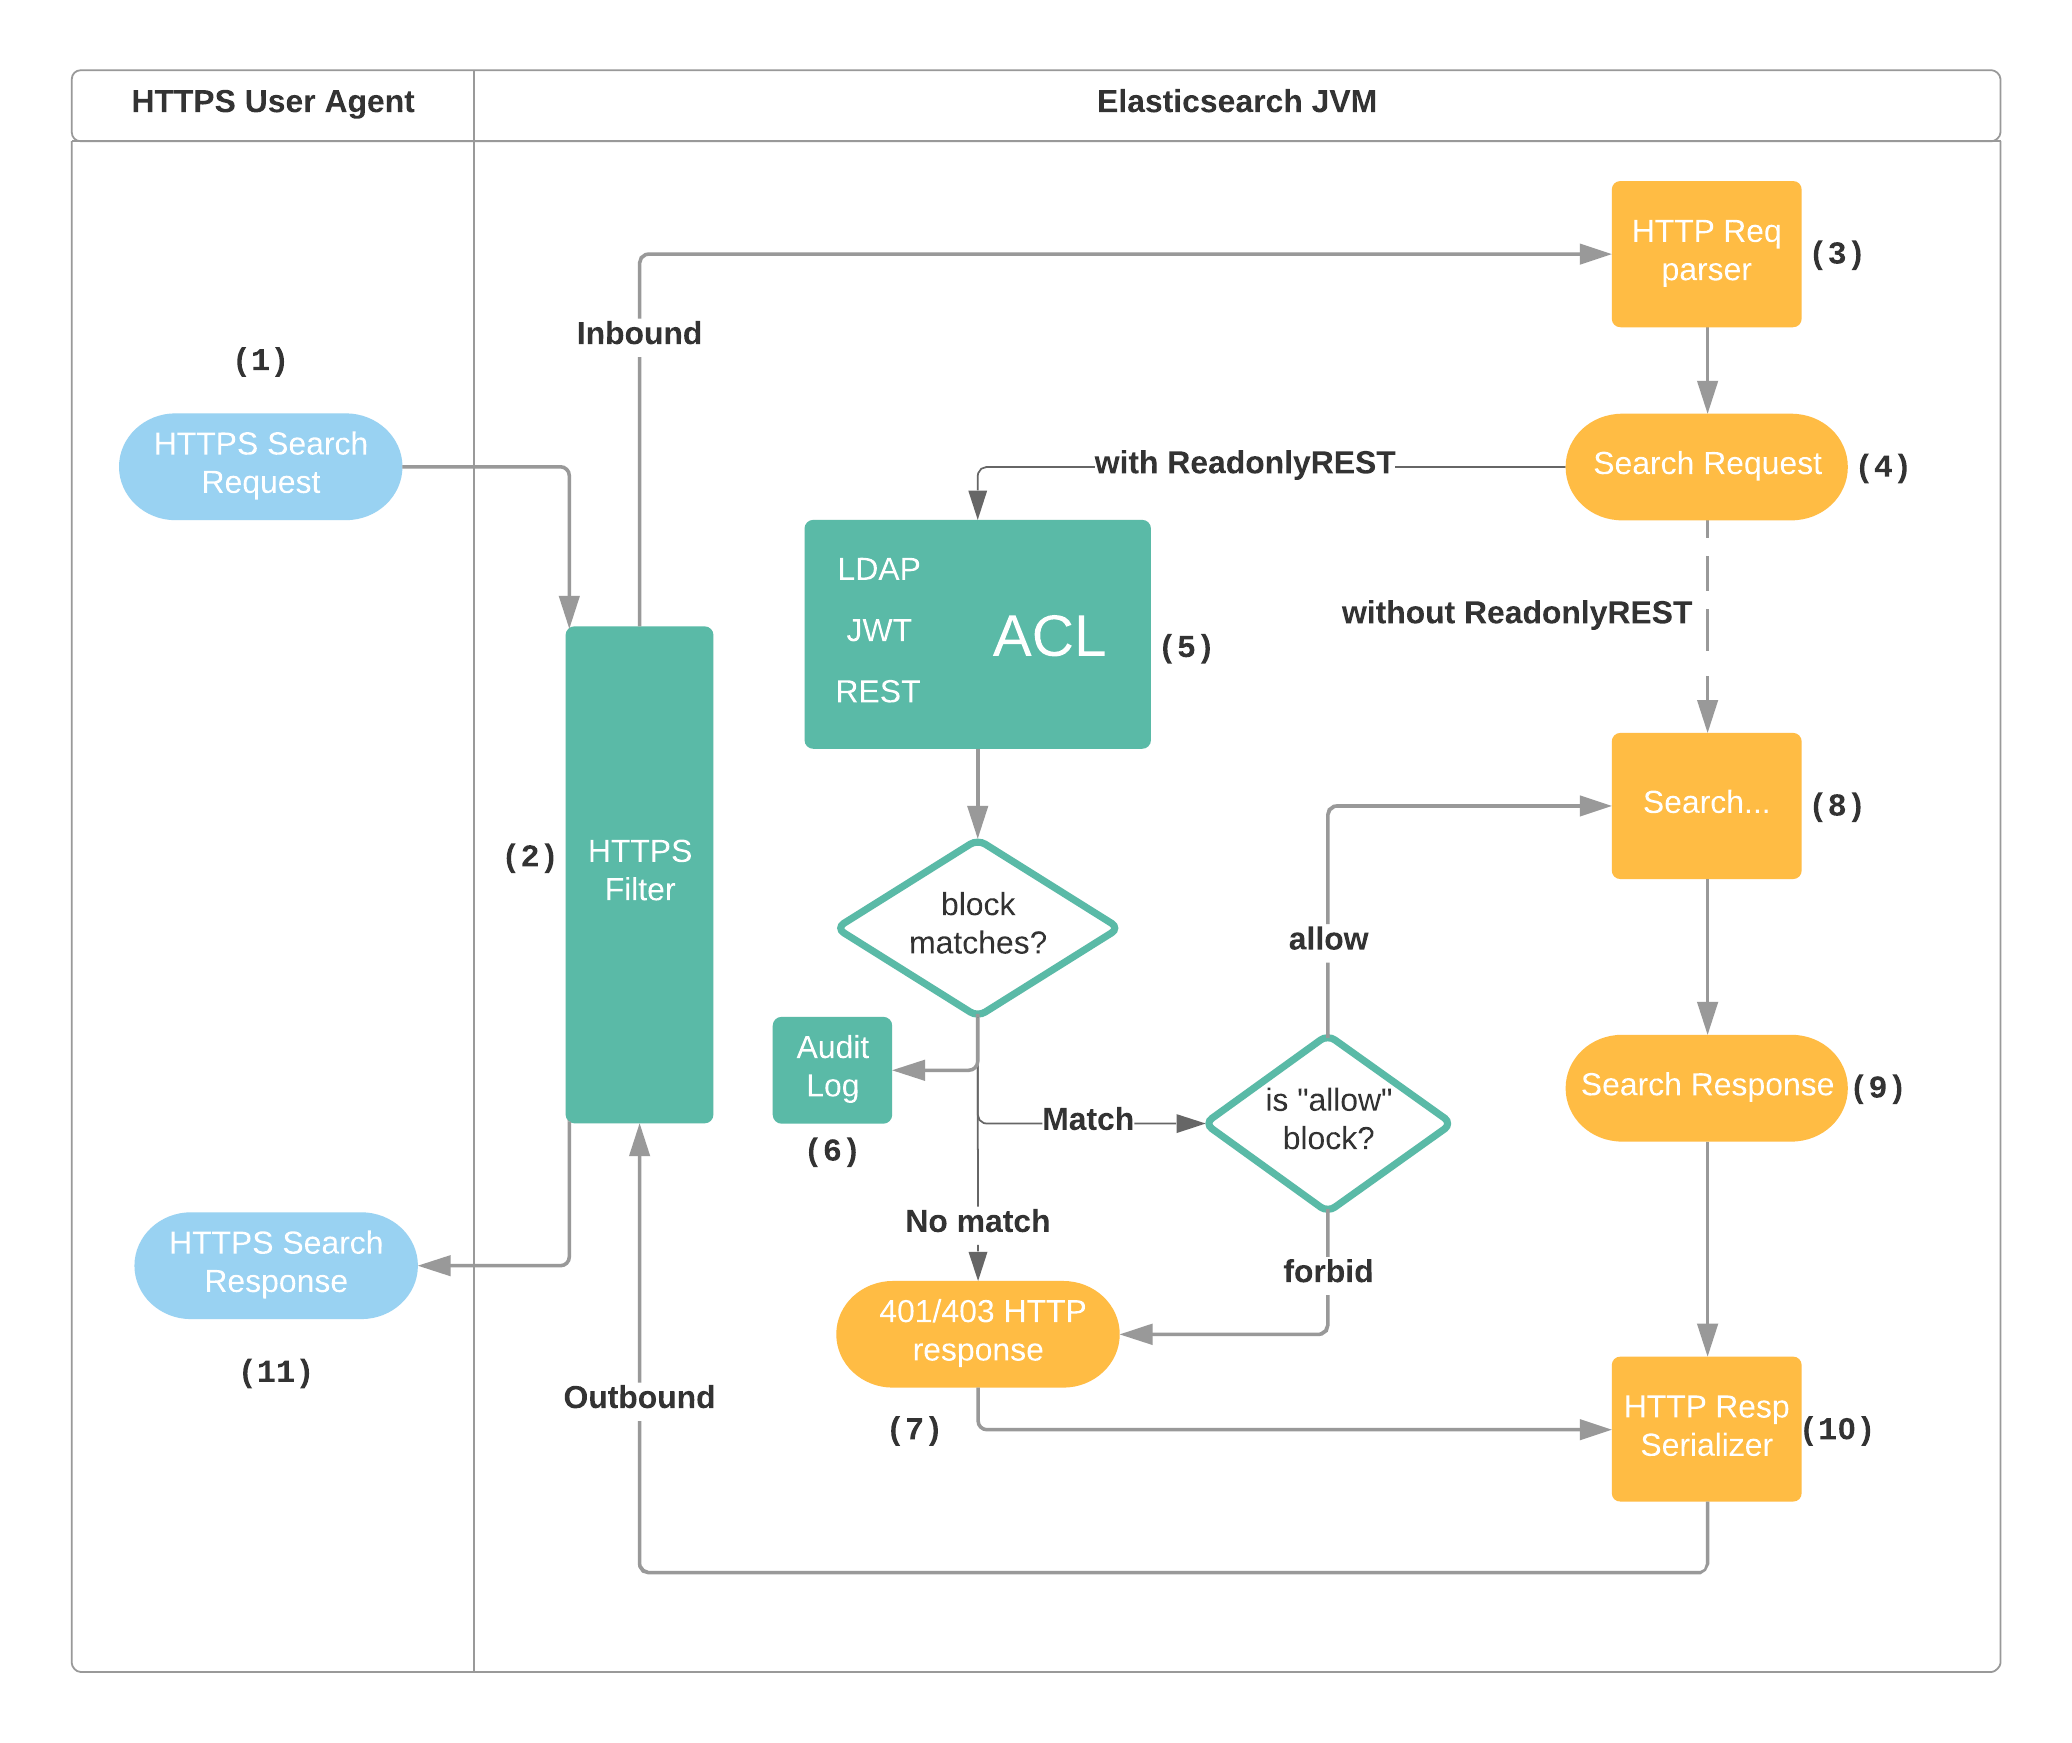
- The User Agent (i.e. cURL, Kibana) sends a search request to Elasticsearch using the port 9200 and the HTTPS URL schema.
- The HTTPS filter in ReadonlyREST plugin unwraps the SSL layer and hands over the request to Elasticsearch HTTP stack
- The HTTP stack in Elasticsearch parses the HTTP request
- The HTTP handler in Elasticsearch extracts the indices, action, request type and creates a
SearchRequest(internal Elasticsearch format). - The SearchRequest goes through the ACL (access control list), external systems like LDAP can be asynchronously queried, and an exit result is eventually produced.
- The exit result is used by the audit log serializer, to write a record to index and/or Elasticsearch log file
- If no ACL block was matched, or if a
type: forbidblock was matched, ReadonlyREST does not forward the search request to the search engine, and creates an "unauthorized" HTTP response. - In case the ACL matched an
type: allowblock, the request is forwarded to the search engine - The Elasticsearch code creates a search response containing the results of the query 10.The search response is converted to an HTTP response by the Elasticsearch code
- The HTTP response flows back to ReadonlyREST's HTTPS filter and to the User agent
Installing the plugin
To install ReadonlyREST plugin for Elasticsearch:
1. Obtain the build
From the official download page. Select your Elasticsearch version and send yourself a link to the compatible ReadonlyREST zip file.
2. Install the build
bin/elasticsearch-plugin install file:///tmp/readonlyrest-X.Y.Z_esW.Q.U.zipNotice how we need to type in the format file:// + absolute path (yes, with three slashes).
@@@@@@@@@@@@@@@@@@@@@@@@@@@@@@@@@@@@@@@@@@@@@@@@@@@@@@@@@@@
@     WARNING: plugin requires additional permissions     @
@@@@@@@@@@@@@@@@@@@@@@@@@@@@@@@@@@@@@@@@@@@@@@@@@@@@@@@@@@@
When prompted about additional permissions, answer y.
3. Patch Elasticsearch
If you are using Elasticsearch 8.0.x or newer, you need an extra post-installation step. Depending on the Elasticsearch version, this command might tweak the main Elasticsearch installation files and/or copy some jars to plugins/readonlyrest directory.
# Patch ES
$ jdk/bin/java -jar plugins/readonlyrest/ror-tools.jar patch??IMPORTANT: for Elasticsearch 8.3.x or newer, the patching operation requires root user privileges.
You can verify if Elasticsearch was correctly patched using command verify:
$ jdk/bin/java -jar plugins/readonlyrest/ror-tools.jar verifyPlease note that the tool assumes that you run it from the root of your ES installation directory or the default installation directory is /usr/share/elasticsearch. But if you want or need, you can instruct it where your Elasticsearch is installed by executing one of tool's command with --es-path parameter:
$ jdk/bin/java -jar plugins/readonlyrest/ror-tools.jar patch --es-path /my/custom/path/to/es/folderor
$ jdk/bin/java -jar plugins/readonlyrest/ror-tools.jar verify --es-path /my/custom/path/to/es/folderNB: In case of any problems with the ror-tools, please call:
$ jdk/bin/java -jar plugins/readonlyrest/ror-tools.jar --help4.Create settings file
Create and edit the readonlyrest.yml settings file in the same directory where elasticsearch.yml is found:
vim $ES_PATH_CONF/conf/readonlyrest.ymlNow write some basic settings, just to get started. In this example we are going to tell ReadonlyREST to require HTTP Basic Authentication for all the HTTP requests, and return 401 Unauthorized otherwise.
readonlyrest:
    access_control_rules:

    - name: "Require HTTP Basic Auth"
      type: allow
      auth_key: user:password
5. Disable X-Pack security module
(applies to ES 6.4.0 or greater)
ReadonlyREST and X-Pack security module can't run together, so the latter needs to be disabled.
Edit elasticsearch.yml and append xpack.security.enabled: false.
vim $ES_PATH_CONF/conf/elasticsearch.yml6. Start Elasticsearch
bin/elasticsearchor:
service start elasticsearchDepending on your environment.
Now you should be able to see the logs and ReadonlyREST related lines like the one below:
[2018-09-18T13:56:25,275][INFO ][o.e.p.PluginsService ] [c3RKGFJ] loaded plugin [readonlyrest]7. Test everything is working
The following command should succeed, and the response should show a status code 200.
curl -vvv -u user:password "http://localhost:9200/_cat/indices"The following command should not succeed, and the response should show a status code 401
curl -vvv "http://localhost:9200/_cat/indices"Upgrading the plugin
To upgrade ReadonlyREST for Elasticsearch:
1. Stop Elasticsearch.
Either kill the process manually, or use:
service stop elasticsearchdepending on your environment.
2. Unpatch Elasticsearch
If you are using Elasticsearch 8.0.x or newer, you need an extra pre-uninstallation step. This will remove all previously copied jars from ROR's installation directory.
# Unpatch ES
$ jdk/bin/java -jar plugins/readonlyrest/ror-tools.jar unpatch
You can verify if Elasticsearch was correctly unpatched using command verify:
$ jdk/bin/java -jar plugins/readonlyrest/ror-tools.jar verifyNB: In case of any problems with the ror-tools, please call:
$ jdk/bin/java -jar plugins/readonlyrest/ror-tools.jar --help3. Uninstall ReadonlyREST
bin/elasticsearch-plugin remove readonlyrest4. Install the new version of ReadonlyREST into Elasticsearch.
bin/elasticsearch-plugin install file://<download_dir>/readonlyrest-<ROR_VERSION>_es<ES_VERSION>.zipe.g.
bin/elasticsearch-plugin install file:///tmp/readonlyrest-1.16.15_es6.1.1.zip5. Patch Elasticsearch
If you are using Elasticsearch 8.0.x or newer, you need an extra post-installation step. Depending on the Elasticsearch version, this command might tweak the main Elasticsearch installation files and/or copy some jars to plugins/readonlyrest directory.
# Patch ES
$ jdk/bin/java -jar plugins/readonlyrest/ror-tools.jar patch??IMPORTANT: for Elasticsearch 8.3.x or newer, the patching operation requires root user privileges.
You can verify if Elasticsearch was correctly patched using command verify:
$ jdk/bin/java -jar plugins/readonlyrest/ror-tools.jar verifyNB: In case of any problems with the ror-tools, please call:
$ jdk/bin/java -jar plugins/readonlyrest/ror-tools.jar --help6. Restart Elasticsearch.
bin/elasticsearchor:
service start elasticsearchDepending on your environment.
Now you should be able to see the logs and ReadonlyREST related lines like the one below:
[2018-09-18T13:56:25,275][INFO ][o.e.p.PluginsService ] [c3RKGFJ] loaded plugin [readonlyrest]Removing the plugin
1. Stop Elasticsearch.
Either kill the process manually, or use:
service stop elasticsearchdepending on your environment.
2. Unpatch Elasticsearch
If you are using Elasticsearch 8.0.x or newer, you need an extra pre-uninstallation step. This will remove all previously copied jars from ROR's installation directory.
# Unpatch ES
$ jdk/bin/java -jar plugins/readonlyrest/ror-tools.jar unpatch
You can verify if Elasticsearch was correctly unpatched using command verify:
$ jdk/bin/java -jar plugins/readonlyrest/ror-tools.jar verifyNB: In case of any problems with the ror-tools, please call:
$ jdk/bin/java -jar plugins/readonlyrest/ror-tools.jar --help3. Uninstall ReadonlyREST from Elasticsearch:
bin/elasticsearch-plugin remove readonlyrest4. Start Elasticsearch.
bin/elasticsearchor:
service start elasticsearchDepending on your environment.
Deploying ReadonlyREST in a stable production cluster
Unless some advanced features are being used (see below),this Elasticsearch plugin operates like a lightweight, stateless filter glued in front of Elasticsearch HTTP API. Therefore it's sufficient to install the plugin only in the nodes that expose the HTTP interface (port 9200).
Installing ReadonlyREST in a dedicated node has numerous advantages:
- No need to restart all nodes, only the one you have installed the plugin into.
- No need to restart all nodes for updating the security settings
- No need to restart all nodes when a security update is out
- Less complexity on the actual cluster nodes.
For example, if we want to move to HTTPS all the traffic coming from Logstash into a 9 nodes Elasticsearch cluster which has been running stable in production for a while, it's not necessary to install ReadonlyREST plugin in all the nodes.
Creating a dedicated, lightweight ES node where to install ReadonlyREST:
- (Optional) disable the HTTP interface from all the existing nodes
- Create a new, lightweight, dedicated node without shards, nor master eligibility.
- Configure ReadonlyREST with SSL encryption in the new node
- Configure Logstash to connect to the new node directly in HTTPS.
An exception
??IMPORTANT By default when fields rule is used, it's required to install ReadonlyREST plugin in all the data nodes.
ACL basics
The core of this plugin is an ACL (access control list). A logic structure very similar to the one found in firewalls. The ACL is part of the plugin configuration, and it's written in YAML.
- The ACL is composed of an ordered sequence of named blocks
- Each block contains some rules, and a policy (forbid or allow)
- HTTP requests run through the blocks, starting from the first,
- The first block that satisfies all the rules decides if to forbid or allow the request (according to its policy).
- If none of the block match, the request is rejected
??IMPORTANT: The ACL blocks are evaluated sequentially, therefore the ordering of the ACL blocks is crucial. The order of the rules inside an ACL block instead, is irrelevant.
readonlyrest:
    access_control_rules:

    - name: "Block 1 - only Logstash indices are accessible"
      type: allow # <-- default policy type is "allow", so this line could be omitted
      indices: ["logstash-*"] # <-- This is a rule

    - name: "Block 2 - Blocking everything from a network"
      type: forbid
      hosts: ["10.0.0.0/24"] # <-- this is a rule
An Example of Access Control List (ACL) made of 2 blocks.
The YAML snippet above, like all of this plugin's settings should be saved inside the readonlyrest.yml file. Create this file on the same path where elasticsearch.yml is found.
TIP: If you are a subscriber of the PRO or Enterprise Kibana plugin, you can edit and refresh the settings through a GUI. For more on this, see the documentation for ReadonlyREST plugin for Kibana.
Encryption
An SSL encrypted connection is a prerequisite for secure exchange of credentials and data over the network. To make use of it you need to have certificate and private key. Letsencrypt certificates work just fine (see tutorial below). Before ReadonlyREST 1.44.0 both files, certificate and private key, had to be placed inside PKCS#12 or JKS keystore. See the tutorial at the end of this section. ReadonlyREST 1.44.0 or newer supports using PEM files directly, without the need to use a keystore.
ReadonlyREST can be configured to encrypt network traffic on two independent levels:
- HTTP (port 9200)
- Internode communication - transport module (port 9300)
An Elasticsearch node with ReadonlyREST can join an existing cluster based on native SSL from
xpack.securitymodule. This configuration is useful to deploy ReadonlyREST Enterprise for Kibana to an existing large production cluster without disrupting any configuration. More on this in the dedicated paragraph of this section.
External REST API
It wraps connection between client and exposed REST API in SSL context, hence making it encrypted and secure.
??IMPORTANT: To enable SSL for REST API, open elasticsearch.yml and append this one line:
http.type: ssl_netty4Now in readonlyrest.yml add the following settings:
readonlyrest:
    ssl:
      keystore_file: "keystore.jks" # or keystore.p12 for PKCS#12 format
      keystore_pass: readonlyrest
      key_pass: readonlyrest
The keystore should be stored in the same directory with elasticsearch.yml and readonlyrest.yml.
Internode communication - transport module
This option encrypts communication between nodes forming Elasticsearch cluster.
??IMPORTANT: To enable SSL for internode communication open elasticsearch.yml and append this one line:
transport.type: ror_ssl_internodeIn readonlyrest.yml following settings must be added (it's just example configuration presenting most important properties):
readonlyrest:
    ssl_internode:
      keystore_file: "keystore.jks" # or keystore.p12 for PKCS#12 format
      keystore_pass: readonlyrest
      key_pass: readonlyrest
Similar to ssl for HTTP, the keystore should be stored in the same directory with elasticsearch.yml and readonlyrest.yml. This config must be added to all nodes taking part in encrypted communication within cluster.
Internode communication with XPack nodes
It is possible to set up internode SSL between ROR and XPack nodes. It works only for ES above 6.3.
To set up cluster in such configuration you have to generate certificate for ROR node according to this description https://www.elastic.co/guide/en/elasticsearch/reference/current/security-basic-setup.html#generate-certificates.
Generated elastic-certificates.p12 could be then used in ROR node with such configuration
readonlyrest:
  ssl_internode:
    enable: true
    keystore_file: "elastic-certificates.p12"
    keystore_pass: [ password for generated certificate ]
    key_pass: [ password for generated certificate ]
    truststore_file: "elastic-certificates.p12"
    truststore_pass: [ password for generated certificate ]
    client_authentication: true # default: false
    certificate_verification: true # certificate verification is enabled by default on XPack nodes
Certificate verification
By default certificate verification is disabled. It means that certificate is not validated in any way, so all certificates are accepted. It is useful on local/test environment, where security is not the most important concern. On production environment it is adviced to enable this option. It can be done by means of:
certificate_verification: trueunder ssl_internode section. This option is applicable only for internode SSL.
Client authentication
By default the client authentication is disabled. When enabled, the server asks the client about its certificate, so ES is able to verify the client's identity. It can be enabled by means of:
client_authentication: trueunder ssl section. This option is applicable for REST API external SSL and internode SSL.
Restrict SSL protocols and ciphers
Optionally, it's possible to specify a list allowed SSL protocols and SSL ciphers. Connections from clients that don't support the listed protocols or ciphers will be dropped.
readonlyrest:
    ssl:
      # put the keystore in the same dir with elasticsearch.yml
      keystore_file: "keystore.jks"
      keystore_pass: readonlyrest
      key_pass: readonlyrest
      allowed_protocols: [TLSv1.2]
      allowed_ciphers: [TLS_ECDHE_ECDSA_WITH_AES_128_GCM_SHA256,TLS_ECDHE_RSA_WITH_AES_128_GCM_SHA256]
ReadonlyREST will log a list of available ciphers and protocols supported by the current JVM at startup.
[2018-01-03T10:09:38,683][INFO ][t.b.r.e.SSLTransportNetty4] ROR SSL: Available ciphers: TLS_ECDHE_ECDSA_WITH_AES_128_GCM_SHA256,TLS_ECDHE_RSA_WITH_AES_128_GCM_SHA256,TLS_ECDHE_RSA_WITH_AES_128_CBC_SHA,TLS_RSA_WITH_AES_128_GCM_SHA256,TLS_RSA_WITH_AES_128_CBC_SHA
[2018-01-03T10:09:38,684][INFO ][t.b.r.e.SSLTransportNetty4] ROR SSL: Restricting to ciphers: TLS_ECDHE_ECDSA_WITH_AES_128_GCM_SHA256,TLS_ECDHE_RSA_WITH_AES_128_GCM_SHA256
[2018-01-03T10:09:38,684][INFO ][t.b.r.e.SSLTransportNetty4] ROR SSL: Available SSL protocols: TLSv1,TLSv1.1,TLSv1.2
[2018-01-03T10:09:38,685][INFO ][t.b.r.e.SSLTransportNetty4] ROR SSL: Restricting to SSL protocols: TLSv1.2
[2018-0
Custom truststore
ReadonlyREST allows using custom truststore, replacing (provided by JRE) default one. Custom truststore can be set with:
truststore_file: "truststore.jks"
truststore_pass: truststorepass
under ssl or ssl_internode section. This option is applicable for both ssl modes - external ssl and internode ssl. The truststore should be stored in the same directory with elasticsearch.yml and readonlyrest.yml (like keystore). When not specifed, ReadonlyREST uses default truststore.
PEM files instead of a keystore and/or truststore
If you are using ReadonlyREST 1.44.0 or newer then you are able to use PEM files directly without the need of placing them inside a keystore or truststore.
To use PEM files instead of keystore file, use such configuration instead of keystore_file, keystore_pass, key_pass fields:
server_certificate_key_file: private_key.pem
server_certificate_file: cert_chain.pem
To use PEM file instead of truststore file, use such configuration instead of truststore_file, truststore_pass fields:
client_trusted_certificate_file: trusted_certs.pemUsing Let's encrypt
We are going to show how to first add all the certificates and private key into PKCS#12 keystore, and then (optionally) converting it to JKS keystore. ReadonlyREST supports both formats.
??IMPORTANT: if you are using ReadonlyREST in version above 1.44.0 then you don't have to create a keystore. You are able to use PEM files directly using the description above.
This tutorial can be a useful example on how to use certificates from other providers.
1. Create keys
./letsencrypt-auto certonly --standalone -d DOMAIN.TLD -d DOMAIN_2.TLD --email EMAIL@EMAIL.TLDNow change to the directory (probably /etc/letsencrypt/live/DOMAIN.tld) where the certificates were created.
2. Create a PKCS12 keystore with the full chain and private key
openssl pkcs12 -export -in fullchain.pem -inkey privkey.pem -out pkcs.p12 -name NAME3. Convert PKCS12 to JKS Keystore (Optional)
The STORE_PASS is the password which was entered in step 2) as a password for the pkcs12 file.
keytool -importkeystore -deststorepass PASSWORD_STORE -destkeypass PASSWORD_KEYPASS -destkeystore keystore.jks -srckeystore pkcs.p12 -srcstoretype PKCS12 -srcstorepass STORE_PASS -alias NAMEIf you happen to get a java.io.IOException: failed to decrypt safe contents entry: javax.crypto.BadPaddingException: Given final block not properly padded, you have probably forgotten to enter the correct password from step 2.
(Credits for the original JKS tutorial to Maximilian Boehm)
Blocks of rules
Every block must have at least the name field, and optionally a type field valued either "allow" or "forbid". If you omit the type, your block will be treated as type: allow by default.
Keep in mind that ReadonlyREST ACL is a white list, so by default all request are blocked, unless you specify a block of rules that allowes all or some requests.
namewill appear in logs, so keep it short and distinctive.typecan be eitheralloworforbid. Can be omitted, default isallow.
    - name: "Block 1 - Allowing anything from localhost"
      type: allow
      # In real life now you should increase the specificity by adding rules here (otherwise this block will allow all requests!)
Example: the simplest example of an allow block.
??IMPORTANT: if no blocks are configured, ReadonlyREST rejects all requests.
Rules
ReadonlyREST access control rules allow to take decisions on three levels:
- Network level
- HTTP level
- Elasticsearch level
Please refrain from using HTTP level rules to protect certain indices or limit what people can do to an index. The level of control at this level is really coarse, especially because Elasticsearch REST API does not always respect RESTful principles. This makes of HTTP a bad abstraction level to write ACLs in Elasticsearch all together.
The only clean and exhaustive way to implement access control is to reason about requests AFTER ElasticSearch has parsed them. Only then, the list of affected indices and the action will be known for sure. See Elasticsearch level rules.
Transport level rules
These are the most basic rules. It is possible to allow/forbid requests originating from a list of IP addresses, host names or IP networks (in slash notation).
hosts
hosts: ["10.0.0.0/24"] Match a request whose origin IP address (also called origin address, or OA in logs) matches one of the specified IP addresses or subnets.
hosts_local
hosts_local: ["127.0.0.1", "127.0.0.2"] Match a request whose destination IP address (called DA in logs) matches one of the specified IP addresses or subnets. This finds application when Elasticsearch HTTP API is bound to multiple IP addresses.
HTTP Level rules
accept_x-forwarded-for_header
accept_x-forwarded-for_header: false
??DEPRECATED (use x_forwarded_for instead) A modifier for hosts rule: if the origin IP won't match, fallback to check the X-Forwarded-For header
x_forwarded_for
x_forwarded_for: ["192.168.1.0/24"]
Behaves exactly like hosts, but gets the source IP address (a.k.a. origin address, OA in logs) inside the X-Forwarded-For header only (useful replacement to hostsrule when requests come through a load balancer like AWS ELB)
Load balancers
This is a nice tip if your Elasticsearch is behind a load balancer. If you want to match all the requests that come through the load balancer, use x_forwarded_for: ["0.0.0.0/0"]. This will match the requests with a valid IP address as a value of the X-Forwarded-For header.
DNS lookup caching
It's worth to note that resolutions of DNS are going to be cached by JVM. By default successfully resolved IPs will be cached forever (until Elasticsearch is restarted) for security reasons. However, this may not always be the desired behaviour, and it can be changed by adding the following JVM options either in the jvm.options file or declaring the ES\_JAVA\_OPTS environment variable: sun.net.inetaddr.ttl=TTL_VALUE (or/and sun.net.inetaddr.negative.ttl=TTL_VALUE). More details about the problem can be found here.
methods
methods: [GET, DELETE]
Match requests with HTTP methods specified in the list. N.B. Elasticsearch HTTP stack does not make any difference between HEAD and GET, so all the HEAD request will appear as GET.
headers
headers: ["h1:x*y","~h2:*xy"]
Match if all the HTTP headers in the request match the defined patterns in headers rule. This is useful in conjunction with proxy\_auth, to carry authorization information (i.e. headers: x-usr-group: admins).
The ~ sign is a pattern negation, so eg. ~h2:*xy means: match if h2 header's value does not match the pattern *xy, or h2 is not present at all.
headers_and
headers_and: ["hdr1:val_*xyz","~hdr2:xyz_*"]
Alias for headers rule
headers_or
headers_or: ["x-myheader:val*","~header2:*xy"]
Match if at least one the specified HTTP headers key:value pairs is matched.
uri_re
uri_re: ["^/secret-index/.*", "^/some-index/.*"]
??HACKY (try to use indices/actions rule instead)
Match if at least one specifed regular expression matches requested URI.
maxBodyLength
maxBodyLength: 0
Match requests having a request body length less or equal to an integer. Use 0 to match only requests without body.
NB: Elasticsearch HTTP API breaks the specifications, nad GET requests might have a body length greater than zero.
api_keys
api_keys: [123456, abcdefg]
A list of api keys expected in the header X-Api-Key
Elasticsearch level rules
indices
indices: ["sales", "logstash-*"]
Matches if the request involves a set of indices whose name is "sales", or starts with the string "logstash-", or a combination of both.
If a request involves a wildcard (i.e. "logstash-*", "*"), this is first expanded to the list of available indices, and then treated normally as follows:
- Requests that do not involve any indices (cluster admin, etc) result in a "match".
- Requests that involve only allowed indices result in a "match".
- Requests that involve a mix of allowed and prohibited indices, are rewritten to only involve allowed indices, and result in a "match".
- Requests that involve only prohibited indices result in a "no match". And the ACL evaluation moves on to the next block.
The rejection message and HTTP status code returned to the requester are chosen carefully with the main intent to make ES behave like the prohibited indices do not exist at all.
The rule has also an extended version:
indices:
  patterns: ["sales", "logstash-*"]`
  must_involve_indices: false
The definition above has the same meaning as the shortest version shown at the beginning of this section. By default the rule will be matched when a request doesn't involve indices (eg. /\_cat/nodes request). But we can change the behaviour by configuring must_involve_indices: true - in this case the request above will be rejected by the rule.
In detail, with examples
In ReadonlyREST we roughly classify requests as:
- "read": the request will not change the data or the configuration of the cluster
- "write": when allowed, the request changes the internal state of the cluster or the data.
If a read request asks for a some indices they have permissions for and some indices that they do NOT have permission for, the request is rewritten to involve only the subset of indices they have permission for. This is behaviour is very useful in Kibana: different users can see the same dashboards with data from only their own indices.
When the subset of indices is empty, it means that user are not allowed to access requested indices. In multitenancy environment we should consider two options:
- requested indices don't exist
- requested indices exist but logged user is not authorized to access them
For both of these cases ROR is going to return HTTP 404 or HTTP 200 with an empty response. The same behaviour will be observed for ES with ROR disabled (for nonexistent index). If an index does exist, but a user is not authorized to access it, ROR is going to pretend that the index doesn't exist and a response will be the same like the index actually did not exist. See detailed example.
It's also worth mentioning, that when prompt_for_basic_auth is set to true (that is, the default value), ROR is going to return 401 instead of 404 HTTP status code. It is relevant for users who don't use ROR Kibana's plugin and who would like to take advantage of default Kibana's behaviour which shows the native browser basic auth dialog, when it receives HTTP 401 response.
If a write request wants to write to indices they don't have permission for, the write request is rejected.
Requests related to templates
Templates are also connected with indices, but rather indirectly. An index template has index patterns and could also have aliases. During an index template creation or modification, ROR checks if index patterns and aliases, defined in a request body, are allowed. When a user tries to remove or get template by name, ROR checks if the template can be considered as allowed for the user, and based on that information, it allows/forbids to remove or see it. See details.
actions
actions: ["indices:data/read/*"]
Match if the request action starts with "indices:data/read/".
In Elasticsearch, each request carries only one action. We extracted from Elasticsearch source code the full list of valid action strings as of all Elasticsearch versions. Please see the dedicated section to find the actions list of your specific Elasticsearch version.
Example actions (see above for the full list):
 "cluster:admin/data_frame/delete"
 "cluster:admin/data_frame/preview"
 ...
 "cluster:monitor/data_frame/stats/get"
 "cluster:monitor/health"
 "cluster:monitor/main"
 "cluster:monitor/nodes/hot_threads"
 "cluster:monitor/nodes/info"
...
 "indices:admin/aliases"
 "indices:admin/aliases/get"
 "indices:admin/analyze"
...
 "indices:data/read/get"
 "indices:data/read/mget"
 "indices:data/read/msearch"
 "indices:data/read/msearch/template"
 ...
 "indices:data/write/bulk"
 "indices:data/write/bulk_shard_operations[s]"
 "indices:data/write/delete"
 "indices:data/write/delete/byquery"
 "indices:data/write/index"
 "indices:data/write/reindex"
 ...
 many more...
kibana_access
kibana_access: ro
Enables the minimum set of actions necessary for browsers to use Kibana.
This "macro" rule allows the minimum set of actions necessary for a browser to use Kibana. This rule allows a set of actions towards the designated kibana index (see kibana_index rule - defaults to ".kibana"), plus a stricter subset of read-only actions towards other indices, which are considered "data indices".
The idea is that with one single rule we allow the bare minimum set of index+action combinations necessary to support a Kibana browsing session.
Possible access levels:
ro_strict: the browser has a read-only view on Kibana dashboards and settings and all other indices.ro: some write requests can go through to the.kibanaindex so that UI state in discover can be saved and short urls can be created.rw: some more actions will be allowed towards the.kibanaindex only, so Kibana dashboards and settings can be modified.admin: like above, but has additional permissions to use the ReadonlyREST PRO/Enterprise Kibana app.
NB: The "admin" access level does not mean the user will be allowed to access all indices/actions. It's just like "rw" with settings changes privileges. If you want really unrestricted access for your Kibana user, including ReadonlyREST PRO/Enterprise app, set kibana_access: unrestricted. You can use this rule with the users rule to restrict access to selected admins.
This rule is often used with the indices rule, to limit the data a user is able to see represented on the dashboards. In that case do not forget to allow the custom kibana index in the indices rule!
kibana_index
kibana_index: .kibana-user1
Default value is .kibana
Specify to what index we expect Kibana to attempt to read/write its settings (use this together with kibana.index setting in kibana.yml.)
This value directly affects how kibana_access works because at all the access levels (yes, even admin), kibana_access rule will not maatch any write request in indices that are not the designated kibana index.
If used in conjunction with ReadonlyREST Enterprise, this rule enables multi tenancy, because in ReadonlyREST, a tenancy is identified with a set of Kibana configurations, which are by design collected inside a kibana index (default: .kibana).
snapshots
snapshots: ["snap_@{user}_*"]
Restrict what snapshots names can be saved or restored
repositories
repositories: ["repo_@{user}_*"]
Restrict what repositories can snapshots be saved into
filter
filter: '{"query_string":{"query":"user:@{user}"}}'
This rule enables Document Level Security (DLS). That is: return only the documents that satisfy the boolean query provided as an argument.
This rule lets you filter the results of a read request using a boolean query. You can use dynamic variables i.e. @{user} (see dedicated paragraph) to inject a user name or some header values in the query, or even environmental variables.
Example: per-user index segmentation
In the index "test-dls", each user can only search documents whose field "user" matches their user name. I.e. A user with username "paul" requesting all documents in "test-dls" index, won't see returned a document containing a field "user": "jeff" .
- name: "::PER-USER INDEX SEGMENTATION::"
  proxy_auth: "*"
  indices: ["test-dls"]
  filter: '{"bool": { "must": { "match": { "user": "@{user}" }}}}'
Example 2: Prevent search of "classified" documents.
In this example, we want to avoid that users belonging to group "press" can see any document that has a field "access\_level" with the value "CLASSIFIED". And this policy is applied to all indices (no indices rule is specified).
- name: "::Press::"
  groups: ["press"]
  filter: '{"bool": { "must_not": { "match": { "access_level": "CLASSIFIED" }}}}'
??IMPORTANT The filterand fields rules will only affect "read" requests, therefore "write" requests will not match because otherwise it would implicitly allow clients to "write" without the filtering restriction. For reference, this behaviour is identical to x-pack and search guard.
??IMPORTANT Beginning with version 1.27.0 all ROR internal requests from kibana will not match blocks containing filter and/or fields rules. There requests are used to perform kibana login and dynamic config reload.
If you want to allow write requests (i.e. for Kibana sessions), just duplicate the ACL block, have the first one with filter and/or fields rule, and the second one without.
fields
This rule enables Field Level Security (FLS). That is:
- for responses where fields with values are returned (e.g. Search/Get API) - filter and show only allowed fields
- make not allowed fields unsearchable - used in QueryDSL requests (e.g. Search/MSearch API) do not have impact on search result.
In other words: FLS protects from usage some not allowed fields for a certain user. From user's perspective it seems like such fields are nonexistent.
Definition
Field rule definition consists of two parts:
- A non empty list of fields (blacklisted or whitelisted) names. Supports wildcards and user runtime variables.
- The FLS engine definition (global setting, optional). See: engine details.
??IMPORTANT With default FLS engine it's required to install ReadonlyREST plugin in all the data nodes. Different configurations allowing to avoid such requirement are described in engine details.
Field names
Fields can be defined using two access modes: blacklist and whitelist.
Blacklist mode (recommended)
Specifies which fields should not be allowed prefixed with ~ (other fields from mapping become allowed implicitly). Example:
fields: ["~excluded_fields_prefix_*", "~excluded_field", "~another_excluded_field.nested_field"]
Return documents but deprived of the fields that:
- start with
excluded_fields_prefix_ - are equal to
excluded_field - are equal to
another_excluded_field.nested_field
Whitelist mode
Specifies which fields should be allowed explicitly (other fields from mapping become not allowed implicitly). Example:
fields: ["allowed_fields_prefix_*", "_*", "allowed_field.nested_field.text"]
Return documents deprived of all the fields, except the ones that:
- start with
allowed_fields_prefix_ - start with underscore
- are equal to
allowed_field.nested_field.text
NB: You can only provide a full black list or white list. Grey lists (i.e. ["~a", "b"]) are invalid settings and ROR will refuse to boot up if this condition is detected.
Example: hide prices from catalogue indices
- name: "External users - hide prices"
  fields: ["~price"]
  indices: ["catalogue_*"]
??IMPORTANT Any metadata fields e.g. _id or _index can not be used in fields rule.
??IMPORTANT The filterand fields rules will only affect "read" requests, therefore "write" requests will not match because otherwise it would implicitly allow clients to "write" without the filtering restriction. For reference, this behaviour is identical to x-pack and search guard.
??IMPORTANT Beginning with version 1.27.0 all ROR internal requests from kibana will not match blocks containing filter and/or fields rules. There requests are used to perform kibana login and dynamic config reload.
If you want to allow write requests (i.e. for Kibana sessions), just duplicate the ACL block, have the first one with filter and/or fields rule, and the second one without.
Configuring an ACL with filter/fields rules when using Kibana
A normal Kibana session interacts with Elasticsearch using a mix of actions which we can roughly group in two macro categories of "read" and "write" actions. However the fields and filter rules will only match read requests. They will also block ROR internal request used to log in to kibana and reload config. This means that a complete Kibana session cannot anymore be entirely matched by a single ACL block like it normally would.
For example, this ACL block would perfectly support a complete Kibana session. That is, 100% of the actions (browser HTTP requests) would be allowed by this ACL block.
    - name: "::RW_USER::"
      auth_key: rw_user:pwd
      kibana_access: rw
      indices: ["r*", ".kibana"]
However, when we introduce a filter (or fields) rule, this block will be able to match only some of the actions (only the "read" ones).
    - name: "::RW_USER::"
      auth_key: rw_user:pwd
      kibana_access: rw  # <-- won't work because of filter present in block
      indices: ["r*", ".kibana"]
      filter: '{"query_string":{"query":"DestCountry:FR"}}'  # <-- will reject all write requests! :(
The solution is to duplicate the block. The first one will intercept (and filter!) the read requests. The second one will intercept the remaining actions. Both ACL blocks together will entirely support a whole Kibana session.
    - name: "::RW_USER (filter read requests)::"
      auth_key: rw_user:pwd
      indices: ["r*"]  # <-- DO NOT FILTER THE .kibana INDEX!
      filter: '{"query_string":{"query":"DestCountry:FR"}}'

    - name: "::RW_USER (allow remaining requests)::"
      auth_key: rw_user:pwd
      kibana_access: rw
      indices: ["r*", ".kibana"]
NB: Look at how we make sure that the requests to ".kibana" won't get filtered by specifying an indices rule in the first block.
Here is another example, a bit more complex. Look at how we can duplicate the "PERSONAL\_GRP" ACL block so that the read requests to the "r*" indices can be filtered, and all the other requests can be intercepted by the second rule (which is identical to the one we had before the duplication).
Before adding the filter rule:
  - name: "::PERSONAL_GRP::"
    groups: ["Personal"]
    kibana_access: rw
    indices: ["r*", ".kibana_@{user}"]
    kibana_hide_apps: ["readonlyrest_kbn", "timelion"]
    kibana_index: ".kibana_@{user}"
After adding the filter rule (using the block duplication strategy).
    - name: "::PERSONAL_GRP (FILTERED SEARCH)::"
      groups: ["Personal"]
      indices: [ "r*" ]
      filter: '{"query_string":{"query":"DestCountry:FR"}}'

    - name: "::PERSONAL_GRP::"
      groups: ["Personal"]
      kibana_access: rw
      indices: ["r*", ".kibana_@{user}"]
      kibana_hide_apps: ["readonlyrest_kbn", "timelion"]
      kibana_index: ".kibana_@{user}"
response_fields
This rule allows filtering Elasticsearch responses using a list of fields. It works in very similar way to fields rule. In contrast to fields rule, which filters out document fields, this rule filters out response fields. It doesn't make use of Field Level Security (FLS) and can be applied to every response returned by Elasticsearch.
It can be configured in two modes:
- whitelist allowing only the defined fields from the response object
- blacklist filtering out (removing) only the defined fields from the response object
Blacklist mode
Specifies which fields should be filtered out by adding the ~ prefix to the field name. Other fields in the response will be implicitly allowed. For example:
response_fields: ["~excluded_fields_prefix_*", "~excluded_field", "~another_excluded_field.nested_field"]
The above will return the usual response object, but deprived (if found) of the fields that:
- start with
excluded_fields_prefix_ - are equal to
excluded_field - are equal to
another_excluded_field.nested_field
Whitelist mode
In this mode rule is configured to filter out each field that isn't defined in the rule.
response_fields: ["allowed_fields_prefix_*", "_*", "allowed_field.nested_field.text"]
Return response deprived of all the fields, except the ones that:
- start with
allowed_fields_prefix_ - start with underscore
- are equal to
allowed_field.nested_field.text
NB: You can only provide a full black list or white list. Grey lists (i.e. ["~a", "b"]) are invalid settings and ROR will refuse to boot up if this condition is detected.
_Example_: allow only cluster_name and status field in cluster health response:
Without any filtering response from /_cluster/health looks more or less like:
{
    "cluster_name": "ROR_SINGLE",
    "status": "yellow",
    "timed_out": false,
    "number_of_nodes": 1,
    "number_of_data_nodes": 1,
    "active_primary_shards": 2,
    "active_shards": 2,
    "relocating_shards": 0,
    "initializing_shards": 0,
    "unassigned_shards": 2,
    "delayed_unassigned_shards": 0,
    "number_of_pending_tasks": 0,
    "number_of_in_flight_fetch": 0,
    "task_max_waiting_in_queue_millis": 0,
    "active_shards_percent_as_number": 50.0
}
but after configuring such rule:
- name: "Filter cluster health response"
  uri_re: "^/_cluster/health"
  response_fields: ["cluster_name", "status"]
response from above will look like:
{
    "cluster_name": "ROR_SINGLE",
    "status": "yellow"
}
NB: Any response field can be filtered using this rule.
Authentication
Local ReadonlyREST users are authenticated via HTTP Basic Auth. This authentication method is secure only if SSL is enabled.
auth_key
auth_key: sales:p455wd
Accepts HTTP Basic Auth. Configure this value _in clear text_. Clients will need to provide the header e.g. Authorization: Basic c2FsZXM6cDQ1NXdk where "c2FsZXM6cDQ1NXdk" is Base64 for "sales:p455wd".
??IMPORTANT: this rule is handy just for tests, replace it with another rule that hashes credentials, like: auth_key_sha512, or auth_key_unix.
Impersonation is supported by this rule by default.
auth_key_sha512
auth_key_sha512: 280ac6f...94bf9
Accepts HTTP Basic Auth. The value is a string like username:password hashed in SHA512. Clients will need to provide the usual Authorization header.
There are also available other rules with less secure SHA algorithms auth_key_sha256 and auth_key_sha1.
The rules support also alternative syntax, where only password is hashed, eg:
auth_key_sha512: "admin:280ac6f...94bf9"
In the example below admin is the username and 280ac6f...94bf9 is the hashed secret.
Impersonation is supported by these rules by default.
auth_key_pbkdf2
auth_key_pbkdf2: "KhIxF5EEYkH5GPX51zTRIR4cHqhpRVALSmTaWE18mZEL2KqCkRMeMU4GR848mGq4SDtNvsybtJ/sZBuX6oFaSg==" \# logstash:logstash
auth_key_pbkdf2: "logstash:JltDNAoXNtc7MIBs2FYlW0o1f815ucj+bel3drdAk2yOufg2PNfQ51qr0EQ6RSkojw/DzrDLFDeXONumzwKjOA==" \# logstash:logstash
Accepts HTTP Basic Auth. The value is hashed in the same way as it's done in auth_key_sha512 rule, but it uses PBKDF2 key derivation function. At the moment there is no way to configure it, so during the hash generation, the user has to take into consideration the following PBKDF2 input parameters values:
Input parameter | Value | Comment |
|---|---|---|
Pseudorandom function | HmacSHA512 | |
Salt | use hashed value as a salt | eg. hashed value = logstash:logstash, use logstash:logstash as the salt |
Iterations count | 10000 | |
Derived key length | 512 | bits |
The hash can be calculated using this calculator (notice that the salt has to base Base64 encoded).
Impersonation is supported by this rule by default.
auth_key_unix
auth_key_unix: test:6rounds=65535d07dnv4NQeErsDT9Mz.ZoEPXW3dwQGL7tzwRz.eOrTBepIwfGEwdUAYSy/NirGoOaNyPx8lqiR6DYRSsDzVvVbhP4Y9wf0 # Hashed for "test:test"
??IMPORTANT this hashing algorithm is very CPU intensive, so we implemented a caching mechanism around it. However, this will not protect Elasticsearch from a DoS attack with a high number of requests with random credentials.
This method is based on /etc/shadow file syntax.
If you configured sha512 encryption with 65535 rounds on your system the hash in /etc/shadow for the account test:test will be test:6rounds=65535d07dnv4NQeErsDT9Mz.ZoEPXW3dwQGL7tzwRz.eOrTBepIwfGEwdUAYSy/NirGoOaNyPx8lqiR6DYRSsDzVvVbhP4Y9wf0
readonlyrest:
    access_control_rules:
    - name: Accept requests from users in group team1 on index1
      groups: ["team1"]
      indices: ["index1"]

    users:
    - username: test
      auth_key_unix: test:$6$rounds=65535$d07dnv4N$QeErsDT9Mz.ZoEPXW3dwQGL7tzwRz.eOrTBepIwfGEwdUAYSy/NirGoOaNyPx8lqiR6DYRSsDzVvVbhP4Y9wf0 #test:test
      groups: ["team1"]
You can generate the hash with mkpasswd Linux command, you need whois package apt-get install whois (or equivalent)
mkpasswd -m sha-512 -R 65534
Also you can generate the hash with a python script (works on Linux):
#!/usr/bin/python
import crypt
import random
import sys
import string

def sha512_crypt(password, salt=None, rounds=None):
    if salt is None:
        rand = random.SystemRandom()
        salt = ''.join([rand.choice(string.ascii_letters + string.digits)
                        for _ in range(8)])

    prefix = '$6$'
    if rounds is not None:
        rounds = max(1000, min(999999999, rounds or 5000))
        prefix += 'rounds={0}$'.format(rounds)
    return crypt.crypt(password, prefix + salt)


if __name__ == '__main__':
    if len(sys.argv) > 1:
        print sha512_crypt(sys.argv[1], rounds=65635)
    else:
        print "Argument is missing, <password>"
Finally you have to put your username at the begining of the hash with ":" separator test:d07dnv4NQeErsDT9Mz.ZoEPXW3dwQGL7tzwRz.eOrTBepIwfGEwdUAYSy/NirGoOaNyPx8lqiR6DYRSsDzVvVbhP4Y9wf0
For example, test is the username and 6rounds=65535d07dnv4NQeErsDT9Mz.ZoEPXW3dwQGL7tzwRz.eOrTBepIwfGEwdUAYSy/NirGoOaNyPx8lqiR6DYRSsDzVvVbhP4Y9wf0 is the hash for test (the password is identical to the username in this example).
Impersonation is supported by this rule by default.
proxy_auth: "*"
proxy_auth: "*"
Delegated authentication. Trust that a reverse proxy has taken care of authenticating the request and has written the resolved user name into the X-Forwarded-User header. The value "*" in the example, will let this rule match any username value contained in the X-Forwarded-User header.
If you are using this technique for authentication using our Kibana plugins, don't forget to add this snippet to conf/kibana.yml:
readonlyrest_kbn.proxy_auth_passthrough: true
So that Kibana will forward the necessary headers to Elasticsearch.
Impersonation is supported by this rule by default.
users
users: ["root", "*@mydomain.com"]
Limit access to of specific users whose username is contained or matches the patterns in the array. This rule is independent from the authentication method chosen, so it will work well in conjunction LDAP, JWT, proxy\_auth, and all others.
For example:
readonlyrest:
  access_control_rules:
    - name: "JWT auth for viewer group (role), limited to certain usernames"
      kibana_access: ro
      users: ["root", "*@mydomain.com"]
      jwt_auth:
        name: "jwt_provider_1"
        groups: ["viewer"]
groups
groups: ["group1", "group2"]
The ACL block will match when the user belongs to any of the specified groups. The information about what users belong to what groups is defined in the users section, typically situated after the ACL, further down in the YAML.
In the users section, each entry tells us that:
- A given user with a username matching one of patterns in the
usernamearray ... - belongs to the local groups listed in the
groupsarray (example 1 & 2 below) OR belongs to local groups that are result of "detailed group mapping" between local group name and external groups (example 3 below). - when they can be authenticated and (if authorization rule is present) authorized by the present rule(s).
In general it looks like this:
  ...
  - name: "ACL block with groups rule"
    indices: [x, y]
    groups: ["local_group1"] # this group name is defined in the "users" section

  users:
  - username: ["pattern1", "pattern2", ...]
    groups: ["local_group1", "local_group2", ...]
    <any_authentication_rule>: ...

  - username: ["pattern1", "pattern2", ...]
    groups: ["local_group1", "local_group2", ...]
    <any_authentication_rule>: ...
    <optionally_any_authorization_rule>: ...

  - username: ["pattern1", "pattern2", ...]
    groups:
      - local_group1: ["external_group1", "external_group2"]
      - local_group2: ["external_group2"]
    <authentication_with_authorization_rule>: ... # `ldap_auth` or `jwt_auth` or `ror_kbn_auth`
For details see User management.
Impersonation support depends on
authentication and authorization rules used in users section.
For more information on the ROR's authorization rules, see Authorization rules details
groups_and
groups_and: ["group1", "group2"]
This rule is identical to the above defined groups rule, but this time ALL the groups listed in the array are required (boolean AND logic), as opposed to at least one (boolean OR logic) of the groups rule.
session_max_idle
session_max_idle: 1h
??DEPRECATED Browser session timeout (via cookie). Example values 1w (one week), 10s (10 seconds), 7d (7 days), etc. NB: not available for Elasticsearch 2.x.
ldap_authentication
simple version:
ldap_authentication: ldap1
extended version:
ldap_authentication:
  name: ldap1
  cache_ttl: 10 sec
It handles LDAP authentication only using the configured LDAP connector (here ldap1). Check the LDAP connector section to see how to configure the connector.
ldap_authorization
ldap_authorization:
  name: "ldap1"
  groups: ["group3"]
  cache_ttl: 10 sec
It handles LDAP authorization only using the configured LDAP connector (here ldap1). It matches when previously authenticated user has groups in LDAP and when he belongs to at least one of the configured groups (OR logic). Alternatively, groups_and can be used to require users belong to all the listed groups (AND logic). Check the LDAP connector section to see how to configure the connector.
ldap_auth
Shorthand rule that combines ldap_authentication and ldap_authorization rules together. It handles both authentication and authorization using the configured LDAP connector (here ldap1).
ldap_auth:
  name: "ldap1"
  groups: ["group1", "group2"]
The same functionality can be achieved using the two rules described below:
ldap_authentication: ldap1
ldap_authorization:
  name: "ldap1"
  groups: ["group1", "group2"] # match when user belongs to at least one group
In both ldap_authand ldap_authorization, the groups clause can be replaced by group_and to require the valid LDAP user must belong to all the listed groups:
ldap_auth:
  name: "ldap1"
  groups_and: ["group1", "group2"] # match when user belongs to ALL listed groups
Or equivalently:
ldap_authentication: ldap1
ldap_authorization:
  name: "ldap1"
  groups_and: ["group1", "group2"] # match when user belongs to ALL listed groups
See the dedicated LDAP section
Impersonation is not supported by default by LDAP rules.
For more information on the ROR's authorization rules, see Authorization rules details
jwt_auth
See below, the dedicated JSON Web Tokens section
Impersonation is not supported by this rule by default.
external-basic-auth
Used to delegate authentication to another server that supports HTTP Basic Auth. See below, the dedicated External BASIC Auth section
Impersonation is not supported by this rule by default.
For more information on the ROR's authorization rules, see Authorization rules details
groups_provider_authorization
Used to delegate groups resolution for a user to a JSON microservice. See below, the dedicated Groups Provider Authorization section
Impersonation is not supported by this rule by default.
For more information on the ROR's authorization rules, see Authorization rules details
ror_kbn_auth
For Enterprise customers only, required for SAML authentication.
readonlyrest:
  access_control_rules:

    - name: "ReadonlyREST Enterprise instance #1"
      ror_kbn_auth:
        name: "kbn1"
        groups: ["SAML_GRP_1", "SAML_GRP_2"] # <- use this field when a user should belong to at least one of the configured groups

    - name: "ReadonlyREST Enterprise instance #1 - two groups required"
      ror_kbn_auth:
        name: "kbn1"
        groups_and: ["SAML_GRP_1", "SAML_GRP_2"] # <- use this field when a user should belong to all configured groups

    - name: "ReadonlyREST Enterprise instance #2"
      ror_kbn_auth:
        name: "kbn2"

  ror_kbn:
    - name: kbn1
      signature_key: "shared_secret_kibana1" # <- use environmental variables for better security!

    - name: kbn2
      signature_key: "shared_secret_kibana2" # <- use environmental variables for better security!
This authentication and authorization connector represents the secure channel (based on JWT tokens) of signed messages necessary for our Enterprise Kibana plugin to securely pass back to ES the username and groups information coming from browser-driven authentication protocols like SAML
Continue reading about this in the kibana plugin documentation, in the dedicated SAML section
Impersonation is not supported by this rule by default.
For more information on the ROR's authorization rules, see Authorization rules details
Ancillary rules
verbosity
verbosity: error
Don't spam elasticsearch log file printing log lines for requests that match this block. Defaults to info.
Audit & Troubleshooting
The main issues seen in support cases:
- Bad ordering or ACL blocks. Remember that the ACL is evaluated sequentially, block by block. And the first block whose rules all match is accepted.
- Users don't know how to read the
HISfield in the logs, which instead is crucial because it contains a trace of the evaluation of rules and blocks. - LDAP configuration: LDAP is tricky to configure in any system. Configure ES root logger to
DEBUGediting$ES_PATH_CONF/config/log4j2.propertiesto see a trace of the LDAP messages.
Interpreting logs
ReadonlyREST prints a log line for each incoming request (this can be selectively avoided on ACL block level using the verbosity rule).
Allowed requests
This is an example of a request that matched an ACL block (allowed) and has been let through to Elasticsearch.
ALLOWED by { name: '::PERSONAL\_GRP::', policy: ALLOW} req={ ID:1667655475--1038482600\#1312339, TYP:SearchRequest, CGR:N/A, USR:simone, BRS:true, ACT:indices:data/read/search, OA:127.0.0.1, IDX:, MET:GET, PTH:/\_search, CNT:<N/A>, HDR:Accept,Authorization,content-length,Content-Type,Host,User-Agent,X-Forwarded-For, HIS:[::PERSONAL\_GRP::->[kibana\_access->true, kibana\_hide\_apps->true, auth\_key->true, kibana\_index->true]], [::Kafka::->[auth\_key->false]], [::KIBANA-SRV::->[auth\_key->false]], [guest lol->[auth\_key->false]], [::LOGSTASH::->[auth\_key->false]] }
Explanation
The log line immediately states that this request has been allowed by an ACL block called "::PERSONAL\_GRP::". Immediately follows a summary of the requests' anatomy. The format is semi-structured, and it's intended for humans to read quickly, it's not JSON, or anything else.
Similar information gets logged in JSON format into Elasticsearch documents enabling the audit logs feature described later.
Here is a glossary:
ID: ReadonlyREST-level request idTYP: String, the name of the Java class that internally represent the request type (very useful for debug)CGR: String, the request carries a "current group" header (used for multi-tenancy).USR: String, the user name ReadonlyREST was able to extract from Basic Auth, JWT, LDAP, or other methods as specified in the ACL.BRS: Boolean, an heuristic attempt to tell if the request comes from a browser.ACT: String, the elasticsearch level action associated with the request. For a list of actions, see our actions rule docs.OA: IP Address, originating address (source address) of the TCP connection underlying the http session.IDX: Strings array: the list of indices affected by this request.MET: String, HTTP MethodCNT: String, HTTP body content. Comes as a summary of its lenght, full body of the request is available in debug mode.HDR: String array, list of HTTP headers, headers' content is available in debug mode.HIS: Chronologically ordered history of the ACL blocks and their rules being evaluated, This is super useful for knowing what ACL block/rule is forbidding/allowing this request.
In the example, the block ::PERSONAL_GRP:: is allowing the request because all the rules in this block evaluate to true.
Forbidden requests
This is an example of a request that gets forbidden by ReadonlyREST ACL.
FORBIDDEN by default req={ ID:747832602--1038482600#1312150, TYP:SearchRequest, CGR:N/A, USR:[no basic auth header], BRS:true, ACT:indices:data/read/search, OA:127.0.0.1, IDX:, MET:GET, PTH:/_search, CNT:<N/A>, HDR:Accept,content-length,Content-Type,Host,User-Agent,X-Forwarded-For, HIS:[::Infosec::->[groups->false]], [::KIBANA-SRV::->[auth_key->false]], [guest lol->[auth_key->false]], [::LOGSTASH::->[auth_key->false]], [::Infosec::->[groups->false]], [::ADMIN_GRP::->[groups->false]], [::Kafka::->[auth_key->false]], [::PERSONAL_GRP::->[groups->false]] }The above rule gets forbidden "by default". This means that no ACL block has matched the request, so ReadonlyREST's default policy of rejection takes effect.
Requests finished with INDEX NOT FOUND
This is an example of such request:
INDEX NOT FOUND req={ ID:501806845-1996085406#74, TYP:GetIndexRequest, CGR:N/A, USR:dev1 (attempted), BRS:true, KDX:null, ACT:indices:admin/get, OA:172.20.0.1/32, XFF:null, DA:172.20.0.2/32, IDX:nonexistent*, MET:GET, PTH:/nonexistent*/_alias/, CNT:<N/A>, HDR:Accept-Encoding=gzip,deflate, Authorization=<OMITTED>, Connection=Keep-Alive, Host=localhost:32773, User-Agent=Apache-HttpClient/4.5.2 (Java/1.8.0_162), content-length=0, HIS:[CONTAINER ADMIN-> RULES:[auth_key->false]], [dev1 indexes-> RULES:[auth_key->true, indices->false], RESOLVED:[user=dev1]], [dev2 aliases-> RULES:[auth_key->false]], [dev3 - no indices rule-> RULES:[auth_key->false]] }The state above is only possible for read-only ES requests (ES requests which don't change ES cluster state) for a block containing an indices rule. If all other rules within the block are matched, but only the indices rule is mismatched, the final state of the block is forbidden due to an index not found.
Audit logs
ReadonlyREST can write events very similarly to Logstash into to a series of indices named by default readonlyrest_audit-YYYY-MM-DD. Every event contains information about a request and how the system has handled it. Here is an example of the data points contained in each audit event. We can leverage all this information to build interesting Kibana dashboards, or any other visualization.
{
    "error_message": null,
    "headers": [
      "Accept",
      "Authorization",
      "content-length",
      "Host",
      "User-Agent"
    ],
    "acl_history": "[[::LOGSTASH::->[auth_key->false]], [::RW::->[kibana_access->true, indices->true, kibana_hide_apps->true, auth_key->true]], [kibana->[auth_key->false]], [::RO::->[auth_key->false]]]",
    "origin": "127.0.0.1",
    "final_state": "ALLOWED",
    "task_id": 1158,
    "type": "SearchRequest",
    "req_method": "GET",
    "path": "/readonlyrest_audit-2017-06-29/_search?pretty",
    "indices": [
      "readonlyrest_audit-2017-06-29"
    ],
    "@timestamp": "2017-06-30T09:41:58Z",
    "content_len_kb": 0,
    "error_type": null,
    "processingMillis": 0,
    "action": "indices:data/read/search",
    "matched_block": "::RW::",
    "id": "933409190-292622897#1158",
    "content_len": 0,
    "user": "simone"
  }
Here is a configuration example, you can see the audit.collector: true setting, which normally defaults to false. Note how the successful requests matched by the first rule (Kibana) will not be written to the audit log, because the verbosity is set to error. Audit log in facts, obey the verbosity setting the same way regular text logs do.
NB Following audit configurations are presented with the separate audit section, although it can be omitted as settings defined using previous approach (defined directly under readonlyrest section and starting with audit_)` are still supported (but not recommended) preserving backward compatibility.
readonlyrest:

    audit:
      collector: true

    access_control_rules:

    - name: Kibana
      type: allow
      auth_key: kibana:kibana
      verbosity: error

    - name: "::RO::"
      auth_key: simone:ro
      kibana_access: ro
Extended audit
If you want to log the request content then an additional serializer is provided. This will log the entire user request within the content field of the audit event. To enable, configure the audit\_serializer parameter as below.
readonlyrest:
  audit:
    collector: true
    serializer: tech.beshu.ror.requestcontext.QueryAuditLogSerializer
  ...
Custom audit indices name and time granularity
It is possible to change the name of the produced audit log indices by specifying a template value as audit.index_template.
Example: tell ROR to write on monthly index.
readonlyrest:
  audit:
    collector: true
    index_template: "'custom-prefix'-yyyy-MM"  # <--monthly pattern
...??IMPORTANT: notice the single quotes inside the double quoted expression. This is the same syntax used for Java's SimpleDateFormat.
Custom audit log serializer
You can write your own custom audit log serializer class, add it to the ROR plugin class path and configure it through the YAML settings.
We provided 2 project examples with custom serializers (in Scala and Java). You can use them as an example to write yours in one of those languages.
Create custom audit log serializer in Scala
- Checkout https://github.com/sscarduzio/elasticsearch-readonlyrest-plugin
git clone git@github.com:sscarduzio/elasticsearch-readonlyrest-plugin.git - Install SBT
https://www.scala-sbt.org/download.html - Find and go to:
elasticsearch-readonlyrest-plugin/custom-audit-examples/ror-custom-scala-serializer/ - Create own serializer:
- from scratch (example can be found in class
ScalaCustomAuditLogSerializer) - extending default one (example can be found in class
ScalaCustomAuditLogSerializer)
- from scratch (example can be found in class
- Build serializer JAR:
sbt assembly - Jar can be find in:
elasticsearch-readonlyrest-plugin/custom-audit-examples/ror-custom-scala-serializer/target/scala-2.13/ror-custom-scala-serializer-1.0.0.jar
Create custom audit log serializer in Java
- Checkout https://github.com/sscarduzio/elasticsearch-readonlyrest-plugin
git clone git@github.com:sscarduzio/elasticsearch-readonlyrest-plugin.git - Install Maven
https://maven.apache.org/install.html - Find and go to:
elasticsearch-readonlyrest-plugin/custom-audit-examples/ror-custom-java-serializer/ - Create own serializer:
- from scratch (example can be found in class
JavaCustomAuditLogSerializer) - extending default one (example can be found in class
JavaCustomAuditLogSerializer)
- from scratch (example can be found in class
- Build serializer JAR:
mvn package - Jar can be find in:
elasticsearch-readonlyrest-plugin/custom-audit-examples/ror-custom-java-serializer/target/ror-custom-java-serializer-1.0.0.jar
Configuration
mv ror-custom-java-serializer-1.0.0.jar plugins/readonlyrest/
Your config/readonlyrest.yml should start like this
 readonlyrest:
     audit:
       collector: true
       serializer: "JavaCustomAuditLogSerializer" # when your serializer class is not in default package, you should use full class name here (eg. "tech.beshu.ror.audit.instances.QueryAuditLogSerializer")
Start elasticsearch (with ROR installed) and grep for:
[2017-11-09T09:42:51,260][INFO ][t.b.r.r.SerializationTool] Using custom serializer: JavaCustomAuditLogSerializerTroubleshooting
Follow these approaches until you find the solution to your problem
Scenario: you can't understand why your requests are being forbidden by ReadonlyREST (or viceversa)
Step 1: see what block/rule is matching Take the Elasticsearch log file, and grep the logs for ACT:. This will show you the whole request context (including the action and indices fields) of the blocked requests. You can now tweak your ACL blocks to include that action.
Step 2: enable debug logs
Logs are good for auditing the activity on the REST API. You can configure them by editing ES_PATH_CONF/config/logging.yml (Elasticsearch 2.x) or ES_PATH_CONF/config/log4j2.properties file (Elasticsearch 5.x)
For example, you can enable the debug log globally by setting the rootLoggerto debug.
rootLogger.level = debugThis is really useful especially to debug the activity of LDAP and other external connectors.
Trick: log requests to different files
Here is a log4j2.properties snippet for ES 5.x that logs all the received requests as a new line in a separate file:
#Plugin readonly rest separate access logging file definition
appender.access_log_rolling.type = RollingFile
appender.access_log_rolling.name = access_log_rolling
appender.access_log_rolling.fileName = ${sys:es.logs}_access.log
appender.access_log_rolling.layout.pattern = [%d{ISO8601}][%-5p][%-25c] %marker%.-10000m%n
appender.access_log_rolling.layout.type = PatternLayout
appender.access_log_rolling.filePattern = ${sys:es.logs}_access-%d{yyyy-MM-dd}.log
appender.access_log_rolling.policies.type = Policies
appender.access_log_rolling.policies.time.type = TimeBasedTriggeringPolicy
appender.access_log_rolling.policies.time.interval = 1
appender.access_log_rolling.policies.time.modulate = true

logger.access_log_rolling.name = tech.beshu.ror
logger.access_log_rolling.level = info
logger.access_log_rolling.appenderRef.access_log_rolling.ref = access_log_rolling
logger.access_log_rolling.additivity = false

# exclude kibana, beat and logstash users as they generate too much noise
logger.access_log_rolling.filter.regex.type = RegexFilter
logger.access_log_rolling.filter.regex.regex = .*USR:(kibana|beat|logstash),.*
logger.access_log_rolling.filter.regex.onMatch = DENY
logger.access_log_rolling.filter.regex.onMismatch = ACCEPT
Custom audit cluster
It's possible to set a custom audit cluster responsible for audit logs storage. When a custom cluster is specified, items will be sent to defined cluster nodes instead of the local one.
readonlyrest:
  audit:
    collector: true
    cluster: ["https://user1:password@auditNode1:9200", "https://user2:password@auditNode2:9200"]
  ...
Setting audit.cluster is optional, it accepts non empty list of audit cluster nodes URIs.
Users and Groups
Sometimes we want to make allow/forbid decisions according to the username associated to a HTTP request. The extraction of the user identity (username) can be done via HTTP Basic Auth (Authorization header) or delegated to a reverse proxy (see proxy_auth rule).
The validation of the said credentials can be carried on locally with hard coded credential hashes (see auth_key_sha256 rule), via one or more LDAP server, or we can forward the Authorization header to an external web server and examine the HTTP status code (see external_authentication).
Optionally we can introduce the notion of groups (see them as bags of users). The aim of having groups is to write a very specific block once, and being able to allow multiple usernames that satisfy the block.
Groups can be declared and associated to users statically in the readonlyrest.yml file. Alternatively, groups for a given username can be retrieved from an LDAP server or from a LDAP server, or a custom JSON/XML service.
You can mix and match the techniques to satisfy your requirements. For example, you can configure ReadonlyREST to:
- Extract the username from X-Forwarded-User
- Resolve groups associated to said user through a JSON microservice
Another example:
- Extract the username from Authorization header (HTTP Basic Auth)
- Validate said username's password via LDAP server
- resolve groups associated to the user from groups defined in readonlyrest.yml
More examples are shown below together with a sample configuration.
Local users and groups
The groups rule accepts a list of group names. This rule will match if the resolved username (i.e. via auth_key) is associated to the given groups. In this example, the usernames are statically associated to group names.
 access_control_rules:

    - name: Accept requests from users in group team1 on index1
      type: allow  # Optional, defaults to "allow" will omit now on.
      groups: ["team1"]
      indices: ["index1"]

    - name: Accept requests from users in group team2 on index2
      groups: ["team2"]
      indices: ["index2"]

    - name: Accept requests from users in groups team1 OR team2 on index3
      groups: ["team1", "team2"]
      indices: ["index3"]

    - name: Accept requests from users in groups team1 AND team2 on index3
      groups_and: ["team1", "team2"]
      indices: ["index3"]

    users:

    - username: "alice"
      groups: ["team1"]
      auth_key: alice:p455phrase

    - username: "bob"
      groups: ["team2", "team4"]
      auth_key: bob:s3cr37

    - username: "claire"
      groups: ["team1", "team5"]
      auth_key_sha256: e0bba5fda92dbb0570fd2e729a3c8ed6b1d52b380581f32427a38e396ba28ec6 #claire:p455key
Example: rules are associated to groups (instead of users) and users-group association is declared separately later under users:
Group mapping
Sometimes we'd like to take advantage of groups (roles) existing in external systems (like LDAP). We can do that in users section too. It's possible to map external groups to local ones. For details see External to local groups mapping .
Username case sensitivity
ReadonlyREST can cooperate with services, that operates in case-insensitive way. For this case ROR has toggleable username case sensitivity option username_case_sensitivity.
readonlyrest:
  username_case_sensitivity: case_sensitive
By default, usernames are case-sensitive username_case_sensitivity: case_sensitive. By setting username_case_sensitivity: case_sensitive username comparison will be case-insensitive in any rule.
Static variables
Anywhere in readonlyrest.yml you can use the expression ${env:MY_ENV_VAR} to replace in place the environmental variables. This is very useful for injecting credentials like LDAP bind passwords, especially in Docker.
For example, here we declare an environment variable, and we write ${env:LDAP_PASSWORD} in our settings:
$ export LDAP_PASSWORD=S3cr3tP4ss
$ cat readonlyrest.ymlldaps:
- name: ldap1
host: "ldap1.example.com"
port: 389
ssl_enabled: false
ssl_trust_all_certs: true
bind_dn: "cn=admin,dc=example,dc=com"
bind_password: "${env:LDAP_PASSWORD}"
search_user_base_DN: "ou=People,dc=example,dc=com"And ReadonlyREST ES will load "S3cr3tP4ss" as bind_password.
Dynamic variables
One of the neatest features in ReadonlyREST is that you can use dynamic variables inside most values of the following rules: indices, users, groups, groups_and, fields, filter, repositories, snapshots, response_fields, uri_re, x_forwarded_for, hosts_local, hosts, kibana_index, kibana_template_index. The variables are related to different contexts:
acl- the context of data collected in authentication and authorization rules of the current block:@{acl:user}gets replaced with the username of the successfully authenticated user. Using this variable is allowed only in blocks where one of the rules is an authentication rule of course it must be a rule different from the one containing the given variable.@{acl:current_group}is the group name explicitly requested by the tenancy selector in ReadonlyREST Enterprise plugin when using multi-tenancy.@{acl:available_groups}gets replaced with available groups found in the authorization rule (bacause by default dynamic variabled are resolved to a string, the variable resolved value will contain groups surrounded with double quotes and joined with a comma)
header- the context of ES HTTP request headers@{header:<header_name>}gets replaced with the value of the HTTP header with name<header_name>included in the incoming request (useful when reverse proxies handle authentication)
jwt- the context of JWT header value@{jwt:<json_path>}get replaced with value (or values) found in the JWT claim under the given JSON path
Dynamic variables exploding
A value resolved from a dynamic variable is a string. Some rules, like indices one, have multivalue context (you can configure several indices names in it).
Let's assume we have a request with the header: APPS: app1,app2,app3. Doing something like this:
indices: ["logstash_@{header:apps}"]We should expect it to be resolved to:
indices: ["logstash_app1,app2,app3"]for this particular request. No, it wouldn't be helpful at all.
But there is an explode function for dynamic variables. Doing:
indices: ["logstash_@explode{header:apps}"]we should get:
indices: ["logstash_app1", "logstash_app2", "logstash_app3"]which looks more useful!
So, as we've seen, the explode attribute of a dynamic variable rule can be used to split a string with comma-separated values into an array of strings. But it can only be used in a rule with multi value context.
Usage examples
Indices from user name
You can let users authenticate externally, i.e. via LDAP, and use their user name string inside the indices rule.
readonlyrest:
    access_control_rules:

    - name: "Users can see only their logstash indices" # i.e. alice can see alice_logstash-20170922
      ldap_authentication:
        name: "myLDAP"
      indices: ["@{acl:user}_logstash-*"]

    # LDAP connector settings omitted, see LDAP section below..
Indices from available groups
You can let users authorize externally, i.e. via LDAP, and use their group strings inside the indices rule.
readonlyrest:
    access_control_rules:

    - name: "Users can see only logstash indices for their departments" # i.e. alice belongs to 'dev' and 'ops' department groups, so she can see dev_logstash-20170922, ops_logstash-20170922
      ldap_auth:
        name: "myLDAP"
        groups: ["dev", "ops", "qa"]
      indices: ["@explode{acl:available_groups}_logstash-*"] # i.e when available_groups=[dev, ops] we will get indices: ["dev_logstash-*", "ops_logstash-*"]

    # LDAP connector settings omitted, see LDAP section below..
Filter from available groups
You can let users authorize externally, i.e. via LDAP, and use their group strings inside the filter rule.
readonlyrest:
    access_control_rules:

    - name: "Users can only see documents related to their departments" # i.e. alice belongs to 'dev' and 'ops' department groups, so she can see documents where "department" field is equal 'dev' or 'ops'
      ldap_auth:
        name: "myLDAP"
        groups: ["dev", "ops", "qa"]
      filter: '{ "terms": { "department": [@{acl:available_groups}] }}' # i.e. from availabe_groups=[dev, ops] we will get filter: '{ "terms": { "department": ["dev","ops"] }}'
      indices: ["logstash-*"]

    # LDAP connector settings omitted, see LDAP section below..
Uri regex matching user's current group
You can let users authorize externally, i.e. via LDAP, and use their group inside the uri_re rule.
readonlyrest:
    access_control_rules:

    - name: "Users can access uri with value containing user's current group, i.e. user with group 'g1' can access: '/path/g1/some_thing'"
      ldap_authorization:
        name: "ldap1"
        groups: ["g1", "g2", "g3"]
      uri_re: ["^/path/@{acl:current_group}/.*"]

    # LDAP connector settings omitted, see LDAP section below..
Kibana index from headers
Imagine that we delegate authentication to a reverse proxy, so we know that only authenticated users will ever reach Elasticsearch. We can tell the reverse proxy (i.e. Nginx) to inject a header called x-nginx-user containing the username.
readonlyrest:
    access_control_rules:

    - name: "Identify a personal kibana index where each user is supposed to save their dashboards"
      kibana_access: rw
      kibana_index: ".kibana_@{header:x-nginx-user}"
Dynamic variables from JWT claims
The JWT token is an authentication string passed generally as a header or a query parameter to the web browser. If you squint, you can see it's a concatenation of three base64 encoded strings. If you base64 decode the middle string, you can see the "claims object". That is the object containing the current user's metadata.
Here is an example of JWT claims object.
{
  "user": "jdoe",
  "display_name": "John Doe",
  "department": "infosec",
  "allowedIndices": ["x", "y"]
}
Here follow some examples of how to use JWT claims as dynamic variables in ReadonlyREST ACL blocks, notice the "jwt:" prefix:
# Using JWT claims as dynamic variables
indices: [ ".kibana_@{jwt:department}", "otherIdx" ]
# claims = { "user": "u1", "department": "infosec"}
# -> indices: [".kibana_infosec", "otherIdx"]

# Using nested values in JWT using JSONPATH as dynamic variables
indices: [ ".kibana_@{jwt:jsonpath.to.department}", "otherIdx"]
# claims = { "jsonpath": {"to": { "department": "infosec" }}}
# -> indices: [".kibana_infosec", "otherIdx"]

# Referencing array-typed values from JWT claims will expand in a list of strings
indices: [ ".kibana_@explode{jwt:allowedIndices}", "otherIdx"]
# claims = {"username": "u1", "allowedIndices":  ["x", "y"] }
# -> indices: [".kibana_x", ".kibana_y", "otherIdx"]

# Explode operator will generate an array of strings from a comma-separated string
indices: ["logstash_@explode{x-indices_csv_string}*", "otherIdx"]
# HTTP Headers: [{ "x-indices_csv_string": "a,b"}]
# -> indices: ["logstash_a*", "logstash_b*", "otherIdx"]
LDAP connector
The auhentication and authorization rules for LDAP (ldap_auth, ldap_authentication, ldap_authorization) defined in the rules section, always need to contain a reference by name to one LDAP connector. One or more LDAP connectors need to be defined in the section "ldaps" of the ACL.
Configuration notes
If you would like to experiment with LDAP and need a development server, you can stand up an OpenLDAP server configuring it using our schema file, which can be found in our tests).
Technical configuration
There are also plenty of technical settings which can be useful:
- an LDAP server address:
- single host:
host(String, required) - LDAP server addressport(Integer, optional, default:389) - LDAP server portssl_enabled(Boolean, optional, default:true) - enables or disables SSL for LDAP connection
- several hosts:
hosts(List, required) - list of LDAP server addresses. The address should look like thisldap://[HOST]:[PORT]or/andldaps://[HOST]:[PORT]ha(enum: [FAILOVER,ROUND_ROBIN], optional, default:FAILOVER) - provides high availability strategy for LDAP
- auto-discovery:
server_discovery(Boolean|YAML object, optional, default:false) - for details see LDAP server discovery section
- single host:
connection_pool_size(Integer, optional, default:30) - indicates how many connections LDAP connector should create to LDAP serverconnection_timeout(Duration, optional, default:10 sec) - instructs connector how long it should wait for the connection to LDAP serverrequest_timeout(Duration, optional, default:10 sec) - instructs connector how long it should wait for receiving a whole response from LDAP serverssl_trust_all_certs(Boolean, optional, default:false) - if it is set totrue, untrusted certificates will be acceptedignore_ldap_connectivity_problems(Boolean, optional, default:false) - when it is set totrue, it allows ROR to function even when LDAP server is unreachable. Rules using unreachable LDAP servers won't match. By default, ROR starts only after it's able to connect to each servercache_ttl(Duration, optional, default:0 sec) - tells how long LDAP connector should cache queries results (for default see caching section)circuit_breaker(YAML object, optional, default:max_retries: 10,reset_duration: 10 sec) - for details see circuit breaker section
Query configuration
Usually, we would like to configure three main things for defining the way LDAP users and groups are queried:
- a way to authenticate client (LDAP binding; used by all LDAP rules):
bind_dn(string, optional, default: [not present]) - a username used to connect to the LDAP service. We can skip this setting when our LDAP service allows for anonymous bindingbind_password(string, optional, default: [not present]) - a password used to connect to the LDAP service. We can skip this setting when our LDAP service allows for anonymous binding
- a way to search users. In ROR it can be done using the following YAML keys (used by all LDAP rules):
search_user_base_DN(string, required) - should refer to the base Distinguished Name of the users to be authenticateduser_id_attribute(string, optional, default:uid) - should refer to a unique ID for the user within the base DN
- a way to search user groups (NOT used by
ldap_authenticationrule). In ROR, depending on LDAP schema, a relation between users and groups can be defined in:- Group entry - it has an attribute that refers to User entries:
search_groups_base_DN(required) - should refer to the base Distinguished Name of the groups to which these users may belonggroup_name_attribute(string, optional, default:cn) - is the LDAP group object attribute that contains the names of the ROR groupsunique_member_attribute(string, optional, default:uniqueMember) - is the LDAP group object attribute that contains the names of the ROR groupsgroup_search_filter(string, optional, default:(cn=*)) - is the LDAP search filter (or filters) to limit the user groups returned by LDAP. By default, this filter will be joined (with&) withunique_member_attribute=user_dnfilter resulting in this LDAP search filter:(&YOUR_GROUP_SEARCH_FILTER(unique_member_attribute=user_dn)).group_attribute_is_dn(boolean, optional, default:true) -- when
truethe search filter will look like that:(&YOUR_GROUP_SEARCH_FILTER(unique_member_attribute={USER_DN})) - then
falsethe search filer will look like that:(&YOUR_GROUP_SEARCH_FILTER(unique_member_attribute={USER_ID_ATTRIBUTE_VALUE}))
- when
- User entry - it has an attribute that refers to Group entries:
search_groups_base_DN(string, required) - should refer to the base Distinguished Name of the groups to which these users may belonggroup_name_attribute(string, optional, default:cn) - is the LDAP group object attribute that contains the names of the ROR groupsgroups_from_user_attribute(string, optional, default:memberOf) - is the LDAP user object attribute that contains the names of the ROR groups
- Group entry - it has an attribute that refers to User entries:
Examples:
group_search_filter: "(objectClass=group)"
group_search_filter: "(objectClass=group)(cn=application*)"
group_search_filter: "(cn=*)" # basically no group filtering
Caching
Too many calls made by ROR to our LDAP service can sometimes be problematic (eg. when one LDAP connector is used in many rules). The problem can be simply solved by using caching functionality. Caching can be configured per LDAP connector or per LDAP rule (see ldap_auth, ldap_authentication, ldap_authorization rules). By default cache is diabled. We can enabled it by set cache_ttl > 0 sec. In the cache will be stored only results of successful requests - info about authentication result and/or returned LDAP groups for the given credentials. When LDAP connector level cache is used any rule that use the connector can take advantage of cached results. When we configure cache_ttl at LDAP rule level, the results of LDAP calls made by the rule will be stored in cache. Other LDAP rules won't have access to this cache.
Circuit Breaker
The LDAP connector is equipped by default with a circuit breaker functionality. The circuit breaker can disable the connector from sending new requests to the server when it doesn't respond properly. After receiving a configurable number of failed responses in a row, the circuit breaker feature disables sending any new requests by terminating them immediately with an exception. After a configurable amount of time, the circuit breaker feature allows one request to pass again. If it succeeds, the connector goes back to normal operation. If not, a test request is sent again after a configurable amount of time. A general description of the concept could be found on wiki and more about specific implementation could be found in library documentation.
The circuit breaker feature can be customized to adapt to specific needs using the following configuration parameters:
max_retriesis the number of failed responses in a row that will trigger the circuit breaker.reset_durationdefines how long the circuit breaker feature will block the incoming requests before starting to send one test request. to the LDAP server.
LDAP Server discovery
The LDAP connector can get all LDAP hostnames from DNS server rather than from the configuration file. By default _ldap._tcp SRV records are used for that, but any other SRV record can be configured.
The simplest configuration example of an LDAP connector instance using server discovery is:
    - name: ldap
      server_discovery: true
      search_user_base_DN: "ou=People,dc=example2,dc=com"
      search_groups_base_DN: "ou=Groups,dc=example2,dc=com"
This configuration is using the system DNS to fetch all the _ldap._tcp SRV records which are expected to contain the hostname and port of all the LDAP servers we should connect to. Each SRV record also has priority and weight assigned to it which determine the order in which they should be contacted. Records with a lower priority value will be used before those with a higher priority value. The weight will be used if there are multiple service records with the same priority, and it controls how likely each record is to be chosen. A record with a weight of 2 is twice as likely to be chosen as a record with the same priority and a weight of 1.
The server discovery mechanism can be optionally configured further, by adding a few more configuration parameters, all of which are optional:
record_name- DNS SRV record name. By default it's_ldap._tcp, but could be_ldap._tcp.domainnameor any custom value.dns_url- Address of non-default DNS server in formdns://IP[:PORT]. By default, the system DNS is used.ttl- DNS cache timeout. Specifies how long values from DNS will be kept in the cache. Default is 1h.use_ssl- Usetruewhen SSL should be used for LDAP connections. Default isfalsewhich means that SSL won't be used.
Example:
    - name: ldap
      server_discovery:
        record_name: "_ldap._tcp.example.com"
        dns_url: "dns://192.168.1.100"
        ttl: "3 hours"
        use_ssl: true
      search_user_base_DN: "ou=People,dc=example2,dc=com"
      search_groups_base_DN: "ou=Groups,dc=example2,dc=com"
ROR with LDAP - examples
In this example, users' credentials are validated via LDAP. The groups associated with each validated user, are resolved using the same LDAP server.
Simpler: authentication and authorization in one rule
readonlyrest:

    access_control_rules:

    - name: Accept requests from users in group team1 on index1
      type: allow                                           # Optional, defaults to "allow", will omit from now on.
      ldap_auth:
        name: "ldap1"                                       # ldap name from below 'ldaps' section
        groups: ["g1", "g2"]                                # group within 'ou=Groups,dc=example,dc=com'
      indices: ["index1"]

    - name: Accept requests from users in group team2 on index2
      ldap_auth:
        name: "ldap2"
        groups: ["g3"]
        cache_ttl_in_sec: 60
      indices: ["index2"]

    ldaps:

    - name: ldap1
      host: "ldap1.example.com"
      port: 389
      ssl_enabled: false
      ssl_trust_all_certs: true
      ignore_ldap_connectivity_problems: true
      bind_dn: "cn=admin,dc=example,dc=com"
      bind_password: "password"
      search_user_base_DN: "ou=People,dc=example,dc=com"
      user_id_attribute: "uid"
      search_groups_base_DN: "ou=Groups,dc=example,dc=com"
      unique_member_attribute: "uniqueMember"
      connection_pool_size: 20
      connection_timeout: 1s
      request_timeout: 2s
      cache_ttl: 60s
      group_search_filter: "(objectClass=group)(cn=application*)"
      group_name_attribute: "cn"
      circuit_breaker:
        max_retries: 2
        reset_duration: 5s

    # High availability LDAP settings (using "hosts", rather than "host")
    - name: ldap2
      hosts:
      - "ldaps://ssl-ldap2.foo.com:636"
      - "ldaps://ssl-ldap3.foo.com:636"
      ha: "ROUND_ROBIN"
      search_user_base_DN: "ou=People,dc=example2,dc=com"
      search_groups_base_DN: "ou=Groups,dc=example2,dc=com"

    # Server discovery variant
    - name: ldap3
      server_discovery: true
      search_user_base_DN: "ou=People,dc=example2,dc=com"
      search_groups_base_DN: "ou=Groups,dc=example2,dc=com"
Advanced: authentication and authorization in separate rules
readonlyrest:
    enable: true
    response_if_req_forbidden: Forbidden by ReadonlyREST ES plugin

    access_control_rules:

    - name: Accept requests to index1 from users with valid LDAP credentials, belonging to LDAP group 'team1'
      ldap_authentication: "ldap1"
      ldap_authorization:
        name: "ldap1"                                       # ldap name from 'ldaps' section
        groups: ["g1", "g2"]                                # group within 'ou=Groups,dc=example,dc=com'
      indices: ["index1"]

    - name: Accept requests to index2 from users with valid LDAP credentials, belonging to LDAP group 'team2'
      ldap_authentication:
        name: "ldap2"
        cache_ttl: 60s
      ldap_authorization:
        name: "ldap2"
        groups: ["g3"]
        cache_ttl: 60s
      indices: ["index2"]

    ldaps:

    - name: ldap1
      host: "ldap1.example.com"
      port: 389
      ssl_enabled: false
      ssl_trust_all_certs: true
      ignore_ldap_connectivity_problems: true
      bind_dn: "cn=admin,dc=example,dc=com"
      bind_password: "password"
      search_user_base_DN: "ou=People,dc=example,dc=com"
      user_id_attribute: "uid"
      search_groups_base_DN: "ou=Groups,dc=example,dc=com"
      unique_member_attribute: "uniqueMember"
      connection_pool_size: 20
      connection_timeout: 1s
      request_timeout: 2s
      cache_ttl: 60s

    # High availability LDAP settings (using "hosts", rather than "host")
    - name: ldap2
      hosts:
      - "ldaps://ssl-ldap2.foo.com:636"
      - "ldaps://ssl-ldap3.foo.com:636"
      ha: "ROUND_ROBIN"
      search_user_base_DN: "ou=People,dc=example2,dc=com"
      search_groups_base_DN: "ou=Groups,dc=example2,dc=com"
External Basic Auth
ReadonlyREST will forward the received Authorization header to a website of choice and evaluate the returned HTTP status code to verify the provided credentials. This is useful if you already have a web server with all the credentials configured and the credentials are passed over the Authorization header.
readonlyrest:
    access_control_rules:

    - name: "::Tweets::"
      methods: GET
      indices: ["twitter"]
      external_authentication: "ext1"

    - name: "::Facebook posts::"
      methods: GET
      indices: ["facebook"]
      external_authentication:
        service: "ext2"
        cache_ttl_in_sec: 60

    external_authentication_service_configs:

    - name: "ext1"
      authentication_endpoint: "http://external-website1:8080/auth1"
      success_status_code: 200
      cache_ttl_in_sec: 60
      http_connection_settings:
        validate: false # SSL certificate validation (default to true)
        connection_timeout_in_sec: 1           # default 2
        socket_timeout_in_sec: 2               # default 5
        connection_request_timeout_in_sec: 1   # default 5
        connection_pool_size: 20               # default 30

    - name: "ext2"
      authentication_endpoint: "http://external-website2:8080/auth2"
      success_status_code: 204
      cache_ttl_in_sec: 60
To define an external authentication service the user should specify:
namefor service (then this name is used as id inserviceattribute ofexternal_authenticationrule)authentication_endpoint(GET request)success_status_code- authentication response success status code
Cache can be defined at the service level or/and at the rule level. In the example, both are shown, but you might opt for setting up either.
Custom groups providers
This external authorization connector makes it possible to resolve to what groups a users belong, using an external JSON or XML service.
readonlyrest:
    access_control_rules:

    - name: "::Tweets::"
      methods: GET
      indices: ["twitter"]
      proxy_auth:
        proxy_auth_config: "proxy1"
        users: ["*"]
      groups_provider_authorization:
        user_groups_provider: "GroupsService"
        groups: ["group3"]

    - name: "::Facebook posts::"
      methods: GET
      indices: ["facebook"]
      proxy_auth:
        proxy_auth_config: "proxy1"
        users: ["*"]
      groups_provider_authorization:
        user_groups_provider: "GroupsService"
        groups: ["group1"]
        cache_ttl_in_sec: 60

    proxy_auth_configs:

    - name: "proxy1"
      user_id_header: "X-Auth-Token"                           # default X-Forwarded-User

    user_groups_providers:

    - name: GroupsService
      groups_endpoint: "http://localhost:8080/groups"
      auth_token_name: "token"
      auth_token_passed_as: QUERY_PARAM                        # HEADER OR QUERY_PARAM
      response_groups_json_path: "$..groups[?(@.name)].name"   # see: https://github.com/json-path/JsonPath
      cache_ttl_in_sec: 60
      http_connection_settings:
        connection_timeout_in_sec: 1                           # default 2
        socket_timeout_in_sec: 2                               # default 5
        connection_request_timeout_in_sec: 2                   # default 5
        connection_pool_size: 20                               # default 30
In example above, a user is authenticated by reverse proxy and then external service is asked for groups for that user. If groups returned by the service contain any group declared in groups list, user is authorized and rule matches.
Also in this rule, the groups clause can be replaced by group_and to require the user must belong to all the listed groups:
  groups_provider_authorization:
    user_groups_provider: "GroupsService"
    groups_and: ["group1", "group2"] # match when user belongs to ALL listed groups
To define user groups provider you should specify:
namefor service (then this name is used as id inuser_groups_providerattribute ofgroups_provider_authorizationrule)groups_endpoint- service with groups endpoint (GET request)auth_token_name- user identifier will be passed with this nameauth_token_passed_as- user identifier can be send using HEADER or QUERY\_PARAMresponse_groups_json_path- response can be unrestricted, but you have to specify JSON Path for groups name list (see example in tests)
As usual, the cache behaviour can be defined at service level or/and at rule level.
JSON Web Token (JWT) Auth
The information about the username can be extracted from the "claims" inside a JSON Web Token. Here is an example.
readonlyrest:
    access_control_rules:
    - name: Valid JWT token with a viewer group
      kibana_access: ro
      jwt_auth:
        name: "jwt_provider_1"
        groups: ["viewer"]

    - name: Valid JWT token with a writer group
      kibana_access: rw
      jwt_auth:
        name: "jwt_provider_1"
        groups: ["writer"]

    - name: Valid JWT token with a viewer and writer groups
      kibana_access: rw
      jwt_auth:
        name: "jwt_provider_1"
        groups_and: ["writer", "viewer"]

    jwt:
    - name: jwt_provider_1
      signature_algo: HMAC # can be NONE, RSA, HMAC (default), and EC
      signature_key: "your_signature_min_256_chars"
      user_claim: email
      groups_claim: resource_access.client-app.groups # JSON-path style
      header_name: Authorization
You can verify groups assigned to the user with the groups field. The rule matches when the user belongs to at least one of the configured groups (OR logic). Alternatively, groups_and matches when the user belongs to all given groups (AND logic).
The user_claim indicates which field in the JSON will be interpreted as the username.
The signature_key is used shared secret between the issuer of the JWT and ReadonlyREST. It is used to verify the cryptographical "paternity" of the message.
The header_name is used if we expect the JWT Token in a custom header (i.e. Google Cloud IAP signed headers)
The signature_algo indicates the family of cryptographic algorithms used to validate the JWT.
Accepted signature\_algo values
The value of this configuration represents the cryptographic family of the JWT protocol. Use the below table to tell what value you should configure, given a JWT token sample. You can decode sample JWT token using an online tool.
Algorithm declared in JWT token | signature_algo value |
|---|---|
NONE | None |
HS256 | HMAC |
HS384 | HMAC |
HS512 | HMAC |
RS256 | RSA |
RS384 | RSA |
RS512 | RSA |
PS256 | RSA |
PS384 | RSA |
PS512 | RSA |
ES256 | EC |
ES384 | EC |
ES512 | EC |
GPLv3 License
ReadonlyREST Free (Elasticsearch plugin) is released under the GPLv3 license. For what this kind of software concerns, this is identical to GPLv2, that is, you can treat ReadonlyREST as you would treat Linux code. The big difference from Linux is that here you can ask for a commercial license and stop thinking about legal implications.
Here is a practical summary of what dealing with GPLv3 means:
You CAN
- Distribute for free or commercially a version (partial or total) of this software (along with its license and attributions) as part of a product or solution that is also released under GPL-compatible license. Please notify us if you do so.
- Use a modified version internally to your company without making your changes available under the GPLv3 license.
- Distribute for free or commercially a modified version (partial or total) of this software, provided that the source is contributed back as pull request to the original project or publicly made available under the GPLv3 or compatible license.
You CANNOT
- Sell or give away a modified version of the plugin (or parts of it, or any derived work) without publishing the modified source under GPLv3 compatible licenses.
- Modify the code for a paying client without immediately contributing your changes back to this project's GitHub as a pull request, or alternatively publicly release said fork under GPLv3 or compatible license.
GPLv3 license FAQ
1. Q: I sell a proprietary software solution that already includes many other OSS components (i.e. Elasticsearch). Can I bundle also ReadonlyREST into it?
A: No, GPLv3 does not allow it. But hey, no problem, just go for the Enterprise subscription.
2. Q: I have a SaaS and we want to use a version of ReadonlyREST for Elasticsearch (as is, or modified), do I need a commercial license?
A: No, you don't. Go for it! However if you are using Kibana, consider the Enterprise offer which includes multi-tenancy.
3. Q: I'm a consultant and I will charge my customer for modifying this software and they will not sell it as a product or part of their product.
A: This is fine with GPLv3.
Dual-license
Please don't hesitate to contact us for a re-licensed copy of this source. Your success is what makes this project worthwhile, don't let legal issues slow you down.
See commercial license FAQ page for more information.
Installation
- Download the binary release of the latest version of ReadonlyREST from the download page
cdto the Elasticsearch home- Install the plugin
Elasticsearch 5.x
bin/elasticsearch-plugin install file:///download-folder/readonlyrest-1.13.2_es5.1.2.zipElasticsearch 2.x
bin/plugin install file:///download-folder/readonlyrest-1.13.2_es5.1.2.zip- Edit
config/readonlyrest.ymland add your configuration as seen in examples.
Build from Source
You need to have installed: git, maven, Java 8 JDK, zip. So use apt-get or brew to get them.
- Clone the repo
git clone https://github.com/sscarduzio/elasticsearch-readonlyrest-plugincd elasticsearch-readonlyrest-plugin- Launch the build script
bin/build.sh
You should find the plugin's zip files under /target (Elasticsearch 2.x) or build/releases/ (Elasticsearch 5.x).
Examples
A small library of typical use cases.
Secure Logstash
We have a Logstash agent installed somewhere and we want to ship the logs to our Elasticsearch cluster securely.
Elasticsearch side
Step 1: Bring Elasticsearch HTTP interface (port 9200) to HTTPS When you get SSL certificates (i.e. from your IT department, or from LetsEncrypt), you should obtain a private key and a certificate chain. In order to use them with ReadonlyREST, we need to wrap them into a JKS (Java key store) file. For the sake of this example, or for your testing, we won't use real SSL certificates, we are going to create a self signed certificate.
Remember, we'll do with a self-signed certificate for example convenience, but if you deploy this to a server, use a real one!
keytool -genkey -keyalg RSA -alias selfsigned -keystore keystore.jks -storepass readonlyrest -validity 360 -keysize 2048Now copy the keystore.jks inside the plugin directory inside the Elasticsearch home.
cp keystore.jks /elasticsearch/config/IMPORTANT: to enable ReadonlyREST's SSL stack, open elasticsearch.yml and append this one line:
http.type: ssl_netty4Step 3 Now We need to create some credentials for logstash to login, let's say
- user = logstash
- password = logstash
Step 4 Hash the credentials string logstash:logstash using SHA256. The simplest way is to paste the string in an online tool You should have obtained "280ac6f756a64a80143447c980289e7e4c6918b92588c8095c7c3f049a13fbf9".
Step 5 Let's add some configuration to our Elasticsearch: edit conf/readonlyrest.yml and append the following lines:
 readonlyrest:

     ssl:
       enable: true
       # keystore in the same dir with readonlyrest.yml
       keystore_file: "keystore.jks"
       keystore_pass: readonlyrest
       key_pass: readonlyrest

     response_if_req_forbidden: Forbidden by ReadonlyREST ES plugin

     access_control_rules:

     - name: "::LOGSTASH::"
       auth_key_sha256: "280ac6f756a64a80143447c980289e7e4c6918b92588c8095c7c3f049a13fbf9" #logstash:logstash
       actions: ["cluster:monitor/main","indices:admin/types/exists","indices:data/read/*","indices:data/write/*","indices:admin/template/*","indices:admin/create"]
       indices: ["logstash-*"]
Logstash side
Edit the logstash configuration file and fix the output block as follows:
 output {
   elasticsearch {
     ssl => true
     ssl_certificate_verification => false
     hosts => ["YOUR_ELASTICSEARCH_HOST:9200"]
     user => logstash
     password => logstash
   }
 }
The ssl_certificate_verification bit is necessary for accepting self-signed SSL certificates. You might also need to add cacert parameter to provide the path to your .cer or .pem file.
Secure Metricbeats
Very similarly to Logstaash, here's a snippet of configuration for Metricbeats logging agent configuration of metricbeat - elasticsearch section
On the Metricbeats side
output.elasticsearch:
  output.elasticsearch:
  username: metricbeat
  password: hereyourpasswordformetricbeat
  protocol: https
  hosts: ["xx.xx.xx.xx:9200"]
  worker: 1
  index: "log_metricbeat-%{+yyyy.MM}"
  template.enabled: false
  template.versions.2x.enabled: false
  ssl.enabled: true
  ssl.certificate_authorities: ["./certs/your-rootca_cert.pem"]
  ssl.certificate: "./certs/your_srv_cert.pem"
  ssl.key: "./certs/your_srv_key.pem"
Of course, if you do not use ssl, disable it.
On the Elasticsearch side
 readonlyrest:
     ssl:
       enable: true
       # keystore in the same dir with elasticsearch.yml
       keystore_file: "keystore.jks"
       keystore_pass: readonlyrest
       key_pass: readonlyrest

    access_control_rules:
    - name: "metricbeat can write and create its own indices"
      auth_key_sha1: fd2e44724a234234454324253094080986e8fda
      actions: ["indices:data/read/*","indices:data/write/*","indices:admin/template/*","indices:admin/create"]
      indices: ["metricbeat-*", "log_metricbeat*"]