Лљгк KubeSphere ЭцзЊ k8s ЕкЖўМОЃќopenEuler 22.03 Лљгк KubeSphere АВзА k8s v1.24 ЪЕеНШыУХ
дДДЛљгк KubeSphere ЭцзЊ k8s ЕкЖўМОЃќopenEuler 22.03 Лљгк KubeSphere АВзА k8s v1.24 ЪЕеНШыУХ
дДД
ДѓМвКУЃЌЛЖгРДЕНдЫЮЌгаЪѕ
ЛЖгРДЕНдЦдЩњдЫЮЌЪЕеНЯЕСажЎЛљгк KubeSphere ЭцзЊ K8s ЕкЖўМО
ЧАбд
ЕМЭМ
жЊЪЖСП
- дФЖСЪБГЄЃК20 Зж
- ааЃК928
- ЕЅДЪЃК6000+
- зжЗћЃК44900+
- ЭМЦЌЃК10 еХ
жЊЪЖЕу
- ЖЈМЖЃКШыУХМЖ
- KubeKey АВзАВПЪ№ KubeSphere КЭ Kubernetes
- KubeSphere ЙмРэПижЦЬЈЛљБОВйзї
- Kubernetes ЛљБОВйзї
- openEuler ВйзїЯЕЭГЕФЛљБОХфжУ
ЪЕеНЗўЮёЦїХфжУ(МмЙЙ1:1ИДПЬаЁЙцФЃЩњВњЛЗОГЃЌХфжУТдгаВЛЭЌ)
жїЛњУћ | IP | CPU | ФкДц | ЯЕЭГХЬ | Ъ§ОнХЬ | гУЭО |
|---|---|---|---|---|---|---|
ks-master-0 | 192.168.9.91 | 2 | 4 | 50 | 100 | KubeSphere/k8s-master |
ks-master-1 | 192.168.9.92 | 2 | 4 | 50 | 100 | KubeSphere/k8s-master |
ks-master-2 | 192.168.9.93 | 2 | 4 | 50 | 100 | KubeSphere/k8s-master |
ks-worker-0 | 192.168.9.95 | 2 | 4 | 50 | 100 | k8s-worker/CI |
ks-worker-1 | 192.168.9.96 | 2 | 4 | 50 | 100 | k8s-worker |
ks-worker-2 | 192.168.9.97 | 2 | 4 | 50 | 100 | k8s-worker |
storage-0 | 192.168.9.81 | 2 | 4 | 50 | 100+ | ElasticSearch/GlusterFS/Ceph/Longhorn/NFS/ |
storage-1 | 192.168.9.82 | 2 | 4 | 50 | 100+ | ElasticSearch/GlusterFS/Ceph/Longhorn |
storage-2 | 192.168.9.83 | 2 | 4 | 50 | 100+ | ElasticSearch/GlusterFS/Ceph/Longhorn |
registry | 192.168.9.80 | 2 | 4 | 50 | 200 | Sonatype Nexus 3 |
КЯМЦ | 10 | 20 | 40 | 500 | 1100+ |
ЪЕеНЛЗОГЩцМАШэМўАцБОаХЯЂ
- ВйзїЯЕЭГЃКopenEuler 22.03 LTS SP2 x86_64
- KubeSphereЃКv3.3.2
- KubernetesЃКv1.24.12
- ContainerdЃК1.6.4
- KubeKey: v3.0.8
1. БОЮФМђНщ
БОЮФЪЧ openEuler 22.03 LTS SP2 Лљгк KubeSphere АВзА Kubernetes ЕФИќаТАцЁЃ
БфИќдвђМАИФЖЏЫЕУїШчЯТЃК
- дкКѓЦкЕФЪЕеНбЕСЗжаЗЂЯж Kubernetes v1.26 АцБОЙ§ИпЕМжТВЛжЇГж GlusterFS зїЮЊКѓЖЫДцДЂЃЌзюКѓжЇГжЕФАцБОЪЧ v1.25 ЯЕСаЁЃ
- KubeKey гаСЫИќаТЃЌЙйЗНЗЂВМСЫ v3.0.8 ЃЌжЇГжИќЖрЕФ Kubernetes АцБОЁЃ
- злКЯПМТЧЃЌЮвУЧбЁдё Kubernetes v1.24.12ЁЂKubeKey v3.0.8 ИќаТЮвУЧЕФЯЕСаЮФЕЕЁЃ
- ЮФЕЕећЬхНсЙЙИњЩЯвЛЦквЛбљЃЌећЬхБфЛЏВЛДѓЃЌжЛЪЧЯИНкТдгаВювьЁЃ
ЮвУЧНЋЪЙгУ KubeSphere ПЊЗЂЕФ KubeKey ЙЄОпЪЕЯжздЖЏЛЏВПЪ№ЃЌФЃФтецЪЕЕФаЁЙцФЃЩњВњЛЗОГдк 6 ЬЈЗўЮёЦїЩЯЪЕЯжИпПЩгУФЃЪНВПЪ№ Kubernetes МЏШККЭ KubeSphereЁЃ
ЮвУЧНЋЬсЙЉЯъЯИЕФВПЪ№ЫЕУїЃЌвдБуЖСепЧсЫЩЕиЭъГЩВЂеЦЮеЪЕеНВПЪ№ KubeSphere КЭ Kubernetes МЏШКЁЃ
2. ВйзїЯЕЭГЛљДЁХфжУ
БОЯЕСаЪЕеНЮФЕЕЃЌЮЊСЫЬљНќЩњВњЃЌбЁгУСЫ 3 Master КЭ 3 Worker ЕФВПЪ№МмЙЙЃЌКѓУцЮЊСЫЪЕеНФЃФтМЏШКаТдіНкЕуЃЌвђДЫЃЌГѕЪМЛЏВПЪ№ЪБЃЌНіЪЙгУ 3 Master КЭ 1 WorkerЁЃдкЪЕМЪЪЙгУжаЃЌЧыИљОнЪЕМЪЧщПіаоИФЁЃ
ЧызЂвтЃЌвдЯТВйзїЮоЬиЪтЫЕУїЪБашдкЫљга openEuler ЗўЮёЦїЩЯжДааЁЃБОЮФжЛбЁШЁ Master-0 НкЕузїЮЊбнЪОЃЌВЂМйЖЈЦфгрЗўЮёЦїЖМвбАДееЯрЭЌЕФЗНЪННјааХфжУКЭЩшжУЁЃ
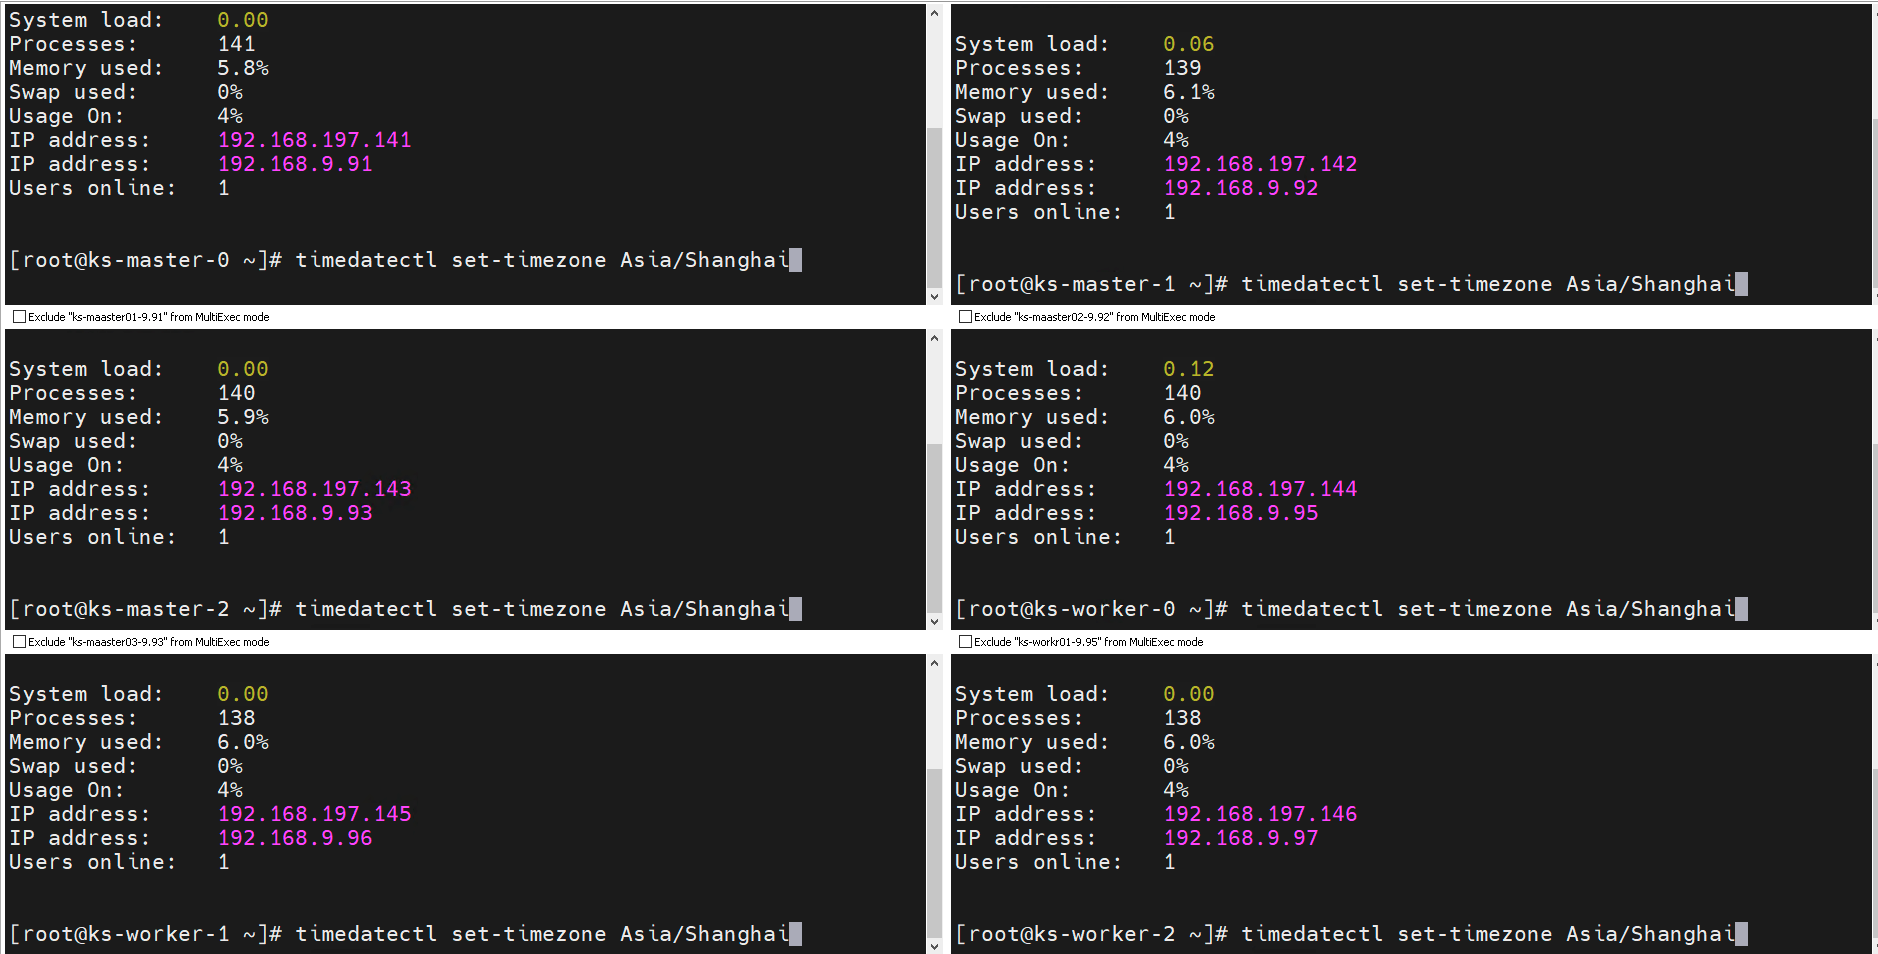
2.1 ХфжУжїЛњУћ
hostnamectl hostname ks-master-0зЂвтЃКworker НкЕуЕФжїЛњУћЧАзКЪЧ ks-worker-
2.2 ХфжУЗўЮёЦїЪБЧј
ХфжУЗўЮёЦїЪБЧјЮЊ Asia/ShanghaiЁЃ
timedatectl set-timezone Asia/ShanghaiбщжЄЗўЮёЦїЪБЧјЃЌе§ШЗХфжУШчЯТЁЃ
[root@MiWiFi-RA67-srv ~]# timedatectl
               Local time: Tue 2023-07-18 10:47:42 CST
           Universal time: Tue 2023-07-18 02:47:42 UTC
                 RTC time: Tue 2023-07-18 02:47:42
                Time zone: Asia/Shanghai (CST, +0800)
System clock synchronized: yes
              NTP service: active
RTC in local TZ: noаЁММЧЩЃКЖрИіЛњЦїжДааЭЌвЛЬѕУќСюЕФЪБКђЃЌПЩвдгУжеЖЫЙЄОпЕФЖрПЊЙІФмЃЌетбљФмЬсИпаЇТЪЁЃЕБШЛАЁЃЌвВПЩвдАДЮвУЧЕквЛМОНщЩмЕФ Ansible ЙЄОп(етвЛМОЮЊСЫееЙЫДПдЫЮЌаЁАзЃЌШЁЯћСЫЃЌИФЪжпЃСЫ)ЁЃ
2.3 ХфжУЪБМфЭЌВН
АВзА chrony зїЮЊЪБМфЭЌВНШэМўЁЃ
yum install chrony аоИФХфжУЮФМў /etc/chrony.confЃЌаоИФ ntp ЗўЮёЦїХфжУЁЃ
vi /etc/chrony.conf
# ЩОГ§ЫљгаЕФ pool ХфжУ
pool pool.ntp.org iburst
# діМгЙњФкЕФ ntp ЗўЮёЦїЃЌЛђЪЧжИЖЈЦфЫћГЃгУЕФЪБМфЗўЮёЦї
pool cn.pool.ntp.org iburst
# ЩЯУцЕФЪжЙЄВйзїЃЌвВПЩвдЪЙгУ sed здЖЏЬцЛЛ
sed -i 's/^pool pool.*/pool cn.pool.ntp.org iburst/g' /etc/chrony.confжиЦєВЂЩшжУ chrony ЗўЮёПЊЛњздЦєЖЏЁЃ
systemctl restart chronyd && systemctl enable chronydбщжЄ chrony ЭЌВНзДЬЌЁЃ
# жДааВщПДУќСю
chronyc sourcestats -v
# е§ГЃЕФЪфГіНсЙћШчЯТ
[root@MiWiFi-RA67-srv ~]# chronyc sourcestats -v
.- Number of sample points in measurement set.
/ .- Number of residual runs with same sign.
| / .- Length of measurement set (time).
| | / .- Est. clock freq error (ppm).
| | | / .- Est. error in freq.
| | | | / .- Est. offset.
| | | | | | On the -.
| | | | | | samples. \
| | | | | | |
Name/IP Address NP NR Span Frequency Freq Skew Offset Std Dev
==============================================================================
ntp6.flashdance.cx 4 3 7 -1139.751 120420 +29ms 18ms
electrode.felixc.at 4 3 8 -880.764 10406.110 -18ms 1576us
ntp8.flashdance.cx 4 3 7 -3806.718 40650.566 -16ms 6936us
time.cloudflare.com 4 3 7 +346.154 30670.580 +30ms 4386us2.4 ХфжУ hosts ЮФМў
БрМ /etc/hosts ЮФМўЃЌНЋЙцЛЎЕФЗўЮёЦї IP КЭжїЛњУћЬэМгЕНЮФМўжаЁЃ
192.168.9.91    ks-master-0
192.168.9.92    ks-master-1
192.168.9.93    ks-master-2
192.168.9.95    ks-worker-0
2.5 ХфжУ DNS
echo "nameserver 114.114.114.114" > /etc/resolv.conf2.6 ЙиБеЯЕЭГЗРЛ№ЧН
systemctl stop firewalld && systemctl disable firewalld2.7 НћгУ SELinux
openEuler 22.03 SP2 зюаЁЛЏАВзАЕФЯЕЭГФЌШЯЦєгУСЫ SELinuxЃЌЮЊСЫМѕЩйТщЗГЃЌЮвУЧЫљгаЕФНкЕуЖМНћгУ SELinuxЁЃ
# ЪЙгУ sed аоИФХфжУЮФМўЃЌЪЕЯжГЙЕзЕФНћгУ
sed -i 's/^SELINUX=enforcing/SELINUX=disabled/' /etc/selinux/config
# ЪЙгУУќСюЃЌЪЕЯжСйЪБНћгУЃЌетвЛВНЦфЪЕВЛзівВааЃЌKubeKey ЛсздЖЏХфжУ
setenforce 02.8 АВзАЯЕЭГвРРЕ
дкЫљгаНкЕуЩЯЃЌвд root гУЛЇЕЧТНЯЕЭГЃЌжДааЯТУцЕФУќСюЮЊ Kubernetes АВзАЯЕЭГЛљБОвРРЕАќЁЃ
# АВзА Kubernetes ЯЕЭГвРРЕАќ
yum install curl socat conntrack ebtables ipset ipvsadm
# АВзАЦфЫћБиБИАќЃЌopenEuler вВЪЧЦцнтСЫЃЌФЌШЯОгШЛЖМВЛАВзАtarЃЌВЛзАЕФЛАКѓУцЛсБЈДэ
yum install tar2.9 ХфжУЛљгк SSH УмдПЕФЩэЗнбщжЄ
KubeKey жЇГждкздЖЏЛЏВПЪ№ KubeSphere КЭ Kubernetes ЗўЮёЪБЃЌРћгУУмТыКЭУмдПзїЮЊдЖГЬЗўЮёЦїЕФСЌНгбщжЄЗНЪНЁЃБОЮФЛсбнЪОЭЌЪБЪЙгУУмТыКЭУмдПЕФХфжУЗНЪНЃЌвђДЫЃЌашвЊЮЊВПЪ№гУЛЇ root ХфжУУтУмТы SSHЩэЗнбщжЄЁЃ
зЂвтЃКБОаЁНкЮЊПЩбЁХфжУЯюЃЌШчЙћФуЪЙгУДПУмТыЕФЗНЪНзїЮЊЗўЮёЦїдЖГЬСЌНгШЯжЄЗНЪНЃЌПЩвдКіТдБОНкФкШнЁЃ
БОЮФНЋ master-0 НкЕузїЮЊВПЪ№НкЕуЃЌЯТУцЕФВйзїНіашвЊдк master-0 НкЕуВйзїЁЃ
вд root гУЛЇЕЧТНЯЕЭГЃЌШЛКѓЪЙгУ ssh-keygen УќСюЩњГЩвЛИіаТЕФ SSH УмдПЖдЃЌУќСюЭъГЩКѓЃЌSSH ЙЋдПКЭЫНдПНЋДцДЂдк /root/.ssh ФПТМжаЁЃ
ssh-keygen -t ed25519УќСюжДаааЇЙћШчЯТЃК
[root@ks-master-0 ~]# ssh-keygen -t ed25519
Generating public/private ed25519 key pair.
Enter file in which to save the key (/root/.ssh/id_ed25519):
Created directory '/root/.ssh'.
Enter passphrase (empty for no passphrase):
Enter same passphrase again:
Your identification has been saved in /root/.ssh/id_ed25519
Your public key has been saved in /root/.ssh/id_ed25519.pub
The key fingerprint is:
SHA256:1PjoUaqv7wrIKwQPvW6FiixzkB9ozv+vhIaYZUBtWrY root@MiWiFi-RA67-srv
The key's randomart image is:
+--[ED25519 256]--+
| ..              |
|.  =     o       |
|..= .   o o      |
|oo.E   . =       |
|.=oo    S .      |
|=B*.o  o .       |
|X*o=... .        |
|*+*... .         |
|.=o..o=*+        |
+----[SHA256]-----+НгЯТРДЃЌЪфШывдЯТУќСюНЋ SSH ЙЋдПДг master-0 НкЕуЗЂЫЭЕНЦфЫћНкЕуЁЃУќСюжДааЪБЪфШы yesЃЌвдНгЪмЗўЮёЦїЕФ SSH жИЮЦЃЌШЛКѓдкГіЯжЬсЪОЪБЪфШы root гУЛЇЕФУмТыЁЃ
ssh-copy-id root@ks-master-0
ssh-copy-id root@ks-master-1
ssh-copy-id root@ks-master-2
ssh-copy-id root@ks-worker-0ЯТУцЪЧУмдПИДжЦЪБЃЌе§ШЗЕФЪфГіНсЙћЁЃ
[root@ks-master-0 ~]# ssh-copy-id root@ks-master-0
/usr/bin/ssh-copy-id: INFO: Source of key(s) to be installed: "/root/.ssh/id_ed25519.pub"
The authenticity of host 'ks-master-0 (192.168.9.91)' can't be established.
ED25519 key fingerprint is SHA256:46y96KewahNGKNhbrGWPkPW8Y662PIGQ4rIEw4SUwGE.
This key is not known by any other names
Are you sure you want to continue connecting (yes/no/[fingerprint])? yes
/usr/bin/ssh-copy-id: INFO: attempting to log in with the new key(s), to filter out any that are already installed
/usr/bin/ssh-copy-id: INFO: 1 key(s) remain to be installed -- if you are prompted now it is to install the new keys

Authorized users only. All activities may be monitored and reported.
root@ks-master-0's password:

Number of key(s) added: 1

Now try logging into the machine, with:   "ssh 'root@ks-master-0'"
and check to make sure that only the key(s) you wanted were added.ЬэМгВЂЩЯДЋ SSH ЙЋдПКѓЃЌФњЯждкПЩвджДааЯТУцЕФУќСюбщжЄЃЌЭЈЙ§ root гУЛЇСЌНгЕНЫљгаЗўЮёЦїЃЌЮоашУмТыбщжЄЁЃ
[root@ks-master-0 ~]# ssh root@ks-master-0
# ЕЧТНЪфГіНсЙћ Тд3. АВзАВПЪ№ KubeSphere КЭ Kubernetes
3.1 ЯТди KubeKey
БОЮФНЋ master-0 НкЕузїЮЊВПЪ№НкЕуЃЌАб KubeKey (ЯТЮФМђГЦkk) зюаТАц(v3.0.8)ЖўНјжЦЮФМўЯТдиЕНИУЗўЮёЦїЁЃОпЬх kk АцБОКХПЩвддкkkЗЂаавГУцВщПДЁЃ
- ЯТдизюаТАцЕФ KubeKey
cd ~
mkdir kubekey
cd kubekey/
# бЁдёжаЮФЧјЯТди(ЗУЮЪ GitHub ЪмЯоЪБЪЙгУ)
export KKZONE=cn
curl -sfL https://get-kk.kubesphere.io | sh -
# вВПЩвдЪЙгУЯТУцЕФУќСюжИЖЈОпЬхАцБО
curl -sfL https://get-kk.kubesphere.io | VERSION=v3.0.8 sh -
# е§ШЗЕФжДаааЇЙћШчЯТ
[root@ks-master-0 ~]# cd ~
[root@ks-master-0 ~]# mkdir kubekey
[root@ks-master-0 ~]# cd kubekey/
[root@ks-master-0 kubekey]# export KKZONE=cn
[root@ks-master-0 kubekey]# curl -sfL https://get-kk.kubesphere.io | sh -
Downloading kubekey v3.0.8 from https://kubernetes.pek3b.qingstor.com/kubekey/releases/download/v3.0.8/kubekey-v3.0.8-linux-amd64.tar.gz ...
Kubekey v3.0.8 Download Complete!
[root@ks-master-0 kubekey]# ll
total 112048
-rwxr-xr-x. 1 root root 78944436 Jul 14 09:17 kk
-rw-r--r--. 1 root root 35788724 Jul 18 11:01 kubekey-v3.0.8-linux-amd64.tar.gz- ВщПД KubeKey жЇГжЕФ Kubernetes АцБОСаБэ
./kk version --show-supported-k8s
[root@ks-master-0 kubekey]# ./kk version --show-supported-k8s
v1.19.0
v1.19.8
v1.19.9
v1.19.15
v1.20.4
v1.20.6
v1.20.10
v1.21.0
v1.21.1
v1.21.2
v1.21.3
v1.21.4
v1.21.5
v1.21.6
v1.21.7
v1.21.8
v1.21.9
v1.21.10
v1.21.11
v1.21.12
v1.21.13
v1.21.14
v1.22.0
v1.22.1
v1.22.2
v1.22.3
v1.22.4
v1.22.5
v1.22.6
v1.22.7
v1.22.8
v1.22.9
v1.22.10
v1.22.11
v1.22.12
v1.22.13
v1.22.14
v1.22.15
v1.22.16
v1.22.17
v1.23.0
v1.23.1
v1.23.2
v1.23.3
v1.23.4
v1.23.5
v1.23.6
v1.23.7
v1.23.8
v1.23.9
v1.23.10
v1.23.11
v1.23.12
v1.23.13
v1.23.14
v1.23.15
v1.23.16
v1.23.17
v1.24.0
v1.24.1
v1.24.2
v1.24.3
v1.24.4
v1.24.5
v1.24.6
v1.24.7
v1.24.8
v1.24.9
v1.24.10
v1.24.11
v1.24.12
v1.24.13
v1.24.14
v1.25.0
v1.25.1
v1.25.2
v1.25.3
v1.25.4
v1.25.5
v1.25.6
v1.25.7
v1.25.8
v1.25.9
v1.25.10
v1.26.0
v1.26.1
v1.26.2
v1.26.3
v1.26.4
v1.26.5
v1.27.0
v1.27.1
v1.27.2зЂвтЃКЪфГіНсЙћЮЊ KK жЇГжЕФНсЙћЃЌЕЋВЛДњБэ KubeSphere КЭЦфЫћ Kubernetes вВФмЭъУРжЇГжЃЌгЩгкКѓЦкЕФЪЕеНЛЙЛсЩцМААцБОЩ§МЖЃЌзлКЯПМТЧБОЮФбЁдёЯрЖдБЃЪиЕФ v1.24.12ЁЃ
3.2 ДДНЈ Kubernetes КЭ KubeSphere ВПЪ№ХфжУЮФМў
ДДНЈМЏШКХфжУЮФМўЃЌБОЪОР§жаЃЌбЁдё KubeSphere v3.3.2 КЭ Kubernetes v1.24.12ЃЌЭЌЪБЃЌжИЖЈХфжУЮФМўУћГЦЮЊ kubesphere-v3.3.2.yamlЃЌШчЙћВЛжИЖЈЃЌФЌШЯЕФЮФМўУћЮЊ config-sample.yamlЁЃ
./kk create config -f kubesphere-v3.3.2.yaml --with-kubernetes v1.24.12 --with-kubesphere v3.3.2УќСюжДааГЩЙІКѓЃЌдкЕБЧАФПТМЛсЩњГЩЮФМўУћЮЊ kubesphere-v3.3.2.yaml ЕФХфжУЮФМўЁЃ
[root@ks-master-0 kubekey]# ./kk create config -f kubesphere-v3.3.2.yaml --with-kubernetes v1.24.12 --with-kubesphere v3.3.2
Generate KubeKey config file successfully
[root@ks-master-0 kubekey]# ll
total 112056
-rwxr-xr-x. 1 root root 78944436 Jul 14 09:17 kk
-rw-r--r--. 1 root root 35788724 Jul 18 11:01 kubekey-v3.0.8-linux-amd64.tar.gz
-rw-r--r--. 1 root root 4681 Jul 18 11:07 kubesphere-v3.3.2.yamlзЂвтЃК ЩњГЩЕФФЌШЯХфжУЮФМўФкШнНЯЖрЃЌетРяОЭВЛзіЙ§ЖреЙЪОСЫЃЌДѓМвПЩвдздМКВщПДЁЃ
БОНкЪОР§ВЩгУ 3 ИіНкЕузїЮЊ control-plane НкЕуЃЌЦєгУЙцЛЎжаЕФ 1Иі worker НкЕуЁЃ
БрМХфжУЮФМў kubesphere-v3.3.2.yamlЃЌаоИФ hosts КЭ roleGroups ЕШаХЯЂЃЌаоИФЫЕУїШчЯТЁЃ
- hostsЃКжИЖЈНкЕуЕФ IPЁЂssh гУЛЇЁЂssh УмТыЁЂss hУмдПЃЌЪОР§бнЪОСЫЭЌЪБЪЙгУУмТыКЭУмдПЕФХфжУЗНЗЈ
- roleGroupsЃКжИЖЈ ks-master-0ЁЂks-master-1ЁЂks-master-2 зїЮЊ etcdЁЂcontrol-planeЁЂworkerНкЕу
- internalLoadbalancerЃК ЦєгУФкжУЕФ HAProxy ИКдиОљКтЦї
- domainЃКздЖЈвхСЫвЛИі opsman.top
- containerManagerЃКЪЙгУСЫcontainerd
аоИФКѓЕФЪОР§ШчЯТЃК
apiVersion: kubekey.kubesphere.io/v1alpha2
kind: Cluster
metadata:
  name: sample
spec:
  hosts:
  - {name: ks-master-0, address: 192.168.9.91, internalAddress: 192.168.9.91, user: root, password: "P@88w0rd"}
  - {name: ks-master-1, address: 192.168.9.92, internalAddress: 192.168.9.92, user: root, privateKeyPath: "~/.ssh/id_ed25519"}
  - {name: ks-master-2, address: 192.168.9.93, internalAddress: 192.168.9.93, user: root, privateKeyPath: "~/.ssh/id_ed25519"}
  - {name: ks-worker-0, address: 192.168.9.95, internalAddress: 192.168.9.95, user: root, privateKeyPath: "~/.ssh/id_ed25519"}
  roleGroups:
    etcd:
    - ks-master-0
    - ks-master-1
    - ks-master-2
    control-plane:
    - ks-master-0
    - ks-master-1
    - ks-master-2
    worker:
    - ks-worker-0
  controlPlaneEndpoint:
    ## Internal loadbalancer for apiservers
    internalLoadbalancer: haproxy

    domain: lb.opsman.top
    address: ""
    port: 6443
  kubernetes:
    version: v1.24.12
    clusterName: opsman.top
    autoRenewCerts: true
    containerManager: containerd
  etcd:
    type: kubekey
  network:
    plugin: calico
    kubePodsCIDR: 10.233.64.0/18
    kubeServiceCIDR: 10.233.0.0/18
    ## multus support. https://github.com/k8snetworkplumbingwg/multus-cni
    multusCNI:
      enabled: false
  registry:
    privateRegistry: ""
    namespaceOverride: ""
    registryMirrors: []
    insecureRegistries: []
  addons: []
3.3 ВПЪ№ KubeSphere КЭ Kubernetes
НгЯТРДЮвУЧжДааЯТУцЕФУќСюЃЌЪЙгУЩЯУцЩњГЩЕФХфжУЮФМўВПЪ№ KubeSphere КЭ KubernetesЁЃ
./kk create cluster -f kubesphere-v3.3.2.yamlЩЯУцЕФУќСюжДааКѓЃЌЪзЯШ kk ЛсМьВщВПЪ№ Kubernetes ЕФвРРЕМАЦфЫћЯъЯИвЊЧѓЁЃМьВщКЯИёКѓЃЌЯЕЭГНЋЬсЪОФњШЗШЯАВзАЁЃЪфШы yes ВЂАД ENTER МЬајВПЪ№ЁЃ
[root@ks-master-0 kubekey]# ./kk create cluster -f kubesphere-v3.3.2.yaml


 _   __      _          _   __
| | / /     | |        | | / /
| |/ / _   _| |__   ___| |/ /  ___ _   _
|    \| | | | '_ \ / _ \    \ / _ \ | | |
| |\  \ |_| | |_) |  __/ |\  \  __/ |_| |
\_| \_/\__,_|_.__/ \___\_| \_/\___|\__, |
                                    __/ |
                                   |___/

11:10:43 CST [GreetingsModule] Greetings
11:10:43 CST message: [ks-worker-0]
Greetings, KubeKey!
11:10:43 CST message: [ks-master-0]
Greetings, KubeKey!
11:10:44 CST message: [ks-master-1]
Greetings, KubeKey!
11:10:44 CST message: [ks-master-2]
Greetings, KubeKey!
11:10:44 CST success: [ks-worker-0]
11:10:44 CST success: [ks-master-0]
11:10:44 CST success: [ks-master-1]
11:10:44 CST success: [ks-master-2]
11:10:44 CST [NodePreCheckModule] A pre-check on nodes
11:10:46 CST success: [ks-master-0]
11:10:46 CST success: [ks-master-2]
11:10:46 CST success: [ks-master-1]
11:10:46 CST success: [ks-worker-0]
11:10:46 CST [ConfirmModule] Display confirmation form
+-------------+------+------+---------+----------+-------+-------+---------+-----------+--------+--------+------------+------------+-------------+------------------+--------------+
| name        | sudo | curl | openssl | ebtables | socat | ipset | ipvsadm | conntrack | chrony | docker | containerd | nfs client | ceph client | glusterfs client | time         |
+-------------+------+------+---------+----------+-------+-------+---------+-----------+--------+--------+------------+------------+-------------+------------------+--------------+
| ks-master-0 | y    | y    | y       | y        | y     | y     | y       | y         | y      |        |            |            |             |                  | CST 11:10:46 |
| ks-master-1 | y    | y    | y       | y        | y     | y     | y       | y         | y      |        |            |            |             |                  | CST 11:10:46 |
| ks-master-2 | y    | y    | y       | y        | y     | y     | y       | y         | y      |        |            |            |             |                  | CST 11:10:46 |
| ks-worker-0 | y    | y    | y       | y        | y     | y     | y       | y         | y      |        |            |            |             |                  | CST 11:10:46 |
+-------------+------+------+---------+----------+-------+-------+---------+-----------+--------+--------+------------+------------+-------------+------------------+--------------+

This is a simple check of your environment.
Before installation, ensure that your machines meet all requirements specified at
https://github.com/kubesphere/kubekey#requirements-and-recommendations

Continue this installation? [yes/no]:зЂвтЃК МьВщНсЙћжаЮвУЧПЩвдПДЕН nfs clientЁЂceph clientЁЂglusterfs client 3 ИігыДцДЂгаЙиЕФ client ЯдЪОУЛгаАВзАЃЌетИіЮвУЧКѓЦкЛсдкЖдНгДцДЂЕФЪЕеНжаЕЅЖРАВзАЁЃ
АВзАЙ§ГЬШежОЪфГіБШНЯЖрЃЌЮЊСЫНкЪЁЦЊЗљетРяОЭВЛеЙЪОСЫЁЃ
ВПЪ№ЭъГЩашвЊДѓдМ10-30ЗжжгзѓгвЃЌОпЬхПДЭјЫйКЭЛњЦїХфжУЃЌБОДЮВПЪ№ЭъГЩКФЪБ 22 ЗжжгЁЃ
ВПЪ№ЭъГЩКѓЃЌФњгІИУЛсдкжеЖЫЩЯПДЕНРрЫЦгкЯТУцЕФЪфГіЁЃЬсЪОВПЪ№ЭъГЩЕФЭЌЪБЃЌЪфГіжаЛЙЛсЯдЪОгУЛЇЕЧТН KubeSphere ЕФФЌШЯЙмРэдБгУЛЇКЭУмТыЁЃ
clusterconfiguration.installer.kubesphere.io/ks-installer created
11:25:03 CST skipped: [ks-master-2]
11:25:03 CST skipped: [ks-master-1]
11:25:03 CST success: [ks-master-0]
#####################################################
### Welcome to KubeSphere! ###
#####################################################
Console: http://192.168.9.91:30880
Account: admin
Password: P@88w0rd
NOTESЃК
1. After you log into the console, please check the
monitoring status of service components in
"Cluster Management". If any service is not
ready, please wait patiently until all components
are up and running.
2. Please change the default password after login.
#####################################################
https://kubesphere.io 2023-07-18 11:33:50
#####################################################
11:33:53 CST skipped: [ks-master-2]
11:33:53 CST skipped: [ks-master-1]
11:33:53 CST success: [ks-master-0]
11:33:53 CST Pipeline[CreateClusterPipeline] execute successfully
Installation is complete.
Please check the result using the command:
kubectl logs -n kubesphere-system $(kubectl get pod -n kubesphere-system -l 'app in (ks-install, ks-installer)' -o jsonpath='{.items[0].metadata.name}') -f4. ВПЪ№бщжЄ
4.1 KubeSphere ЙмРэПижЦЬЈбщжЄМЏШКзДЬЌ
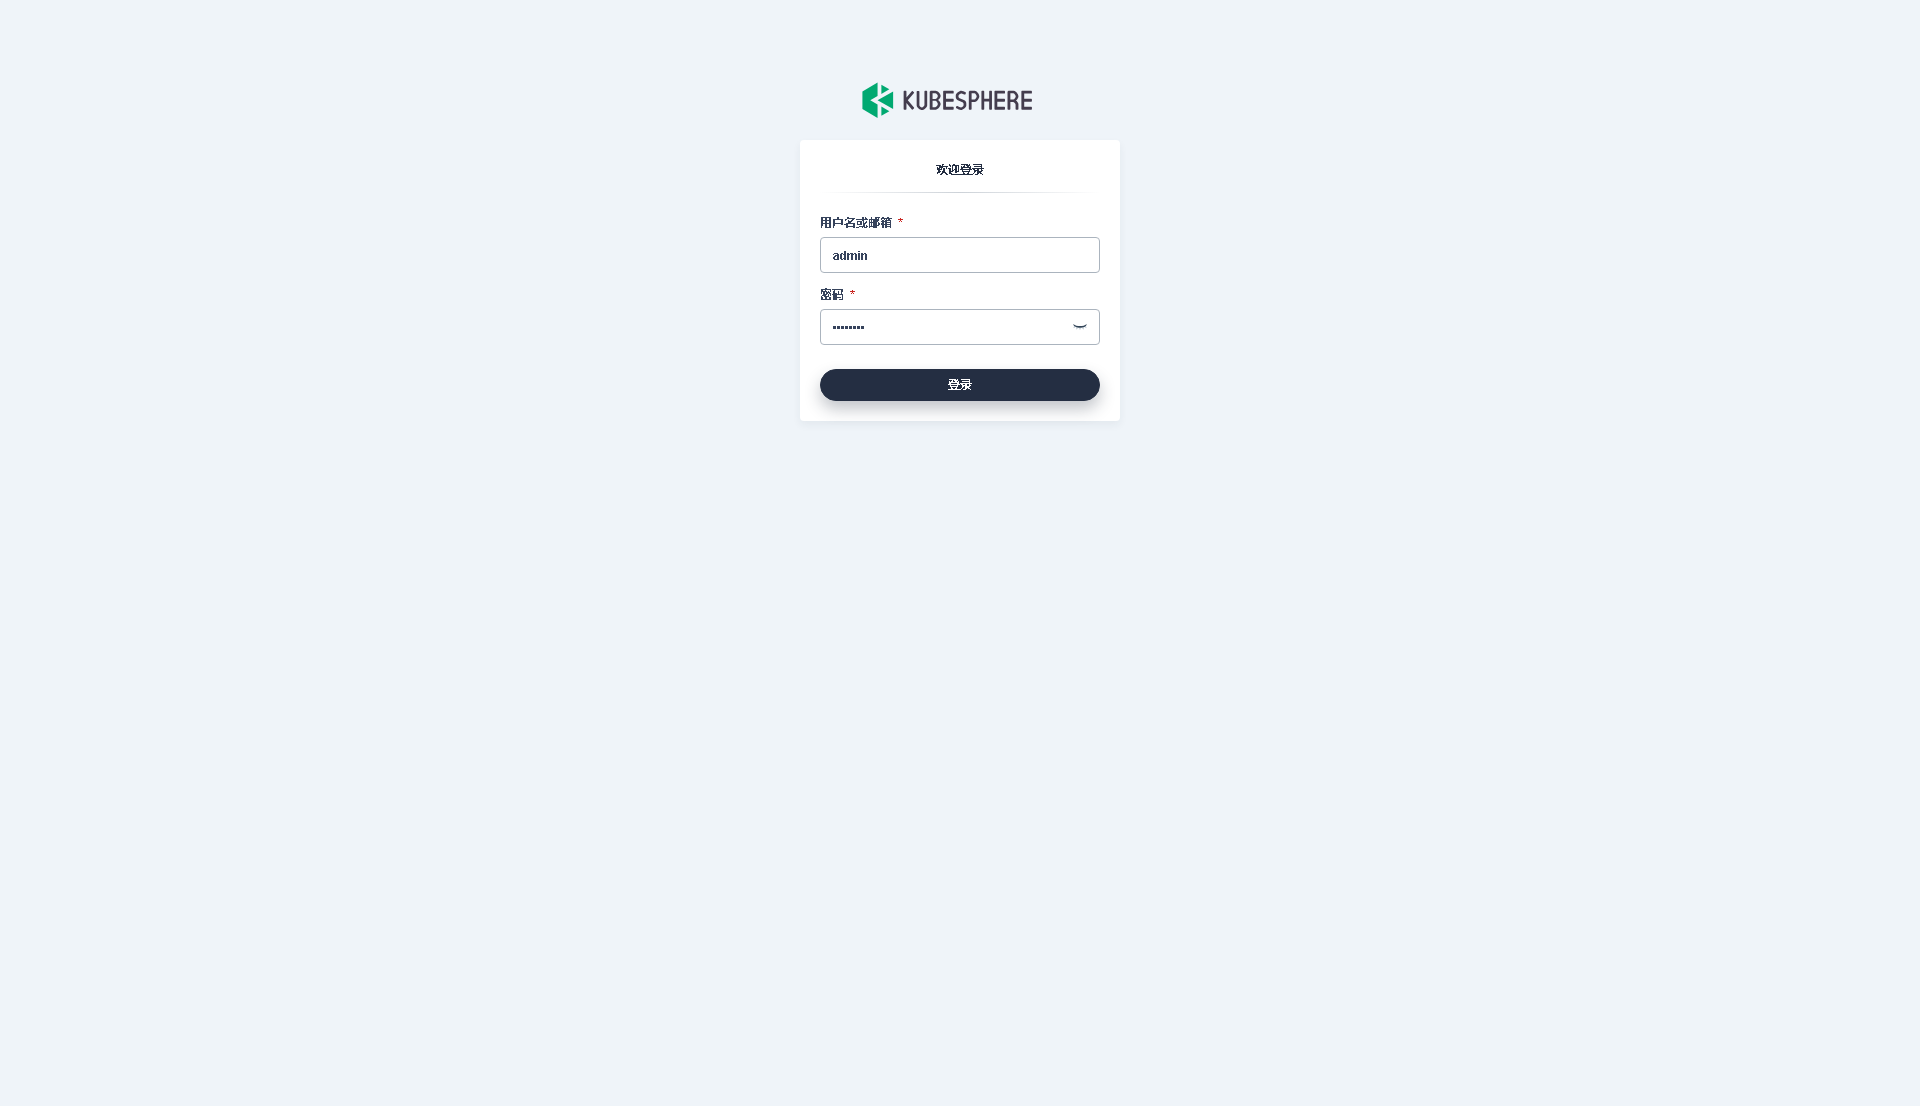
ЮвУЧДђПЊфЏРРЦїЗУЮЪ master-0 НкЕуЕФ IP ЕижЗКЭЖЫПк 30880ЃЌПЩвдПДЕН KubeSphere ЙмРэПижЦЬЈЕФЕЧТМвГУцЁЃ
ЪфШыФЌШЯгУЛЇ admin КЭФЌШЯУмТы P@88w0rdЃЌШЛКѓЕуЛїЁИЕЧТМЁЙЁЃ
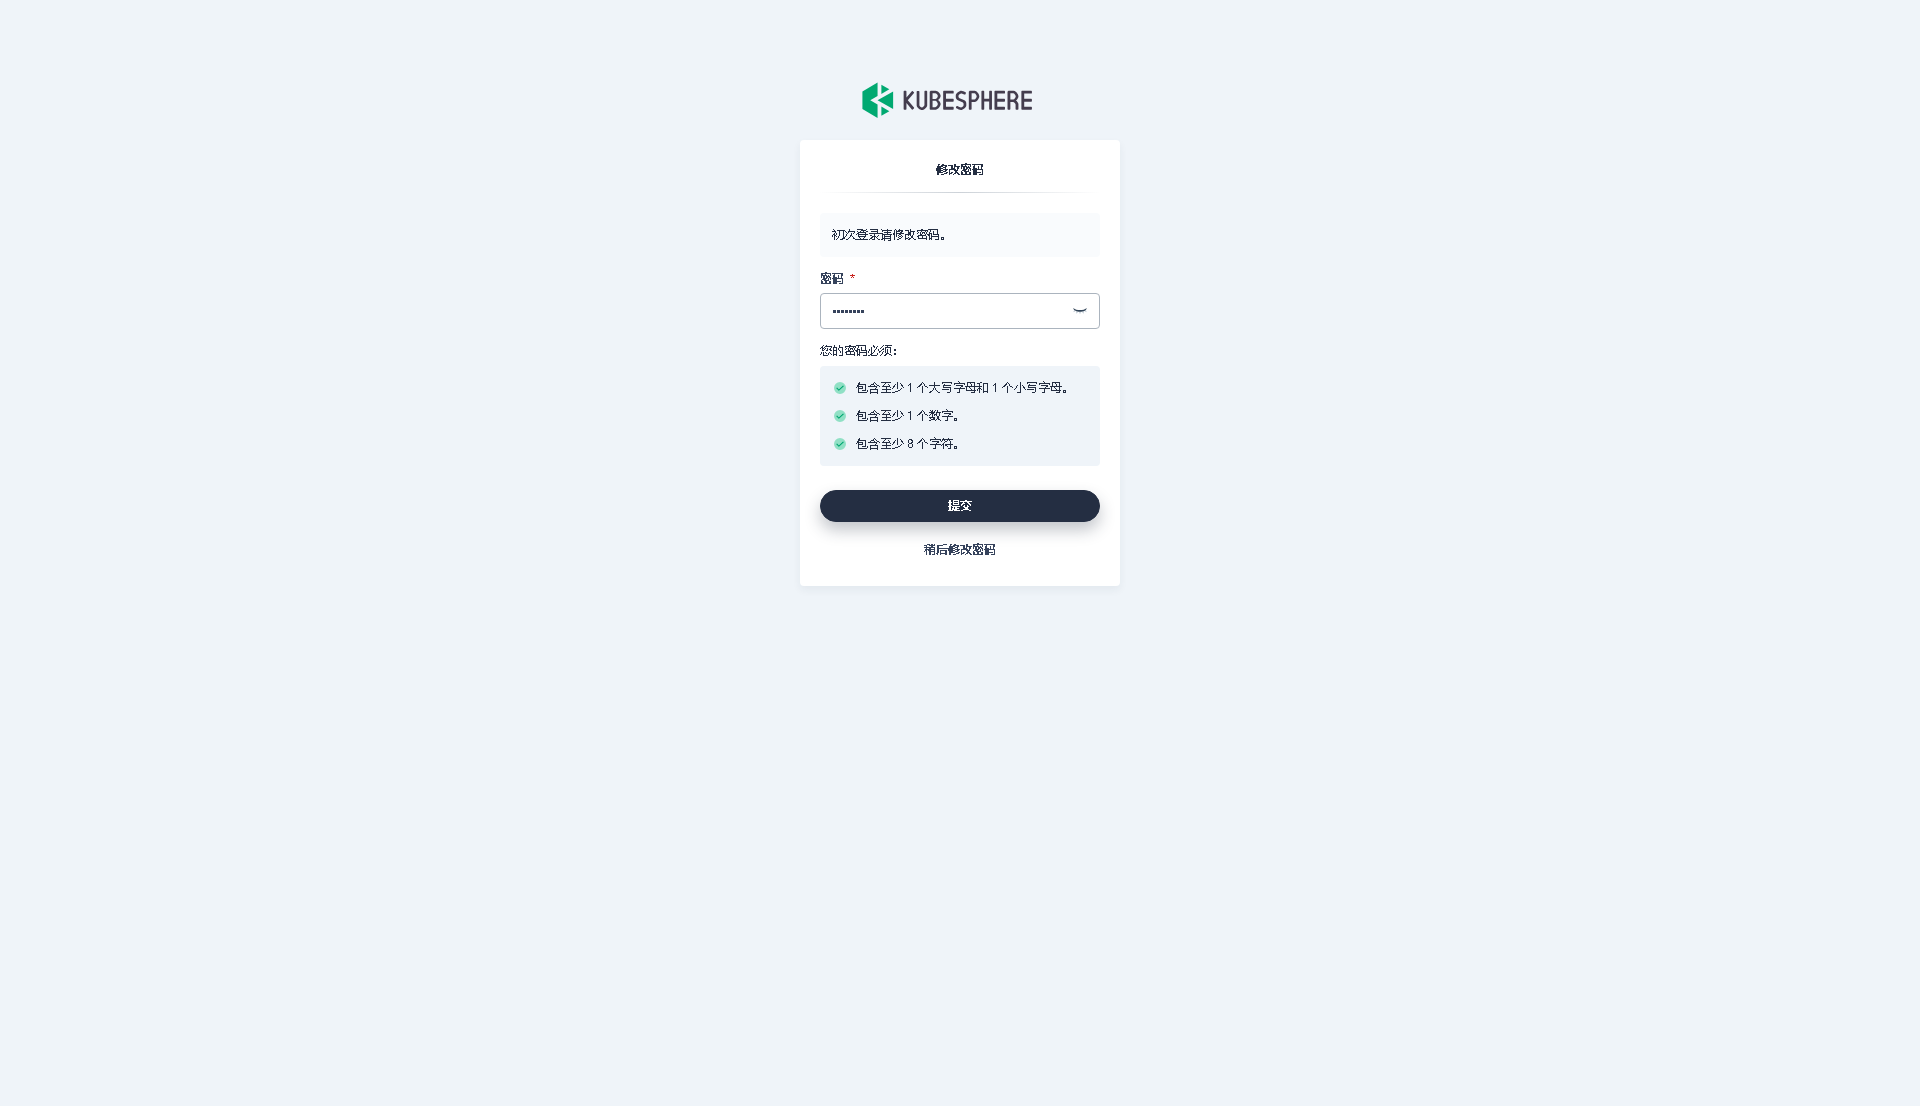
ЕЧТМКѓЃЌЯЕЭГЛсвЊЧѓФњИќИФ KubeSphere ФЌШЯгУЛЇ admin ЕФФЌШЯУмТыЃЌЪфШыаТЕФУмТыВЂЕуЛїЁИЬсНЛЁЙЁЃ
ЬсНЛЭъГЩКѓЃЌЯЕЭГЛсЬјзЊЕН KubeSphere admin гУЛЇЙЄзїЬЈвГУцЃЌИУвГУцЯдЪОСЫЕБЧА KubeSphere АцБОЮЊ v3.3.2ЃЌПЩгУЕФ Kubernetes МЏШКЪ§СПЮЊ 1ЁЃ
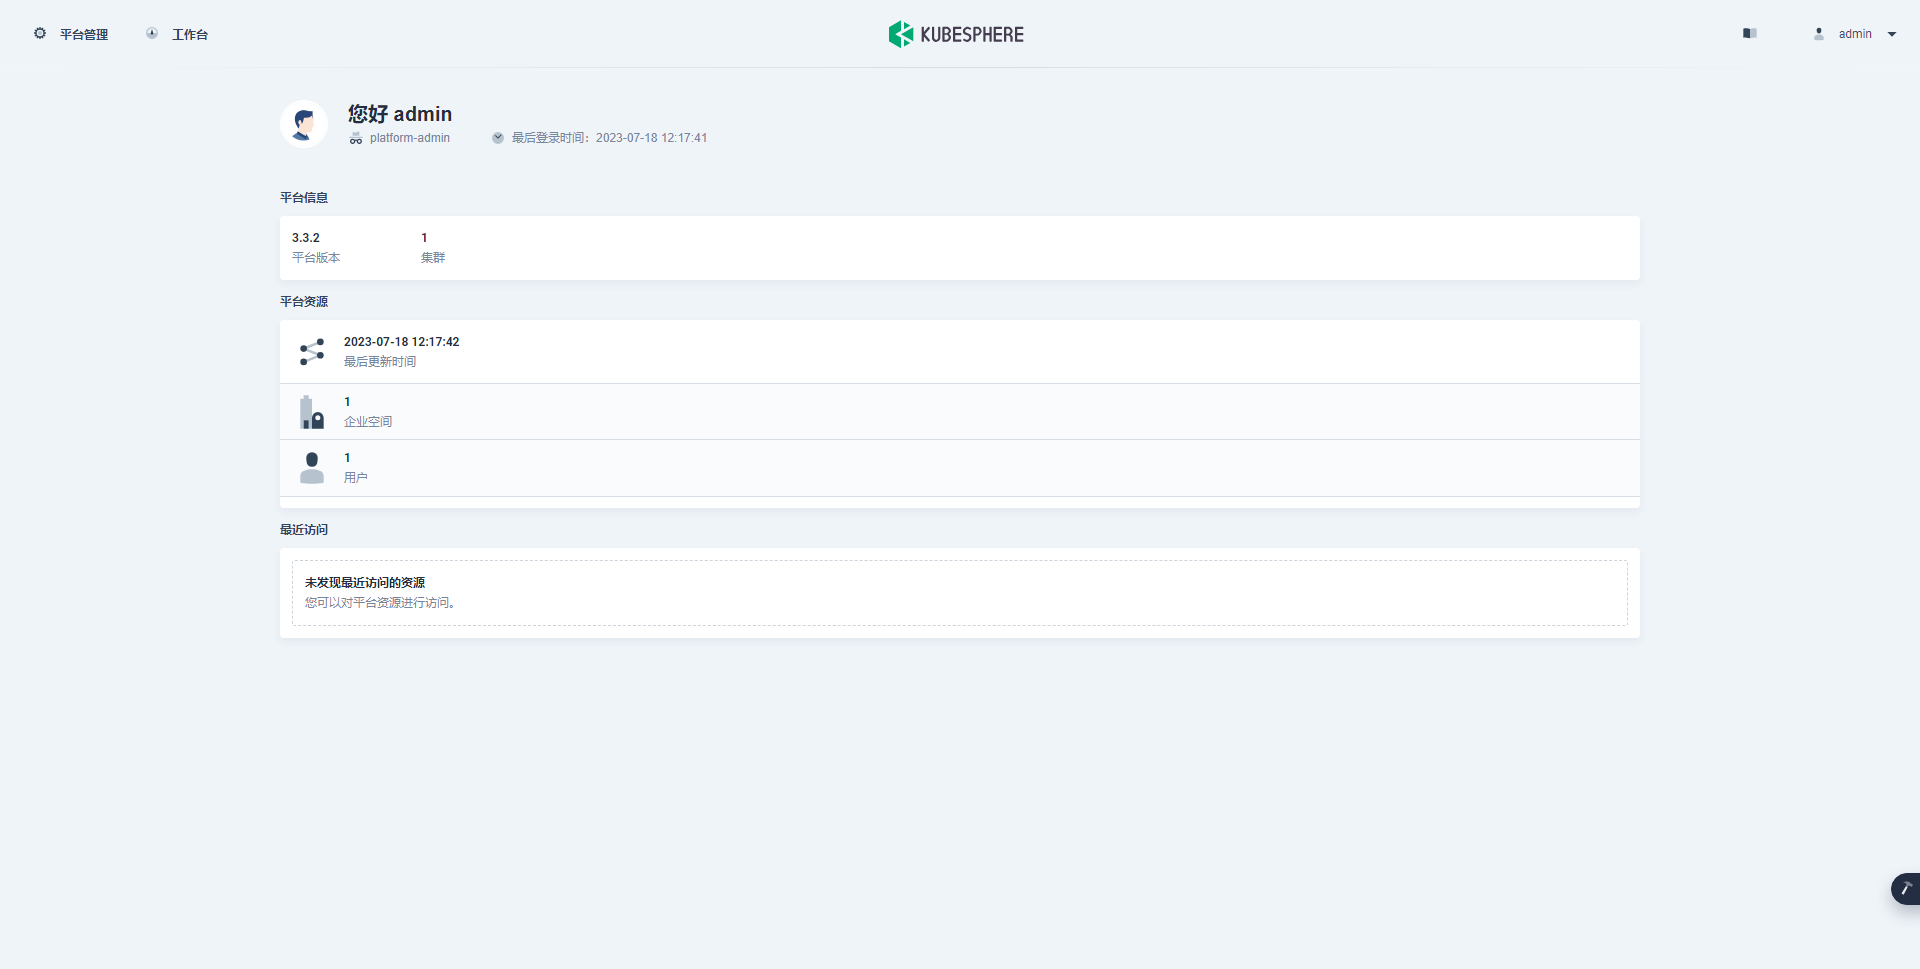
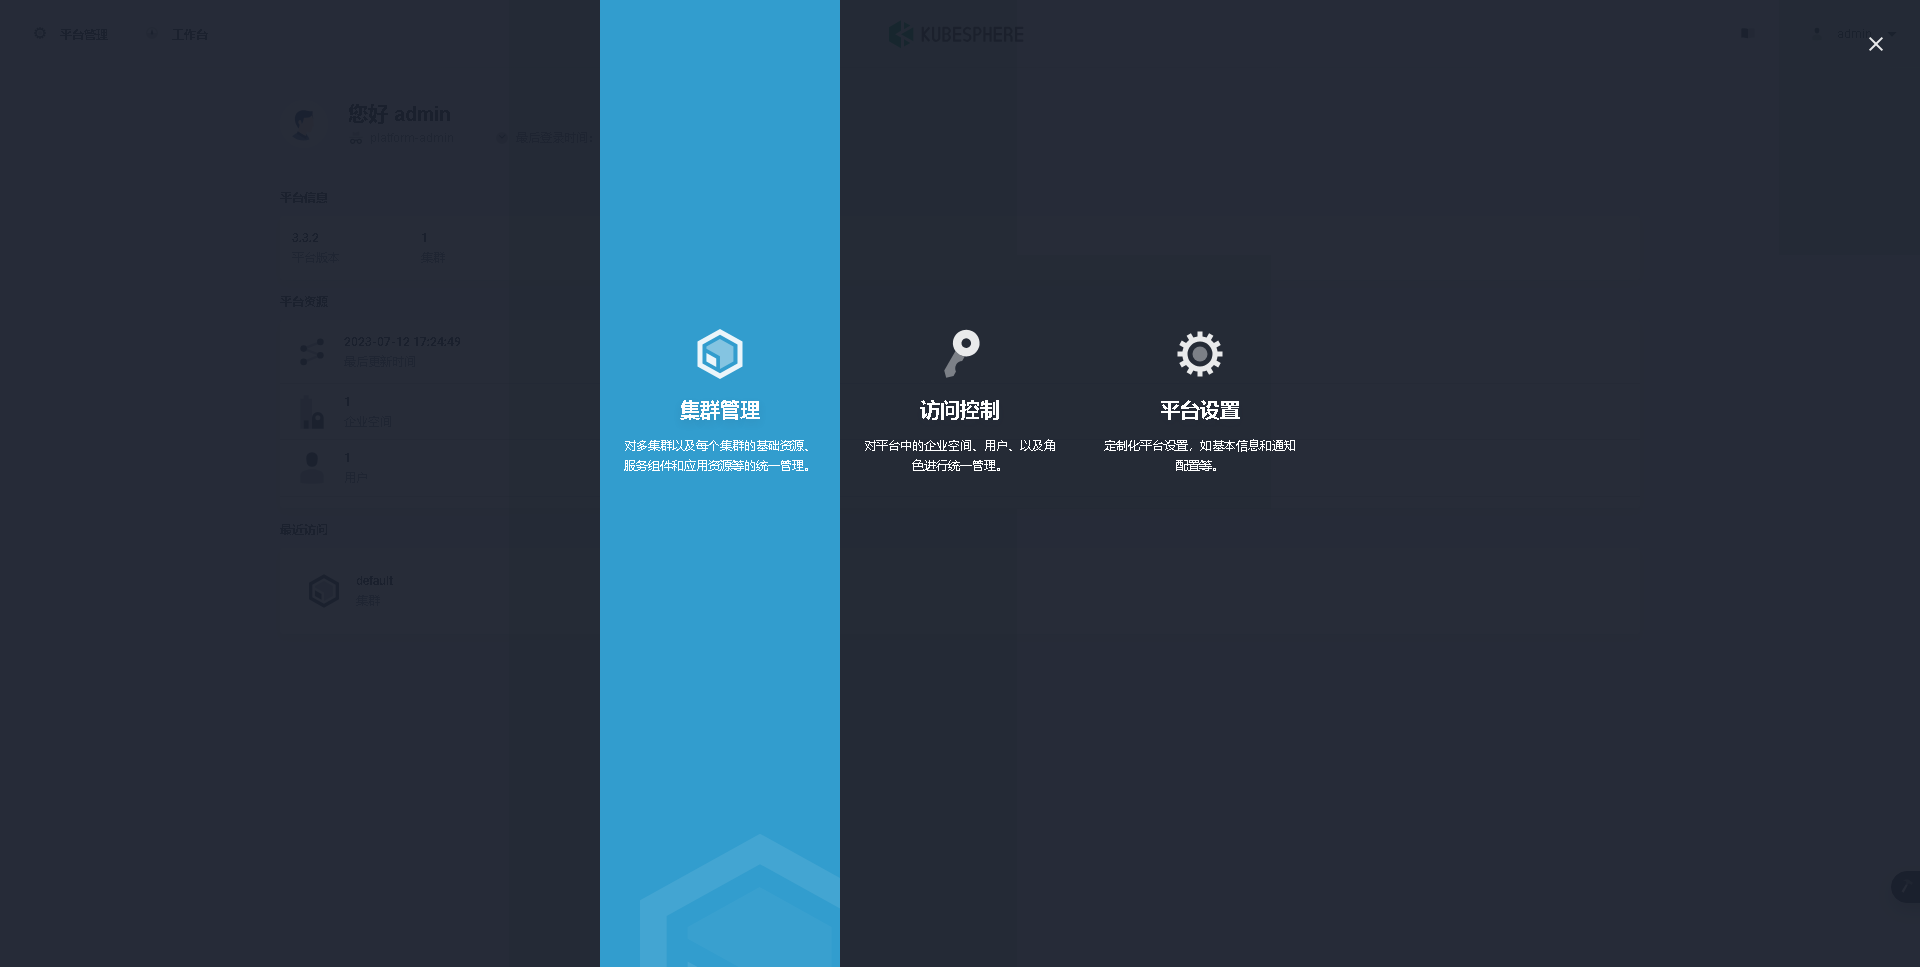
НгЯТРДЃЌЕЅЛїзѓЩЯНЧЕФЁИЦНЬЈЙмРэЁЙВЫЕЅЃЌбЁдёЁИМЏШКЙмРэЁЙЁЃ
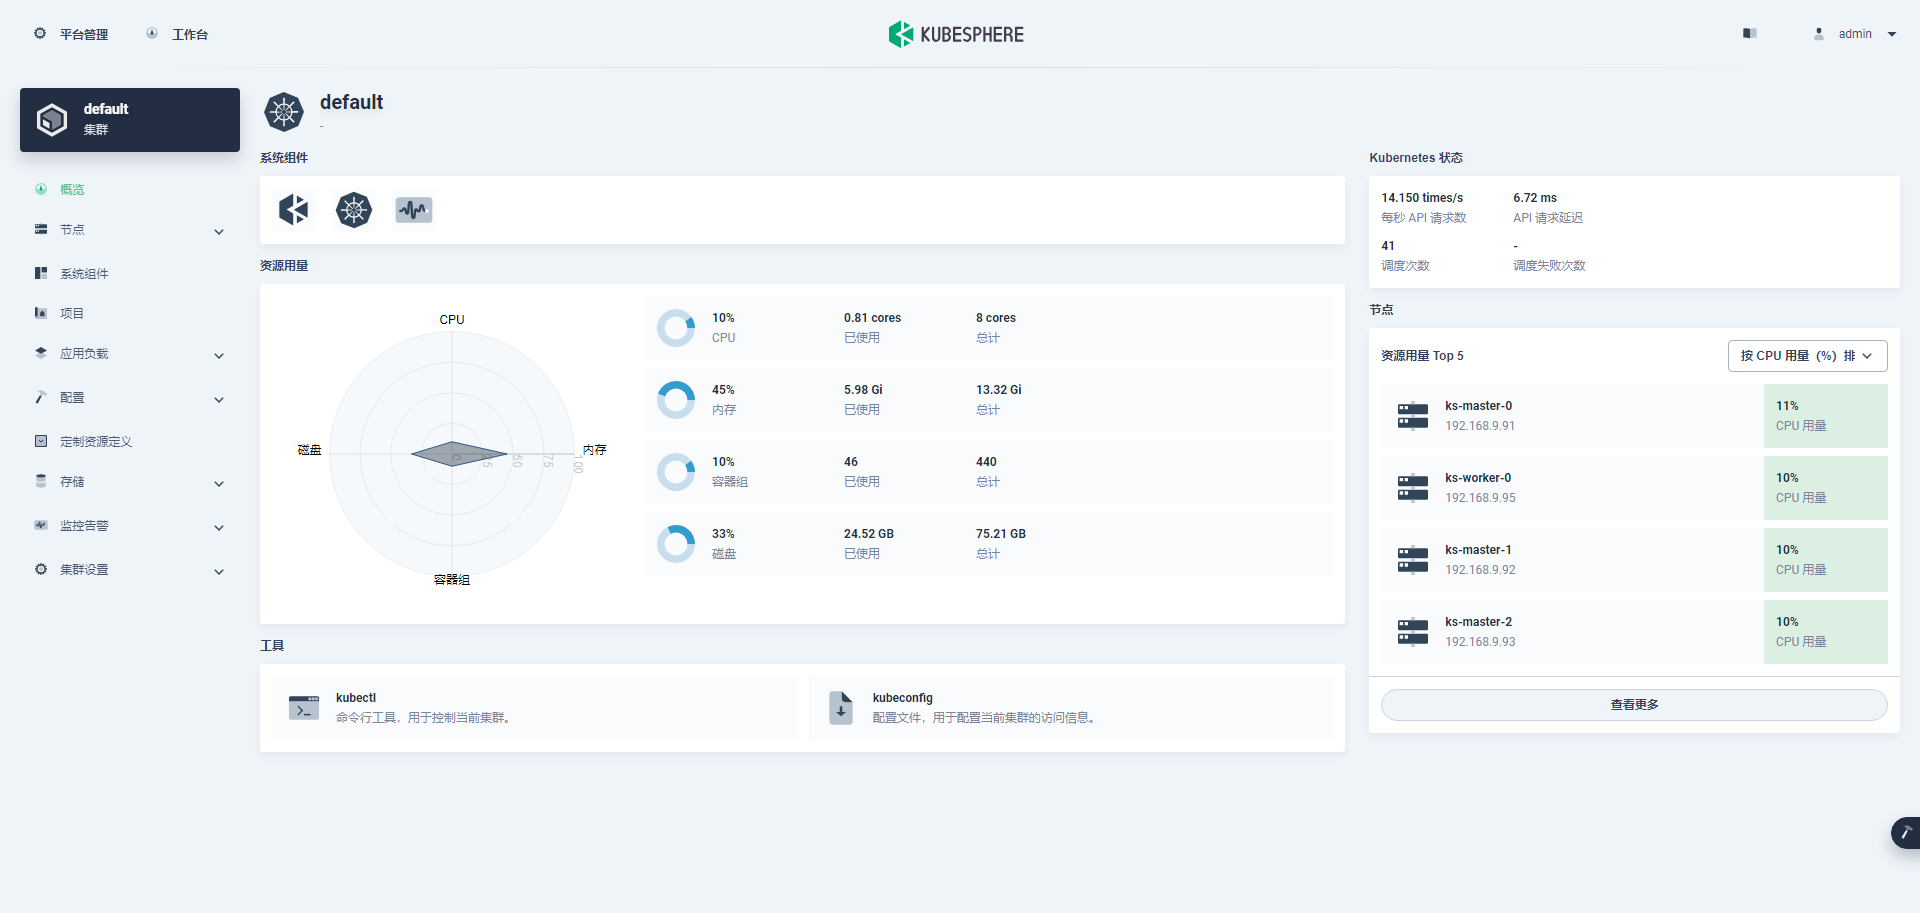
НјШыМЏШКЙмРэНчУцЃЌдкИУвГУцПЩвдВщПДМЏШКЕФЛљБОаХЯЂЃЌАќРЈМЏШКзЪдДгУСПЁЂKubernetes зДЬЌЁЂНкЕузЪдДгУСП TopЁЂЯЕЭГзщМўЁЂЙЄОпЯфЕШФкШнЁЃ
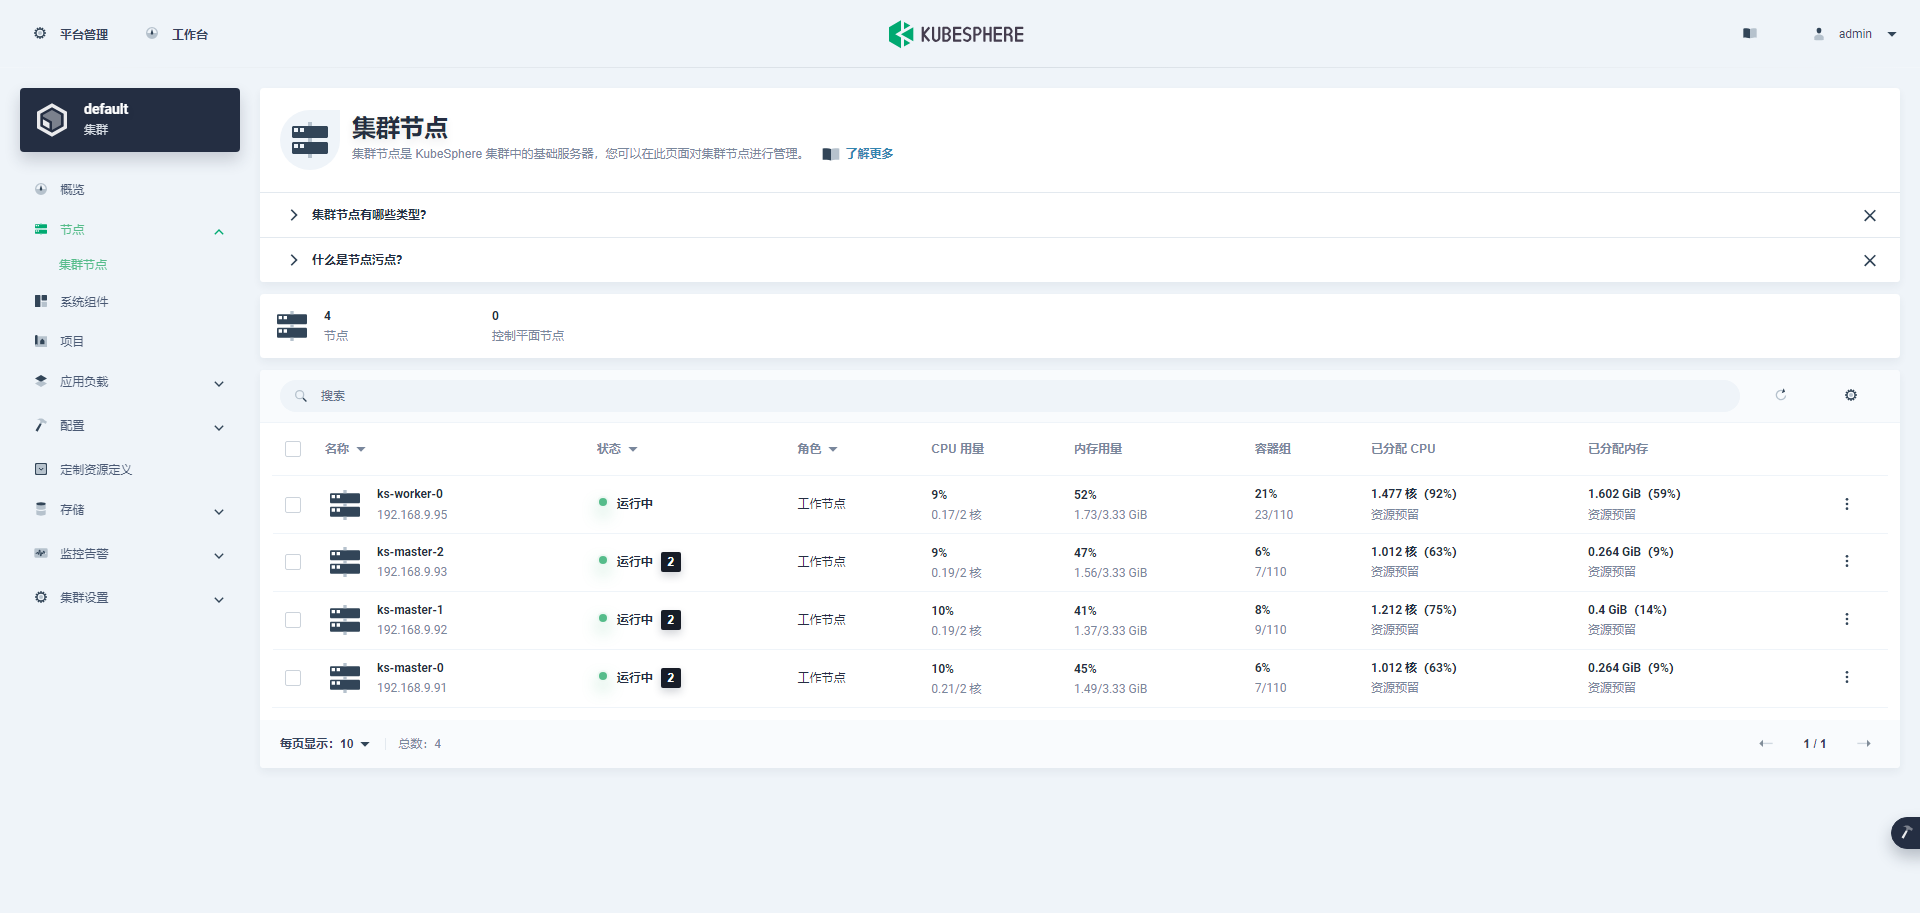
ЕЅЛїзѓВрЁИНкЕуЁЙВЫЕЅЃЌЕуЛїЁИМЏШКНкЕуЁЙПЩвдВщПД Kubernetes МЏШКПЩгУНкЕуЕФЯъЯИаХЯЂЁЃ
ЕЅЛїзѓВрЁИЯЕЭГзщМўЁЙВЫЕЅЃЌПЩвдВщПДвбАВзАзщМўЕФЯъЯИаХЯЂЁЃФПЧАМЏШКВЩгУЕФзюаЁЛЏАВзАЃЌНіАќКЌ KubeSphereЁЂKubernetesЁЂМрПиШ§ИіРрБ№ЕФзщМўЁЃ
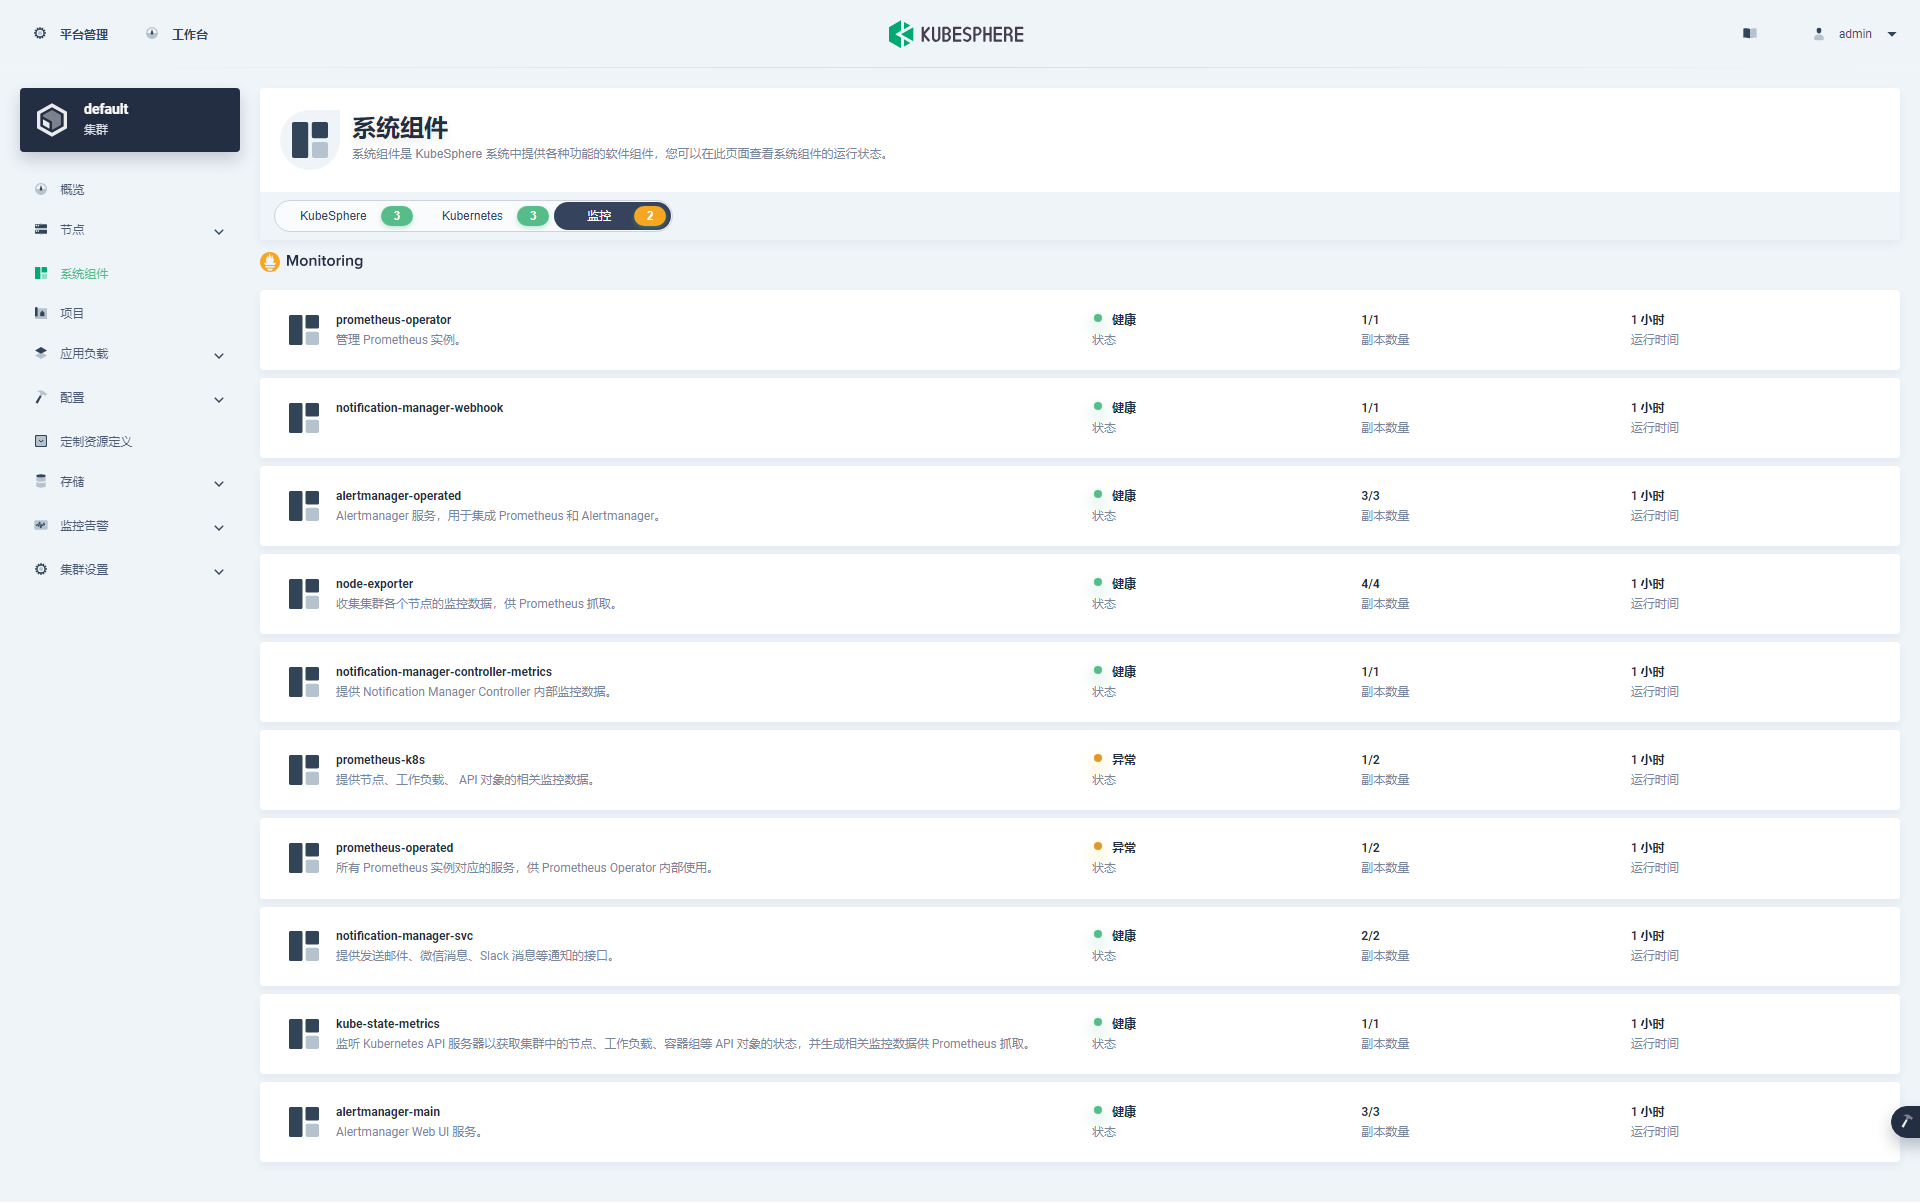
ЬиЪтЫЕУїЃК МрПизщМўЯТЕФ prometheus-k8s КЭ prometheus-operated 2 ИізщМўДІгквьГЃзДЬЌЃЌетИіЪЧгЩгкжЛгавЛИі Worker НкЕуЃЌЕкЖўИі prometheus-k8s-1 ЮоЗЈЕїЖШВПЪ№ЁЃКѓУцМгШыаТНкЕужиНЈМДПЩНтОіЁЃ
4.2 Kubectl УќСюаабщжЄМЏШКзДЬЌ
- ВщПДМЏШКНкЕуаХЯЂ
дк master-0 НкЕудЫаа kubectl УќСюЛёШЁ Kubernetes МЏШКЩЯЕФПЩгУНкЕуСаБэЁЃ
kubectl get nodes -o wideдкЪфГіНсЙћжаПЩвдПДЕНЃЌЕБЧАЕФ Kubernetes МЏШКгаШ§ИіПЩгУНкЕуЁЂНкЕуЕФФкВП IPЁЂНкЕуНЧЩЋЁЂНкЕуЕФ Kubernetes АцБОКХЁЂШнЦїдЫааЪБМААцБОКХЁЂВйзїЯЕЭГРраЭМАФкКЫАцБОЕШаХЯЂЁЃ
[root@ks-master-0 kubekey]# kubectl get nodes -o wide
NAME          STATUS   ROLES           AGE   VERSION    INTERNAL-IP    EXTERNAL-IP   OS-IMAGE                    KERNEL-VERSION                        CONTAINER-RUNTIME
ks-master-0   Ready    control-plane   35m   v1.24.12   192.168.9.91   <none>        openEuler 22.03 (LTS-SP2)   5.10.0-153.12.0.92.oe2203sp2.x86_64   containerd://1.6.4
ks-master-1   Ready    control-plane   35m   v1.24.12   192.168.9.92   <none>        openEuler 22.03 (LTS-SP2)   5.10.0-153.12.0.92.oe2203sp2.x86_64   containerd://1.6.4
ks-master-2   Ready    control-plane   35m   v1.24.12   192.168.9.93   <none>        openEuler 22.03 (LTS-SP2)   5.10.0-153.12.0.92.oe2203sp2.x86_64   containerd://1.6.4
ks-worker-0 Ready worker 34m v1.24.12 192.168.9.95 <none> openEuler 22.03 (LTS-SP2) 5.10.0-153.12.0.92.oe2203sp2.x86_64 containerd://1.6.4- ВщПД Pod СаБэ
ЪфШывдЯТУќСюЛёШЁдк Kubernetes МЏШКЩЯдЫааЕФ Pod СаБэЃЌАДФЌШЯЫГађХХађЁЃ
kubectl get pods -o wide -AдкЪфГіНсЙћжаПЩвдПДЕНЃЌ Kubernetes МЏШКЩЯгаЖрИіПЩгУЕФУќУћПеМф kube-systemЁЂkubesphere-control-systemЁЂkubesphere-monitoring-system КЭ kubesphere-systemЃЌЫљга pod ЖМдкдЫааЁЃ
[root@ks-master-0 kubekey]# kubectl get pods -o wide -A
NAMESPACE                      NAME                                               READY   STATUS    RESTARTS   AGE   IP              NODE          NOMINATED NODE   READINESS GATES
kube-system                    calico-kube-controllers-f9f9bbcc9-9x49n            1/1     Running   0          34m   10.233.115.2    ks-worker-0   <none>           <none>
kube-system                    calico-node-kvfbg                                  1/1     Running   0          34m   192.168.9.95    ks-worker-0   <none>           <none>
kube-system                    calico-node-kx4fz                                  1/1     Running   0          34m   192.168.9.91    ks-master-0   <none>           <none>
kube-system                    calico-node-qx5qk                                  1/1     Running   0          34m   192.168.9.92    ks-master-1   <none>           <none>
kube-system                    calico-node-rb2cf                                  1/1     Running   0          34m   192.168.9.93    ks-master-2   <none>           <none>
kube-system                    coredns-f657fccfd-8lnd5                            1/1     Running   0          35m   10.233.103.2    ks-master-1   <none>           <none>
kube-system                    coredns-f657fccfd-vtlmx                            1/1     Running   0          35m   10.233.103.1    ks-master-1   <none>           <none>
kube-system                    haproxy-ks-worker-0                                1/1     Running   0          35m   192.168.9.95    ks-worker-0   <none>           <none>
kube-system                    kube-apiserver-ks-master-0                         1/1     Running   0          35m   192.168.9.91    ks-master-0   <none>           <none>
kube-system                    kube-apiserver-ks-master-1                         1/1     Running   0          35m   192.168.9.92    ks-master-1   <none>           <none>
kube-system                    kube-apiserver-ks-master-2                         1/1     Running   0          35m   192.168.9.93    ks-master-2   <none>           <none>
kube-system                    kube-controller-manager-ks-master-0                1/1     Running   0          35m   192.168.9.91    ks-master-0   <none>           <none>
kube-system                    kube-controller-manager-ks-master-1                1/1     Running   0          35m   192.168.9.92    ks-master-1   <none>           <none>
kube-system                    kube-controller-manager-ks-master-2                1/1     Running   0          35m   192.168.9.93    ks-master-2   <none>           <none>
kube-system                    kube-proxy-728cs                                   1/1     Running   0          35m   192.168.9.92    ks-master-1   <none>           <none>
kube-system                    kube-proxy-ndc62                                   1/1     Running   0          35m   192.168.9.93    ks-master-2   <none>           <none>
kube-system                    kube-proxy-qdmkb                                   1/1     Running   0          35m   192.168.9.95    ks-worker-0   <none>           <none>
kube-system                    kube-proxy-sk4hz                                   1/1     Running   0          35m   192.168.9.91    ks-master-0   <none>           <none>
kube-system                    kube-scheduler-ks-master-0                         1/1     Running   0          35m   192.168.9.91    ks-master-0   <none>           <none>
kube-system                    kube-scheduler-ks-master-1                         1/1     Running   0          35m   192.168.9.92    ks-master-1   <none>           <none>
kube-system                    kube-scheduler-ks-master-2                         1/1     Running   0          35m   192.168.9.93    ks-master-2   <none>           <none>
kube-system                    nodelocaldns-5594x                                 1/1     Running   0          35m   192.168.9.92    ks-master-1   <none>           <none>
kube-system                    nodelocaldns-d572z                                 1/1     Running   0          35m   192.168.9.95    ks-worker-0   <none>           <none>
kube-system                    nodelocaldns-gnbg6                                 1/1     Running   0          35m   192.168.9.93    ks-master-2   <none>           <none>
kube-system                    nodelocaldns-h4vmx                                 1/1     Running   0          35m   192.168.9.91    ks-master-0   <none>           <none>
kube-system                    openebs-localpv-provisioner-7497b4c996-ngnv9       1/1     Running   0          34m   10.233.115.1    ks-worker-0   <none>           <none>
kube-system                    snapshot-controller-0                              1/1     Running   0          33m   10.233.115.4    ks-worker-0   <none>           <none>
kubesphere-controls-system     default-http-backend-587748d6b4-57zck              1/1     Running   0          31m   10.233.115.6    ks-worker-0   <none>           <none>
kubesphere-controls-system     kubectl-admin-5d588c455b-7bw75                     1/1     Running   0          26m   10.233.115.19   ks-worker-0   <none>           <none>
kubesphere-monitoring-system   alertmanager-main-0                                2/2     Running   0          28m   10.233.115.9    ks-worker-0   <none>           <none>
kubesphere-monitoring-system   alertmanager-main-1                                2/2     Running   0          28m   10.233.115.10   ks-worker-0   <none>           <none>
kubesphere-monitoring-system   alertmanager-main-2                                2/2     Running   0          28m   10.233.115.11   ks-worker-0   <none>           <none>
kubesphere-monitoring-system   kube-state-metrics-5b8dc5c5c6-9ng42                3/3     Running   0          29m   10.233.115.8    ks-worker-0   <none>           <none>
kubesphere-monitoring-system   node-exporter-79c6m                                2/2     Running   0          29m   192.168.9.95    ks-worker-0   <none>           <none>
kubesphere-monitoring-system   node-exporter-b57bp                                2/2     Running   0          29m   192.168.9.92    ks-master-1   <none>           <none>
kubesphere-monitoring-system   node-exporter-t9vrm                                2/2     Running   0          29m   192.168.9.91    ks-master-0   <none>           <none>
kubesphere-monitoring-system   node-exporter-vm9cq                                2/2     Running   0          29m   192.168.9.93    ks-master-2   <none>           <none>
kubesphere-monitoring-system   notification-manager-deployment-6f8c66ff88-mqmxx   2/2     Running   0          27m   10.233.115.16   ks-worker-0   <none>           <none>
kubesphere-monitoring-system   notification-manager-deployment-6f8c66ff88-pjm79   2/2     Running   0          27m   10.233.115.15   ks-worker-0   <none>           <none>
kubesphere-monitoring-system   notification-manager-operator-6455b45546-kgdpf     2/2     Running   0          28m   10.233.115.13   ks-worker-0   <none>           <none>
kubesphere-monitoring-system   prometheus-k8s-0                                   2/2     Running   0          28m   10.233.115.14   ks-worker-0   <none>           <none>
kubesphere-monitoring-system   prometheus-k8s-1                                   0/2     Pending   0          28m   <none>          <none>        <none>           <none>
kubesphere-monitoring-system   prometheus-operator-66d997dccf-zfdf5               2/2     Running   0          29m   10.233.115.7    ks-worker-0   <none>           <none>
kubesphere-system              ks-apiserver-7ddfccbb94-kd7tg                      1/1     Running   0          31m   10.233.115.18   ks-worker-0   <none>           <none>
kubesphere-system              ks-console-7f88c4fd8d-b4wdr                        1/1     Running   0          31m   10.233.115.5    ks-worker-0   <none>           <none>
kubesphere-system              ks-controller-manager-6cd89786dc-4xnhq             1/1     Running   0          31m   10.233.115.17   ks-worker-0   <none>           <none>
kubesphere-system ks-installer-559fc4b544-pcdrn 1/1 Running 0 34m 10.233.115.3 ks-worker-0 <none> <none>ЬиЪтЫЕУїЃК вђЮЊжЛгавЛИі Worker НкЕуЃЌЪмЯогкЕїЖШВпТдЃЌУќУћПеМф kubesphere-monitoring-system ЯТЕФ prometheus-k8s-1 ДІгк PendingзДЬЌЃЌетИіднЪБКіТдЃЌКѓУцМгШыаТНкЕужиНЈМДПЩНтОіЁЃ
ЪфШывдЯТУќСюЛёШЁдк Kubernetes МЏШКЩЯдЫааЕФ Pod СаБэЃЌАДЙЄзїИКдидк NODE ЩЯЕФЗжВМХХађЁЃ
kubectl get pods -o wide -A | sort -k 8дкЪфГіНсЙћжаПЩвдПДЕНЃЌ Worker НкЕуЩЯЕФИКдиЪЧзюЖрЕФЃЌkube-system УќУћПеМфжЎЭтЕФИКдиЖМЗХдкСЫ WorkerЩЯЁЃ
[root@ks-master-0 kubekey]# kubectl get pods -o wide -A | sort -k 8
NAMESPACE                      NAME                                               READY   STATUS    RESTARTS   AGE   IP              NODE          NOMINATED NODE   READINESS GATES
kubesphere-monitoring-system   node-exporter-ccxbp                                2/2     Running   0          147m  192.168.9.91   ks-master-0    <none>           <none>
kubesphere-monitoring-system   node-exporter-t9vrm                                2/2     Running   0          29m   192.168.9.91    ks-master-0   <none>           <none>
kube-system                    calico-node-kx4fz                                  1/1     Running   0          35m   192.168.9.91    ks-master-0   <none>           <none>
kube-system                    kube-apiserver-ks-master-0                         1/1     Running   0          36m   192.168.9.91    ks-master-0   <none>           <none>
kube-system                    kube-controller-manager-ks-master-0                1/1     Running   0          36m   192.168.9.91    ks-master-0   <none>           <none>
kube-system                    kube-proxy-sk4hz                                   1/1     Running   0          35m   192.168.9.91    ks-master-0   <none>           <none>
kube-system                    kube-scheduler-ks-master-0                         1/1     Running   0          36m   192.168.9.91    ks-master-0   <none>           <none>
kube-system                    nodelocaldns-h4vmx                                 1/1     Running   0          36m   192.168.9.91    ks-master-0   <none>           <none>
kubesphere-monitoring-system   node-exporter-b57bp                                2/2     Running   0          29m   192.168.9.92    ks-master-1   <none>           <none>
kube-system                    calico-node-qx5qk                                  1/1     Running   0          35m   192.168.9.92    ks-master-1   <none>           <none>
kube-system                    coredns-f657fccfd-8lnd5                            1/1     Running   0          36m   10.233.103.2    ks-master-1   <none>           <none>
kube-system                    coredns-f657fccfd-vtlmx                            1/1     Running   0          36m   10.233.103.1    ks-master-1   <none>           <none>
kube-system                    kube-apiserver-ks-master-1                         1/1     Running   0          35m   192.168.9.92    ks-master-1   <none>           <none>
kube-system                    kube-controller-manager-ks-master-1                1/1     Running   0          35m   192.168.9.92    ks-master-1   <none>           <none>
kube-system                    kube-proxy-728cs                                   1/1     Running   0          35m   192.168.9.92    ks-master-1   <none>           <none>
kube-system                    kube-scheduler-ks-master-1                         1/1     Running   0          35m   192.168.9.92    ks-master-1   <none>           <none>
kube-system                    nodelocaldns-5594x                                 1/1     Running   0          35m   192.168.9.92    ks-master-1   <none>           <none>
kubesphere-monitoring-system   node-exporter-vm9cq                                2/2     Running   0          29m   192.168.9.93    ks-master-2   <none>           <none>
kube-system                    calico-node-rb2cf                                  1/1     Running   0          35m   192.168.9.93    ks-master-2   <none>           <none>
kube-system                    kube-apiserver-ks-master-2                         1/1     Running   0          35m   192.168.9.93    ks-master-2   <none>           <none>
kube-system                    kube-controller-manager-ks-master-2                1/1     Running   0          35m   192.168.9.93    ks-master-2   <none>           <none>
kube-system                    kube-proxy-ndc62                                   1/1     Running   0          35m   192.168.9.93    ks-master-2   <none>           <none>
kube-system                    kube-scheduler-ks-master-2                         1/1     Running   0          35m   192.168.9.93    ks-master-2   <none>           <none>
kube-system                    nodelocaldns-gnbg6                                 1/1     Running   0          35m   192.168.9.93    ks-master-2   <none>           <none>
kubesphere-controls-system     default-http-backend-587748d6b4-57zck              1/1     Running   0          31m   10.233.115.6    ks-worker-0   <none>           <none>
kubesphere-monitoring-system   alertmanager-main-0                                2/2     Running   0          29m   10.233.115.9    ks-worker-0   <none>           <none>
kubesphere-monitoring-system   kube-state-metrics-5b8dc5c5c6-9ng42                3/3     Running   0          29m   10.233.115.8    ks-worker-0   <none>           <none>
kubesphere-monitoring-system   node-exporter-79c6m                                2/2     Running   0          29m   192.168.9.95    ks-worker-0   <none>           <none>
kubesphere-monitoring-system   prometheus-operator-66d997dccf-zfdf5               2/2     Running   0          29m   10.233.115.7    ks-worker-0   <none>           <none>
kubesphere-system              ks-console-7f88c4fd8d-b4wdr                        1/1     Running   0          31m   10.233.115.5    ks-worker-0   <none>           <none>
kubesphere-system              ks-installer-559fc4b544-pcdrn                      1/1     Running   0          35m   10.233.115.3    ks-worker-0   <none>           <none>
kube-system                    calico-kube-controllers-f9f9bbcc9-9x49n            1/1     Running   0          35m   10.233.115.2    ks-worker-0   <none>           <none>
kube-system                    calico-node-kvfbg                                  1/1     Running   0          35m   192.168.9.95    ks-worker-0   <none>           <none>
kube-system                    haproxy-ks-worker-0                                1/1     Running   0          35m   192.168.9.95    ks-worker-0   <none>           <none>
kube-system                    kube-proxy-qdmkb                                   1/1     Running   0          35m   192.168.9.95    ks-worker-0   <none>           <none>
kube-system                    nodelocaldns-d572z                                 1/1     Running   0          35m   192.168.9.95    ks-worker-0   <none>           <none>
kube-system                    openebs-localpv-provisioner-7497b4c996-ngnv9       1/1     Running   0          35m   10.233.115.1    ks-worker-0   <none>           <none>
kube-system                    snapshot-controller-0                              1/1     Running   0          33m   10.233.115.4    ks-worker-0   <none>           <none>
kubesphere-controls-system     kubectl-admin-5d588c455b-7bw75                     1/1     Running   0          26m   10.233.115.19   ks-worker-0   <none>           <none>
kubesphere-monitoring-system   alertmanager-main-1                                2/2     Running   0          29m   10.233.115.10   ks-worker-0   <none>           <none>
kubesphere-monitoring-system   alertmanager-main-2                                2/2     Running   0          29m   10.233.115.11   ks-worker-0   <none>           <none>
kubesphere-monitoring-system   notification-manager-deployment-6f8c66ff88-mqmxx   2/2     Running   0          27m   10.233.115.16   ks-worker-0   <none>           <none>
kubesphere-monitoring-system   notification-manager-deployment-6f8c66ff88-pjm79   2/2     Running   0          27m   10.233.115.15   ks-worker-0   <none>           <none>
kubesphere-monitoring-system   notification-manager-operator-6455b45546-kgdpf     2/2     Running   0          29m   10.233.115.13   ks-worker-0   <none>           <none>
kubesphere-monitoring-system   prometheus-k8s-0                                   2/2     Running   0          29m   10.233.115.14   ks-worker-0   <none>           <none>
kubesphere-system              ks-apiserver-7ddfccbb94-kd7tg                      1/1     Running   0          31m   10.233.115.18   ks-worker-0   <none>           <none>
kubesphere-system              ks-controller-manager-6cd89786dc-4xnhq             1/1     Running   0          31m   10.233.115.17   ks-worker-0   <none>           <none>
kubesphere-monitoring-system prometheus-k8s-1 0/2 Pending 0 29m <none> <none> <none> <none>зЂвтЃКЪЕеНЛЗОГЮЊСЫФЃФтЩњВњаТдіНкЕуЃЌЫљвдГѕЪМжЛМгШыСЫвЛИі Worker НкЕуЃЌЫљвдИКдиНЯИпЃЌЧв prometheus-k8s-1 ДІгк Pending зДЬЌЃЌЪЕМЪЪЙгУжаНЈвщжБНгНЋЫљга Worker вЛЦ№МгШыМЏШКЁЃ
- ВщПД Image СаБэ
ЪфШывдЯТУќСюЛёШЁдк Kubernetes МЏШКНкЕуЩЯвбОЯТдиЕФ Image СаБэЁЃ
crictl images lsдк Master КЭ Worker НкЕуЗжБ№жДааЃЌЪфГіНсЙћШчЯТЃК
# Master НкЕу
[root@ks-master-0 kubekey]# crictl images ls
IMAGE TAG IMAGE ID SIZE
registry.cn-beijing.aliyuncs.com/kubesphereio/cni v3.23.2 a87d3f6f1b8fd 111MB
registry.cn-beijing.aliyuncs.com/kubesphereio/coredns 1.8.6 a4ca41631cc7a 13.6MB
registry.cn-beijing.aliyuncs.com/kubesphereio/k8s-dns-node-cache 1.15.12 5340ba194ec91 42.1MB
registry.cn-beijing.aliyuncs.com/kubesphereio/kube-apiserver v1.24.12 2d5d51b77357e 34.1MB
registry.cn-beijing.aliyuncs.com/kubesphereio/kube-controller-manager v1.24.12 d30605171488d 31.3MB
registry.cn-beijing.aliyuncs.com/kubesphereio/kube-controllers v3.23.2 ec95788d0f725 56.4MB
registry.cn-beijing.aliyuncs.com/kubesphereio/kube-proxy v1.24.12 562ccc25ea629 39.6MB
registry.cn-beijing.aliyuncs.com/kubesphereio/kube-rbac-proxy v0.11.0 29589495df8d9 19.2MB
registry.cn-beijing.aliyuncs.com/kubesphereio/kube-scheduler v1.24.12 cfa5d12eaa131 15.7MB
registry.cn-beijing.aliyuncs.com/kubesphereio/node-exporter v1.3.1 1dbe0e9319764 10.3MB
registry.cn-beijing.aliyuncs.com/kubesphereio/node v3.23.2 a3447b26d32c7 77.8MB
registry.cn-beijing.aliyuncs.com/kubesphereio/pause 3.7 221177c6082a8 311kB
registry.cn-beijing.aliyuncs.com/kubesphereio/pod2daemon-flexvol v3.23.2 b21e2d7408a79 8.67MB
# Worker НкЕу
[root@ks-worker-0 ~]# crictl images ls
IMAGE TAG IMAGE ID SIZE
registry.cn-beijing.aliyuncs.com/kubesphereio/alertmanager v0.23.0 ba2b418f427c0 26.5MB
registry.cn-beijing.aliyuncs.com/kubesphereio/cni v3.23.2 a87d3f6f1b8fd 111MB
registry.cn-beijing.aliyuncs.com/kubesphereio/coredns 1.8.6 a4ca41631cc7a 13.6MB
registry.cn-beijing.aliyuncs.com/kubesphereio/defaultbackend-amd64 1.4 846921f0fe0e5 1.82MB
registry.cn-beijing.aliyuncs.com/kubesphereio/haproxy 2.3 0ea9253dad7c0 38.5MB
registry.cn-beijing.aliyuncs.com/kubesphereio/k8s-dns-node-cache 1.15.12 5340ba194ec91 42.1MB
registry.cn-beijing.aliyuncs.com/kubesphereio/ks-apiserver v3.3.2 37a47a554cae2 68.3MB
registry.cn-beijing.aliyuncs.com/kubesphereio/ks-console v3.3.2 684e2ec7ee7c1 38.7MB
registry.cn-beijing.aliyuncs.com/kubesphereio/ks-controller-manager v3.3.2 ce4308712bea2 63MB
registry.cn-beijing.aliyuncs.com/kubesphereio/ks-installer v3.3.2 d4c00015d9614 154MB
registry.cn-beijing.aliyuncs.com/kubesphereio/kube-controllers v3.23.2 ec95788d0f725 56.4MB
registry.cn-beijing.aliyuncs.com/kubesphereio/kube-proxy v1.24.12 562ccc25ea629 39.6MB
registry.cn-beijing.aliyuncs.com/kubesphereio/kube-rbac-proxy v0.11.0 29589495df8d9 19.2MB
registry.cn-beijing.aliyuncs.com/kubesphereio/kube-rbac-proxy v0.8.0 ad393d6a4d1b1 20MB
registry.cn-beijing.aliyuncs.com/kubesphereio/kube-state-metrics v2.5.0 b781b8478c274 11.9MB
registry.cn-beijing.aliyuncs.com/kubesphereio/kubectl v1.22.0 30c7baa8e18c0 26.6MB
registry.cn-beijing.aliyuncs.com/kubesphereio/linux-utils 3.3.0 e88cfb3a763b9 26.9MB
registry.cn-beijing.aliyuncs.com/kubesphereio/node-exporter v1.3.1 1dbe0e9319764 10.3MB
registry.cn-beijing.aliyuncs.com/kubesphereio/node v3.23.2 a3447b26d32c7 77.8MB
registry.cn-beijing.aliyuncs.com/kubesphereio/notification-manager-operator v1.4.0 08ca8def2520f 19.3MB
registry.cn-beijing.aliyuncs.com/kubesphereio/notification-manager v1.4.0 b8b2f6b3790fe 21.7MB
registry.cn-beijing.aliyuncs.com/kubesphereio/notification-tenant-sidecar v3.2.0 4b47c43ec6ab6 14.7MB
registry.cn-beijing.aliyuncs.com/kubesphereio/pause 3.7 221177c6082a8 311kB
registry.cn-beijing.aliyuncs.com/kubesphereio/pod2daemon-flexvol v3.23.2 b21e2d7408a79 8.67MB
registry.cn-beijing.aliyuncs.com/kubesphereio/prometheus-config-reloader v0.55.1 7c63de88523a9 4.84MB
registry.cn-beijing.aliyuncs.com/kubesphereio/prometheus-operator v0.55.1 b30c215b787f5 14.3MB
registry.cn-beijing.aliyuncs.com/kubesphereio/prometheus v2.34.0 e3cf894a63f55 78.1MB
registry.cn-beijing.aliyuncs.com/kubesphereio/provisioner-localpv 3.3.0 739e82fed8b2c 28.8MB
registry.cn-beijing.aliyuncs.com/kubesphereio/snapshot-controller v4.0.0 f1d8a00ae690f 19MBзЂвтЃКWorker НкЕуЕФ Image НЯЖрЃЌвђЮЊИУНкЕудЫааСЫГ§ K8S КЫаФЗўЮёжЎЭтЕФЦфЫћЗўЮёЁЃ
жСДЫЃЌЮвУЧвбОВПЪ№СЫОпгаШ§Иі Master НкЕуКЭвЛИі Worker НкЕуЕФзюаЁЛЏЕФ Kubernetes МЏШККЭ KubeSphereЁЃЮвУЧЛЙЭЈЙ§ KubeSphere ЙмРэПижЦЬЈКЭУќСюааНчУцВщПДСЫМЏШКЕФзДЬЌЁЃ
5. ГЃМћЮЪЬт
ЮЪЬт 1
БЈДэЯжЯѓ
kubesphere-monitoring-system УќУћПеМфЯТЕФ prometheus-k8s-1 ДІгк PendingзДЬЌ
# ЪЙгУУќСюВщПДБЈДэЯъЧщ
$ kubectl describe pod prometheus-k8s-1 -n kubesphere-monitoring-system
Events:
Type Reason Age From Message
---- ------ ---- ---- -------
Warning FailedScheduling 2m35s default-scheduler 0/4 nodes are available: 1 Insufficient cpu, 3 node(s) had untolerated taint {node-role.kubernetes.io/master: }. preemption: 0/4 nodes are available: 1 No preemption victims found for incoming pod, 3 Preemption is not helpful for scheduling.НтОіЗНАИ
діМг Worker НкЕуКѓжиНЈНсЪјгя
БОЮФжївЊЪЕеНбнЪОСЫдк openEuler 22.03 LTS SP2 ЗўЮёЦїЩЯРћгУ KubeKey здЖЏЛЏВПЪ№ KubeSphere КЭ Kubernetes ИпПЩгУМЏШКЕФЯъЯИЙ§ГЬЁЃ
ВПЪ№ЭъГЩКѓЃЌЮвУЧЛЙРћгУ KubeSphere ЙмРэПижЦЬЈКЭ kubectl УќСюааЃЌВщПДВЂбщжЄСЫ KubeSphere КЭ Kubernetes МЏШКЕФзДЬЌЁЃ
ЯТвЛЦкЃЌЮвУЧЛсЪЕеНбнЪОШчКЮНЋаТЕФНкЕуМгШывбгаМЏШКЃЌЧыГжајЙизЂЁЃ
Лљгк KubeSphere ЭцзЊ K8S ЕкЖўМОЯЕСаЮФЕЕЃЌЪЧдЫЮЌгаЪѕЭЦГіЕФЛљгк KubeSphere ЭцзЊ K8S ЕкЖўМОЪЕеНбЕСЗгЊЕФЪЕеНЮФЕЕЁЃ
ЯыЛёШЁИќЖрЕФ KubeSphereЁЂKubernetesЁЂдЦдЩњдЫЮЌЪЕеНММФмЃЌЧыГжајЙизЂЮвЃЌвВПЩвджБНгМгШыЮвЕФжЊЪЖаЧЧђЁЃ
ШчЙћФуЯВЛЖБОЮФЃЌЧыЗжЯэИјФуЕФаЁЛяАщЃЁ
БОЯЕСаЮФЕЕФкШнКИЧ (ЕЋВЛЯогк) вдЯТММЪѕСьгђЃК
- KubeSphere
- Kubernetes
- Ansible
- здЖЏЛЏдЫЮЌ
- CNCF ММЪѕеЛ
Get ЮФЕЕ/ДњТы
- жЊЪЖаЧЧђ-дЫЮЌгаЪѕ
АцШЈЩљУї
- ЫљгаФкШнОљЪєгкдДДЃЌећРэВЛвзЃЌИааЛЪеВиЃЌзЊдиЧыБъУїГіДІЁЃ
About Me
- ъЧГЦЃКЮоУћдЫЮЌЯР
- жАвЕЃКздгЩжАвЕеп
- ЮЂаХЃКдЫЮЌгаЪѕ(ЙЋКХВЫЕЅ/гыЮвСЊЯЕ)
- ЗўЮёЕФСьгђЃКдЦМЦЫу / дЦдЩњММЪѕдЫЮЌЃЌздЖЏЛЏдЫЮЌЃЌДѓЪ§Он
- ММФмБъЧЉЃКOpenStackЁЂKubernetesЁЂKubeSphereЁЂAnsibleЁЂPythonЁЂGoЁЂDevOpsЁЂCNCF
дДДЩљУїЃКБОЮФЯЕзїепЪкШЈЬкбЖдЦПЊЗЂепЩчЧјЗЂБэЃЌЮДОаэПЩЃЌВЛЕУзЊдиЁЃ
ШчгаЧжШЈЃЌЧыСЊЯЕ cloudcommunity@tencent.com ЩОГ§ЁЃ
дДДЩљУїЃКБОЮФЯЕзїепЪкШЈЬкбЖдЦПЊЗЂепЩчЧјЗЂБэЃЌЮДОаэПЩЃЌВЛЕУзЊдиЁЃ
ШчгаЧжШЈЃЌЧыСЊЯЕ cloudcommunity@tencent.com ЩОГ§ЁЃ