基于Aidlux平台的工业视觉缺陷检测
原创基于Aidlux平台的工业视觉缺陷检测
原创
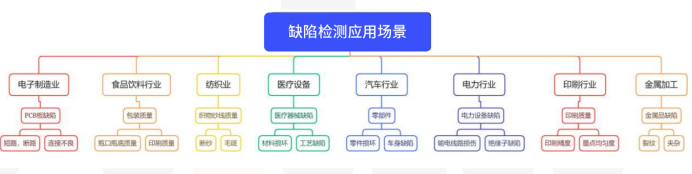
工业视觉缺陷检测是一种利用计算机视觉技术,对工业制品进行自动化检测,以识别和分类可能存在的缺陷的方法。它是现代工业生产中的重要环节,可以大大提高生产效率,降低产品缺陷率,提高产品质量。

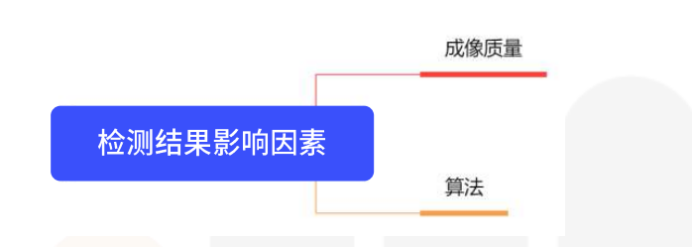
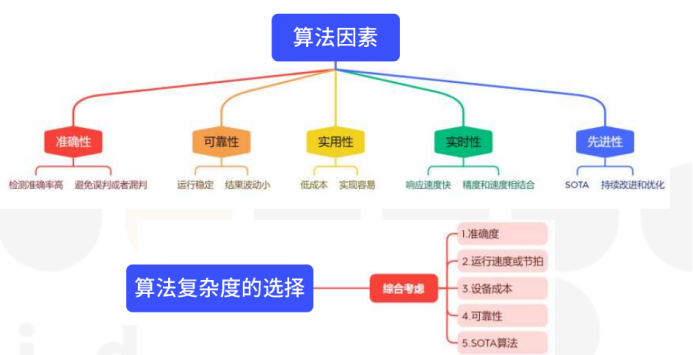
成像质量是根本,好的算法可以锦上添花
影响因素:

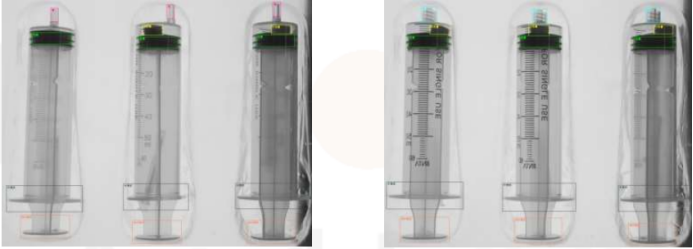
该项目为医疗注射器缺陷检测,要求检观出汗射器是否有质量缺路(缺件或者多件),检测对象分别为,胶暴、推杆承部 针尾品、针嘴、媒口、小较暴,产品如下图所示摆放,针对歪嘴情况单独来增加一个类作为检测项。
通过对样本进行分析,注射器摆放的位置略有差异,采用目标检测来检测各个部件是否存在比较合适,最后综合判断每个注射器的最终结果,如果检测某个注射器出现歪嘴或者缺件的直接输出对应的NG信号,方便剔除不合格产品。
采集图片:使用相机采图工具或者专用软件对缺陷产品进行采图,本项目采集图片1000张左右,为了模拟小样本训练的效果,实际只使用200张左右。
标注:标注工程师按照要求将目标检测项分为7类,分别是胶塞、推杆尾部、针尾部.
针嘴、歪嘴、螺口、小胶塞。
训练:使用改进的yolov8进行训练得到模型。
模型上线:模型转换、量化等,使模型满足部署平台的上线要求,这里使用Aidlux进行部署。
相机:工业高清黑白相机600w
光源:红外平板光源,背面补光
镜头:工业高清FA镜头35mm
算法:yolov8
部署:工控机显卡RTX206012G
界面及通信:WPF或者C#或者OT (这里不做讨论)
下图是yolov8模型结构图

选择yolov8模型的理由:集大成者之作,包括分类、实例分割、目标检测、关键点检测、目标跟踪等,更多的功能更快的推理速度、更高的精度、更加易于训练和调整支持更多的平台、全新的SOTA模型
该项目使用volov8的目标检测,对该模型进行两点改进在head中加入slimNeck
在优化中加入Siou
改进1:
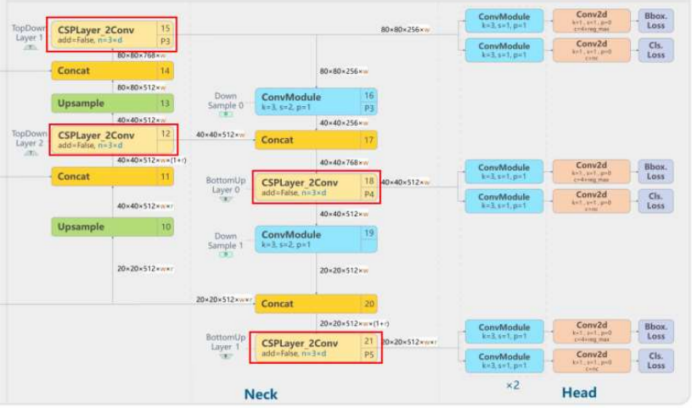
yolov8模型改进: slicNeck
将neck中的4个CSPLayer2Conv全部更换为VoVGSCSPC。
相比与C2f,VoVGSCSPC在保持性能的同时具更少的有参数量,轻量化效果明显。
改进2:
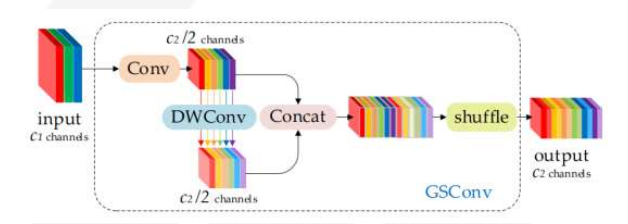
yolov8模型改进: slicNeckslimNeck之GSConv
slimNeck的作者提出了一种新方法GSConv来减轻模型复杂度,保持准确性。GSConv可以更好地平衡模型的准确性和速度。并且,提供了一种设计范式Slim-Neck,以实现检测器更高的计算成本效益。实验过程中,与原始网络相比改进方法获得了最优秀的检测结果。
改进3:
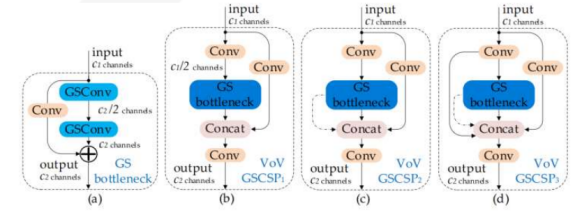
yolov8模型改进: slicNeckslimNeck之VoVGSCSPC
P1--P2--P3,依次增加残差连接层的个数,使得到的特征层的维度更多,获得抽象的语义特征信息越丰富。
改进4:
yolov8模型改进: SIoU
源代码修改:
进入到ultralyticsyololutils metrics,py中,76行开始修改bbox_iou方法,增加和修改SIoU,EloU,Focal,alpha,gamma相关的代码.
进入到ultralyticsyoloutils loss.py中,43行开始修改bbox_iou, 并注释掉以前的loss_iou,增加带Fcal的loss_iouo
进入到ultralyticslyoloutilsltalpy中,157行修改bbox_iouo
注射器数据集:139张训练数据集,46张验证集
训练方式:基于yolov8预训练权重进行训练
新建或者拷贝对应的yaml文件,设置nc=7,如果是自己的数据集,按照实际类别进行设置。
训练yolov8n模型
使用main.py文件,训练模型或者转换为onnx模型加载自己的yaml文件,再加载预训练模型,将预训练权重移植到新模型中,这样就可以开始训练yolov8模型了。
if __name__ == '__main__':
? ? mode="predict"
? ? if mode=="train":
? ? ? ? model=YOLO("E:\\Aidlux8\\2\\yolov8-aidlux\\yolov8-main\\yolov8n.yaml")
? ? ? ? model=YOLO("E:\\Aidlux8\\2\\yolov8-aidlux\\yolov8-main\\yolov8n.pt")
? ? ? ? # model.train(**{'cfg':'D:\\AI\\YOLO\\yolov8-main\\ultralytics\\yolo\\cfg\\keypoints.yaml'})
? ? ? ? model.train(data='ultralytics\\datasets\\keypoint.yaml',epochs=100,device=0,batch=4,workers=6)
? ? ? ? # path = model.export(format="onnx")

? ? if mode=="onnx" :
? ? ? ? #D:\\IROnnx\\best.pt
? ? ? ? model = YOLO('E:\\Aidlux8\\2\\yolov8-aidlux\\yolov8-main\\runs\\detect\\train8\\weights\\best.pt')
? ? ? ? # model = YOLO('D:\\AI\\Unet\\unet-pytorch\\logs\\best_epoch_weights.pth')
? ? ? ? model.export(format="onnx",opset=11,simplify=True)
? ? ? ? # path = model.export(format="onnx",opset=13,half=True,simplify=True)
? ? ? ? # path = model.export(format="onnx",opset=13,half=True,simplify=True)
训练过程:
将预训练权重的加载到了我们自己的模型中,经过3个batchsize,模型就开始收敛。
Aidlux平台介绍
Aidlux安装和环境配置
特点o安卓手机app市场下载并安装AidLux应用。安装包大小为1.2g打开AidLux,配置各种权限,手机-设置-关于手机-多次点击系统版本号,打开开发者模式重启AidLux,选择登陆或者免注册登陆,应用系统第一次打开需要加载AidLux,等待进度条完成手机端进入AidLux界面后,查看手机端桌面Cloud ip蓝色云朵图标,获得ip和端口号PC端浏览器中输入ip地址和端口号,登录界面为root用户,输入aidlux(默认密码)登陆进入到AidLux桌面打开终端更新和安装所需工具包,默认已安装aidlite_gpu,也可以更新。
安装vscode:
打开应用中心,选择Linux-Aid源-vscode进行安装
进入已安装-点击vscode-点击添加到桌面-桌面上显示vscode
可以使用直接在设备里直接调试运行vscode,也可以使用ssh连接vscode进行远程调试。
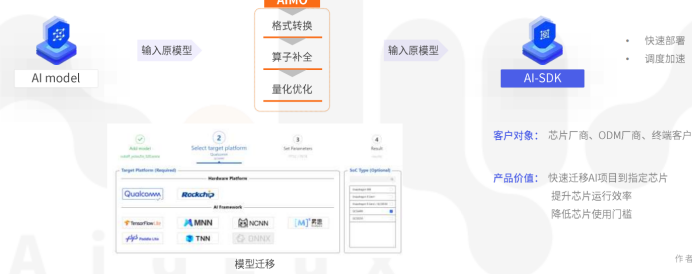
基于Aidlux的yolov8模型转换
打开网站: http://aimo.aidlux.com/
输入试用账号和密码:
账号:AIMOTC001,密码:AIMOTCO01
选择对应的原模型(.onnx)->选择目标平台(tensorflowlite)->参数设置默认->转换结果->下载模型
基于tflite的yolov8模型部署
images文件夹:推理图像样本
onnx原模型:yolov8_slimneck_SIOU.onnx
tflite: tflite模型和推理的py文件
手机设备打开AidLux
PC网页登录AidLux,默认用户为root,密码为aidlux将images、tflite模型文件以及tflite.py文件放入到home目录中
打开vscode,打开tflite.py文件,右键在终端运行,可在result中查找推理的结果
最后的推理源码如下:
import aidlite_gpu
import cv2
from cvs import *
import numpy as np
import os
import time

# import ?matplotlib.pyplot as plt

model_path = "/home/yolov8_slimneck_SIOU_save_path_tflite/yolov8_slimneck_SIOU_fp32.tflite"
image_path = "/home/test"
NUMS_CLASS = 7

confThresh = 0.3
NmsThresh = 0.45

# 输入格式 (8400,11)
def postProcess(pres, confThresh, NmsThresh):
? ? boxes_out = []
? ? scores_out = []
? ? class_out = []
? ? for pred in pres:

? ? ? ? pred_class = pred[4:]
? ? ? ? box_ = pred[0:4]
? ? ? ? # pred_class=(pred_class-min(pred_class))/(max(pred_class)-min(pred_class))
? ? ? ? class_index = np.argmax(pred_class)
? ? ? ? if pred_class[class_index] > 0.3:
? ? ? ? ? ? # box=np.array([round(pred[2]-0.5*pred[0]),round(pred[3]-0.5*pred[1]),round(pred[0]),round(pred[1])])
? ? ? ? ? ? box_ = pred[0:4] ?# w,h,xc,yc
? ? ? ? ? ? box = np.array([round((pred[2] / 2 - pred[0])), round((pred[3] / 2 - pred[1])), round(pred[0] * 2),
? ? ? ? ? ? ? ? ? ? ? ? ? ? round(pred[1] * 2)])
? ? ? ? ? ? boxes_out.append(box)
? ? ? ? ? ? score = pred_class[class_index]
? ? ? ? ? ? scores_out.append(score)
? ? ? ? ? ? class_out.append(class_index)

? ? result_boxes = cv2.dnn.NMSBoxes(boxes_out, np.array(scores_out), confThresh, NmsThresh)
? ? # detections=[]
? ? boxes = []
? ? scores = []
? ? classes = []
? ? for result_box in result_boxes:
? ? ? ? index = int(result_box)
? ? ? ? box = boxes_out[index]
? ? ? ? score = scores_out[index]
? ? ? ? class_type = class_out[index]
? ? ? ? boxes.append(box)
? ? ? ? scores.append(score)
? ? ? ? classes.append(class_type)
? ? return boxes, scores, classes

def draw(img, xscale, yscale, boxes, scores, classes):
? ? width = img.shape[1]
? ? w1 = 1620
? ? w2 = 2350
? ? w3 = width
? ? S1 = []
? ? S2 = []
? ? S3 = []
? ? S1_res = [False for i in range(NUMS_CLASS)]
? ? S2_res = [False for i in range(NUMS_CLASS)]
? ? S3_res = [False for i in range(NUMS_CLASS)]
? ? S_res = [S1_res, S2_res, S3_res]

? ? img_ = img.copy()
? ? # 遍历所有box,按照分割区域将box归类
? ? for i in range(len(boxes)):
? ? ? ? # boxes=[x1,y1,w,h]
? ? ? ? box = boxes[i]
? ? ? ? score = scores[i]
? ? ? ? class_ = int(classes[i])
? ? ? ? # class_text=label[class_]
? ? ? ? # detect=[round(box[0]*xscale),round(box[1]*yscale),round((box[0]+box[2])*xscale),round((box[1]+box[3])*yscale)]
? ? ? ? detect = [round(box[0] * xscale), round(box[1] * yscale), round(box[0] * xscale + (box[2]) * xscale),
? ? ? ? ? ? ? ? ? round(box[1] * yscale + (box[3]) * yscale)]
? ? ? ? text = "{}:{:.2f}".format(label[class_], float(score))
? ? ? ? img_ = cv2.rectangle(img_, (detect[0], detect[1]), (detect[2], detect[3]), (0, 255, 0), 2)
? ? ? ? cv2.putText(img_, text, (detect[0], detect[1] + 10), cv2.FONT_HERSHEY_COMPLEX, 2, (0, 0, 255), 1)

? ? ? ? # 分割为三块
? ? ? ? if (detect[0] <= w1):
? ? ? ? ? ? p1 = []
? ? ? ? ? ? p1.append(detect)
? ? ? ? ? ? p1.append(class_)
? ? ? ? ? ? p1.append(score)
? ? ? ? ? ? S1.append(p1)
? ? ? ? elif (w1 < detect[0] <= w2):
? ? ? ? ? ? p2 = []
? ? ? ? ? ? p2.append(detect)
? ? ? ? ? ? p2.append(class_)
? ? ? ? ? ? p2.append(score)
? ? ? ? ? ? S2.append(p2)
? ? ? ? elif (w2 < detect[0] <= w3):
? ? ? ? ? ? p3 = []
? ? ? ? ? ? p3.append(detect)
? ? ? ? ? ? p3.append(class_)
? ? ? ? ? ? p3.append(score)
? ? ? ? ? ? S3.append(p3)

? ? ? ? ? ? # 判断每个分割图像中的结果
? ? index = 0
? ? for S in [S1, S2, S3]:
? ? ? ? for i in range(len(S)):
? ? ? ? ? ? p1 = S[i]
? ? ? ? ? ? box_temp = p1[0]
? ? ? ? ? ? class_temp = p1[1]
? ? ? ? ? ? score_temp = p1[2]
? ? ? ? ? ? S_res[index][class_temp] = True
? ? ? ? index += 1

? ? # 最终分割输出结果true or false
? ? S_out = [False, False, False]
? ? index_out = 0
? ? for s_r in S_res:
? ? ? ? c0 = s_r[0]
? ? ? ? c1 = s_r[1]
? ? ? ? c2 = s_r[2]
? ? ? ? c3 = s_r[3]
? ? ? ? c4 = s_r[4]
? ? ? ? c5 = s_r[5]
? ? ? ? c6 = s_r[6]

? ? ? ? if (c0 & c1 & c2 & c3 & (~c4) & (~c5) & (~c6)):
? ? ? ? ? ? S_out[index_out] = True
? ? ? ? elif (c0 & c1 & c2 & (~c3) & (~c4) & c5 & (~c6)):
? ? ? ? ? ? S_out[index_out] = True
? ? ? ? index_out += 1

? ? # 打印分割结果
? ? cv2.putText(img_, "OK" if S_out[0] == True else "NG", (w1 - 200, 100), cv2.FONT_HERSHEY_COMPLEX, 2, (255, 0, 0), 1)
? ? cv2.putText(img_, "OK" if S_out[1] == True else "NG", (w2 - 200, 100), cv2.FONT_HERSHEY_COMPLEX, 2, (255, 0, 0), 1)
? ? cv2.putText(img_, "OK" if S_out[2] == True else "NG", (w3 - 200, 100), cv2.FONT_HERSHEY_COMPLEX, 2, (255, 0, 0), 1)

? ? return img_

label = ["rubber stopper", "push rod tail", "needle tail", "mouth", "crooked mouth", "screw mouth", "small rubber plug"]

if __name__ == "__main__":

? ? # 1.初始化aidlite类并创建aidlite对象
? ? aidlite = aidlite_gpu.aidlite()
? ? print("ok")

? ? # 2.加载模型
? ? value = aidlite.ANNModel(model_path, [640 * 640 * 3 * 4], [8400 * 11 * 4], 4, 0)
? ? print("gpu:", value)
? ? # file_names=os.listdir(image_path)
? ? # root,dirs,files = os.walk(image_path)
? ? for root, dirs, files in os.walk(image_path):
? ? ? ? num = 0
? ? ? ? for file in files:
? ? ? ? ? ? file = os.path.join(root, file)
? ? ? ? ? ? frame = cv2.imread(file)
? ? ? ? ? ? x_scale = frame.shape[1] / 640
? ? ? ? ? ? y_scale = frame.shape[0] / 640

? ? ? ? ? ? img = cv2.resize(frame, (640, 640))
? ? ? ? ? ? # img_copy=img.co
? ? ? ? ? ? img = img / 255.0
? ? ? ? ? ? img = np.expand_dims(img, axis=0)
? ? ? ? ? ? img = img.astype(dtype=np.float32)
? ? ? ? ? ? print(img.shape)

? ? ? ? ? ? # 3.传入模型输入数据
? ? ? ? ? ? aidlite.setInput_Float32(img)

? ? ? ? ? ? # 4.执行推理
? ? ? ? ? ? start = time.time()

? ? ? ? ? ? aidlite.invoke()

? ? ? ? ? ? end = time.time()
? ? ? ? ? ? timerValue = 1000 * (end - start)
? ? ? ? ? ? print("infer time(ms):{0}", timerValue)

? ? ? ? ? ? # 5.获取输出
? ? ? ? ? ? pred = aidlite.getOutput_Float32(0)
? ? ? ? ? ? # print(pred.shape)
? ? ? ? ? ? pred = np.array(pred)
? ? ? ? ? ? print(pred.shape)
? ? ? ? ? ? pred = np.reshape(pred, (8400, 11))
? ? ? ? ? ? # pred=np.reshape(pred,(11,8400)).transpose()
? ? ? ? ? ? print(pred.shape) ?# shape=(8400,11)

? ? ? ? ? ? # 6.后处理,解析输出
? ? ? ? ? ? boxes, scores, classes = postProcess(pred, confThresh, NmsThresh)

? ? ? ? ? ? # 7.绘制保存图像
? ? ? ? ? ? ret_img = draw(frame, x_scale, y_scale, boxes, scores, classes)

? ? ? ? ? ? ret_img = ret_img[:, :, ::-1]
? ? ? ? ? ? num += 1
? ? ? ? ? ? image_file_name = "/home/result/res" + str(num) + ".jpg"
? ? ? ? ? ? # 8.保存图片
? ? ? ? ? ? cv2.imwrite(image_file_name, ret_img)
个人体会:
笔者是在Aidlux团队以及龙哥的训练营中学习而来,期间龙哥区别以往的视频课,以一种更加直观的方式展现出整个项目的流程与细节。不管是AI算法小白还是AI算法的老手都在这次训练营受益匪浅。Aidlux工程实践内容全是干货,同时过程也遇见了很多问题,但是龙哥和训练营的其他同学们都很认真为其他学员解决,耐心辅导,对我来言,刚刚接触这一领域,以及Aidlux平台的使用,让我耳目一新。整个流程下,我已经学会了如何在Aidlux进行模型部署,令我也感觉到成就感,在此特别感谢张子豪老师和Aidlux团队的贡献,希望他们以后在AI算法开发的道路事业更加顺利。
最后放上本次基于Aidlux平台实现工业视觉缺陷检测的效果视频的地址。
https://www.bilibili.com/video/BV1GN4y197cD/
原创声明:本文系作者授权腾讯云开发者社区发表,未经许可,不得转载。
如有侵权,请联系 cloudcommunity@tencent.com 删除。
原创声明:本文系作者授权腾讯云开发者社区发表,未经许可,不得转载。
如有侵权,请联系 cloudcommunity@tencent.com 删除。