linux安装mysql
原创
linux安装mysql
概述:
mysql是关系型数据库,可运行在linux、windows、macOS等各个操作系统。由于体积小、速度快、低成本等优点,大多数企业在软件开发都选择MYSQL作为软件数据库。
本次linux安装mysql使用的是5.7版本,其他版本也是大同小异,思路步骤都一致。
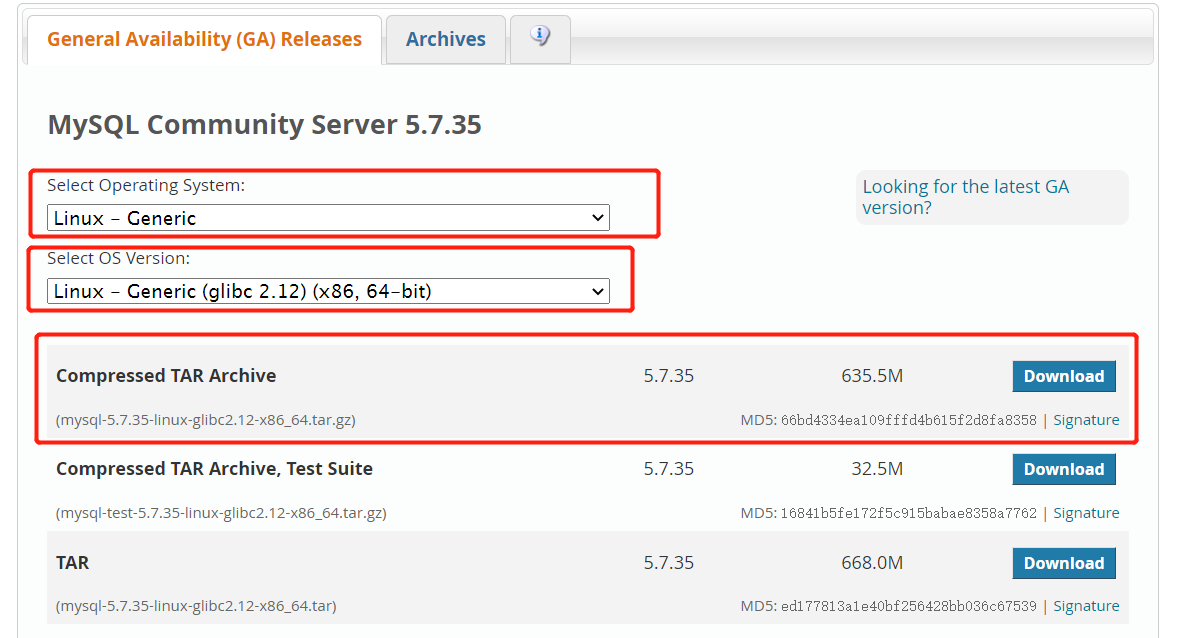
第一步:下载mysql
下载地址:https://dev.mysql.com/downloads/mysql/5.7.html#downloads
第二步: 上传服务器,解压压缩包,再移动并重命名一下
#解压
tar -zxvf mysql-5.7.26-linux-glibc2.12-x86_64.tar

#再移动并重命名一下
mv mysql-5.7.26-linux-glibc2.12-x86_64 /usr/local/mysql
第三步 创建文件夹
创建目录用于存放mysql数据
mkdir -p  /data/mysql              #创建目录
chown mysql:mysql -R /data/mysql   #赋予权限
第四步 配置my.cnf
vi /etc/my.cnf内容如下:
[mysqld]
bind-address=0.0.0.0
port=3306
user=mysql
basedir=/usr/local/mysql
datadir=/data/mysql
socket=/tmp/mysql.sock
log-error=/data/mysql/mysql.err
pid-file=/data/mysql/mysql.pid
#character config
character_set_server=utf8mb4
symbolic-links=0
explicit_defaults_for_timestamp=true
第五步 初始化数据库
进入mysql文件夹,执行初始化命令
#进入mysql目录
cd /usr/local/mysql/bin/

#执行初始化命令
./mysqld --defaults-file=/etc/my.cnf --basedir=/usr/local/mysql/ --datadir=/data/mysql/ --user=mysql --initialize
第六步 查看mysql初始化密码
首次登录使用mysql初始化密码
cat /data/mysql/mysql.err
第七步 启动mysql
1.先将mysql.server放置到/etc/init.d/mysql中
cp /usr/local/mysql/support-files/mysql.server /etc/init.d/mysql2.执行启动命令
service mysql start

ps -ef|grep mysql
第八步 修改密码
1.登录mysql。登录密码是初始化密码
./mysql -u root -p #bin目录下2.执行三个修改密码命令
SET PASSWORD = PASSWORD('123456');

ALTER USER 'root'@'localhost' PASSWORD EXPIRE NEVER;

FLUSH PRIVILEGES;
第九步 设置运行远程连接mysql
use mysql                                            #访问mysql库

update user set host = '%' where user = 'root';      #使root能再任何host访问

FLUSH PRIVILEGES;
可能会出现的错误
1.初始化时,-bash: ./mysqld: /lib/ld-linux.so.2: bad ELF interpreter: No such file or directory
yum install glibc.i686
yum install libstdc++.so.6
2.yum版本冲突
[root@localhost bin]#  yum install libnuma.so.1
Loaded plugins: fastestmirror
Loading mirror speeds from cached hostfile
 * base: mirrors.aliyun.com
 * extras: mirrors.aliyun.com
 * updates: mirrors.aliyun.com
Resolving Dependencies
--> Running transaction check
---> Package numactl-libs.i686 0:2.0.12-5.el7 will be installed
--> Finished Dependency Resolution
Error:  Multilib version problems found. This often means that the root
       cause is something else and multilib version checking is just
       pointing out that there is a problem. Eg.:

         1. You have an upgrade for numactl-libs which is missing some
            dependency that another package requires. Yum is trying to
            solve this by installing an older version of numactl-libs of the
            different architecture. If you exclude the bad architecture
            yum will tell you what the root cause is (which package
            requires what). You can try redoing the upgrade with
            --exclude numactl-libs.otherarch ... this should give you an error
            message showing the root cause of the problem.

         2. You have multiple architectures of numactl-libs installed, but
            yum can only see an upgrade for one of those architectures.
            If you don't want/need both architectures anymore then you
            can remove the one with the missing update and everything
            will work.

         3. You have duplicate versions of numactl-libs installed already.
            You can use "yum check" to get yum show these errors.

       ...you can also use --setopt=protected_multilib=false to remove
       this checking, however this is almost never the correct thing to
       do as something else is very likely to go wrong (often causing
       much more problems).

       Protected multilib versions: numactl-libs-2.0.12-5.el7.i686 != numactl-libs-2.0.9-7.el7.x86_64

我正在参与2023腾讯技术创作特训营第三期有奖征文,组队打卡瓜分大奖!
原创声明:本文系作者授权腾讯云开发者社区发表,未经许可,不得转载。
如有侵权,请联系 cloudcommunity@tencent.com 删除。
原创声明:本文系作者授权腾讯云开发者社区发表,未经许可,不得转载。
如有侵权,请联系 cloudcommunity@tencent.com 删除。
评论
登录后参与评论
推荐阅读