基于YOLOv8的老虎姿态(Tiger-Pose)识别
原创基于YOLOv8的老虎姿态(Tiger-Pose)识别
原创
AI小怪兽
修改于 2024-01-16 16:25:23
代码可运行
修改于 2024-01-16 16:25:23
运行总次数:3
代码可运行
???本文解决什么问题:教会你如何用自己的数据集训练Yolov8-pose关键点检测
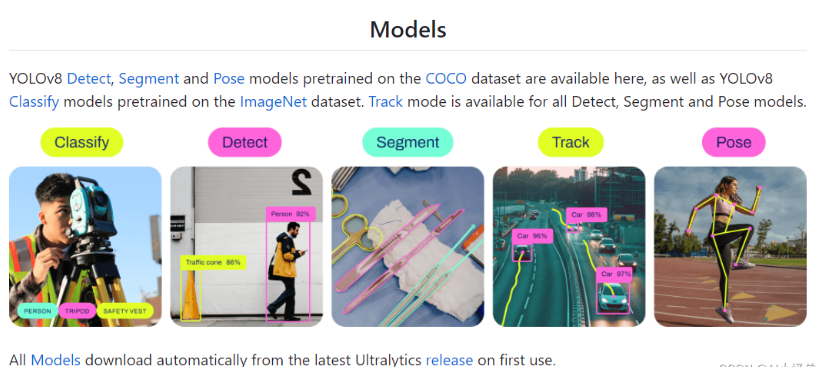
1.YOLOv8 介绍
YOLOv8目前支持目标检测、实例分割、图像分类、目标跟踪、姿态估计,也许还有更多惊喜在后面。
代码地址:GitHub - ultralytics/ultralytics: NEW - YOLOv8 ? in PyTorch > ONNX > OpenVINO > CoreML > TFLite
进军工业界标杆,并向着“CV全家桶”阔步向前。
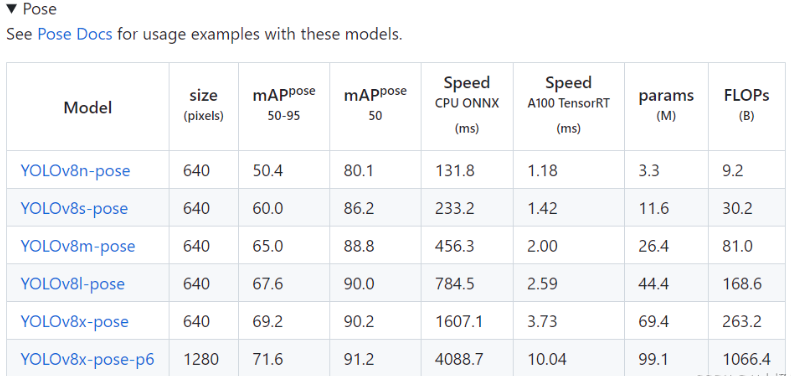
pose官方在COCO数据集上做了更多测试:
? 1.1数据集介绍
Ultralytics介绍了Tiger-Pose数据集,这是一个为姿态估计任务设计的多功能集合。该数据集包括来自YouTube视频的263张图像,其中210张用于训练,53张用于验证。
数据集下载地址:Tiger-pose - Ultralytics YOLOv8 Docs
?

2.Tiger-Pose关键点训练
2.1 新建data/tiger-pose/tiger-pose.yaml
# Ultralytics YOLO ?, AGPL-3.0 license
# Tiger Pose dataset by Ultralytics
# Example usage: yolo train data=tiger-pose.yaml
# parent
# ├── ultralytics
# └── datasets
#     └── tiger-pose  ← downloads here (75.3 MB)


# Train/val/test sets as 1) dir: path/to/imgs, 2) file: path/to/imgs.txt, or 3) list: [path/to/imgs1, path/to/imgs2, ..]
path: D:/ultralytics-pose/data/tiger-pose/  # dataset root dir
train: train  # train images (relative to 'path') 210 images
val: val  # val images (relative to 'path') 53 images

# Keypoints
kpt_shape: [12, 2]  # number of keypoints, number of dims (2 for x,y or 3 for x,y,visible)
flip_idx: [0, 1, 2, 3, 4, 5, 6, 7, 8, 9, 10, 11]

# Classes
names:
  0: tiger

# Download script/URL (optional)
#download: https://ultralytics.com/assets/tiger-pose.zip
2.2修改ultralytics/cfg/models/v8/yolov8-pose.yaml
修改为21个关键点和一个类别nc:1
# Ultralytics YOLO ?, AGPL-3.0 license
# YOLOv8-pose keypoints/pose estimation model. For Usage examples see https://docs.ultralytics.com/tasks/pose

# Parameters
nc: 1  # number of classes
kpt_shape: [21, 2]  # number of keypoints, number of dims (2 for x,y or 3 for x,y,visible)
scales: # model compound scaling constants, i.e. 'model=yolov8n-pose.yaml' will call yolov8-pose.yaml with scale 'n'
  # [depth, width, max_channels]
  n: [0.33, 0.25, 1024]
  s: [0.33, 0.50, 1024]
  m: [0.67, 0.75, 768]
  l: [1.00, 1.00, 512]
  x: [1.00, 1.25, 512]

# YOLOv8.0n backbone
backbone:
  # [from, repeats, module, args]
  - [-1, 1, Conv, [64, 3, 2]]  # 0-P1/2
  - [-1, 1, Conv, [128, 3, 2]]  # 1-P2/4
  - [-1, 3, C2f, [128, True]]
  - [-1, 1, Conv, [256, 3, 2]]  # 3-P3/8
  - [-1, 6, C2f, [256, True]]
  - [-1, 1, Conv, [512, 3, 2]]  # 5-P4/16
  - [-1, 6, C2f, [512, True]]
  - [-1, 1, Conv, [1024, 3, 2]]  # 7-P5/32
  - [-1, 3, C2f, [1024, True]]
  - [-1, 1, SPPF, [1024, 5]]  # 9

# YOLOv8.0n head
head:
  - [-1, 1, nn.Upsample, [None, 2, 'nearest']]
  - [[-1, 6], 1, Concat, [1]]  # cat backbone P4
  - [-1, 3, C2f, [512]]  # 12

  - [-1, 1, nn.Upsample, [None, 2, 'nearest']]
  - [[-1, 4], 1, Concat, [1]]  # cat backbone P3
  - [-1, 3, C2f, [256]]  # 15 (P3/8-small)

  - [-1, 1, Conv, [256, 3, 2]]
  - [[-1, 12], 1, Concat, [1]]  # cat head P4
  - [-1, 3, C2f, [512]]  # 18 (P4/16-medium)

  - [-1, 1, Conv, [512, 3, 2]]
  - [[-1, 9], 1, Concat, [1]]  # cat head P5
  - [-1, 3, C2f, [1024]]  # 21 (P5/32-large)

  - [[15, 18, 21], 1, Pose, [nc, kpt_shape]]  # Pose(P3, P4, P5)
2.3默认参数开启训练
from ultralytics.cfg import entrypoint
arg="yolo pose train model=yolov8-pose.yaml data=data/tiger-pose/tiger-pose.yaml"
entrypoint(arg)
模型配置如下:
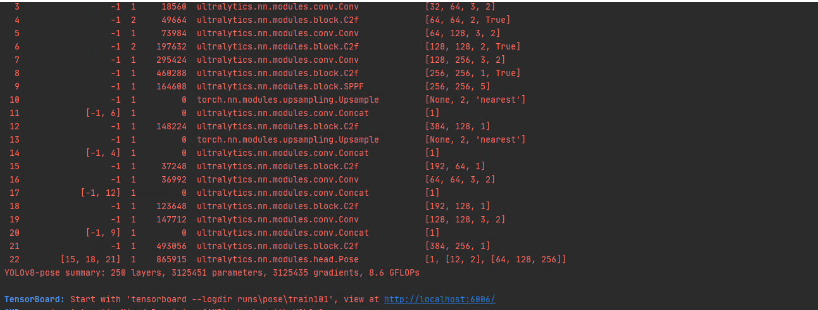
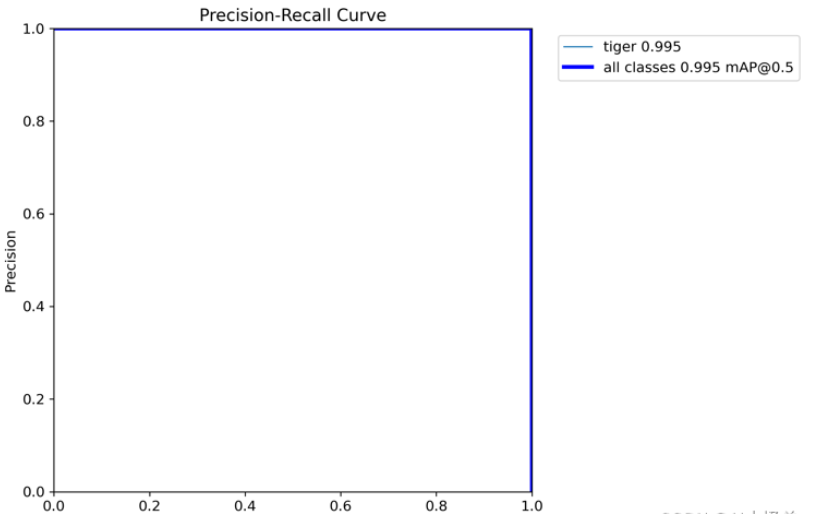
2.4训练结果分析
100个epoch以后
BoxPR_curve.png
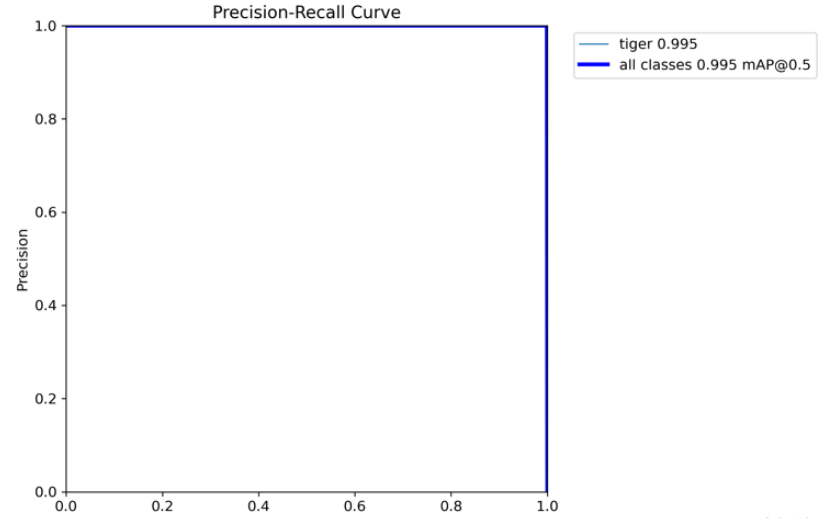
PosePR_curve.png
预测图片结果如下:

原创声明:本文系作者授权腾讯云开发者社区发表,未经许可,不得转载。
如有侵权,请联系 cloudcommunity@tencent.com 删除。
原创声明:本文系作者授权腾讯云开发者社区发表,未经许可,不得转载。
如有侵权,请联系 cloudcommunity@tencent.com 删除。
评论
登录后参与评论
推荐阅读
目录