

本文实例为大家分享了ASP.NET实现图片自动添加水印的具体代码,供大家参考,具体内容如下
先建一个类,感觉注释已经很详细了,有不懂的欢迎评论
using System;
using System.Collections.Generic;
using System.Drawing;
using System.Drawing.Imaging;
using System.IO;
using System.Linq;
using System.Web;

namespace shuiyin
{
 public class Water : IHttpHandler
 {
  /*
   这个IsReusable的true是可以提高效率但是,会线程不安全
   IHttpHandler实例可以再次使用

   false,会安全一些,效率会低一些
   IHttpHandler的实例就不能使用
    */
  public bool IsReusable => true;
  //水印
  private const string Water_Url = "~/Images/watermark.png";
  //没有图片的时候使用
  private const string None_Picture = "~/Error/default.jpg";

  public void ProcessRequest(HttpContext context)
  {
   //获取图片的物理路径
   string path = context.Request.PhysicalPath;
   Image image;
   //如果我当前项目中有这个图片,就可以进行加水印操作
   if (File.Exists(path))
   {
    //获取指定的图片(要添加水印的图片)
    image = Image.FromFile(path);
    //再找到,要添加的水印
    Image image_Water = Image.FromFile(context.Server.MapPath(Water_Url));
    //使用画图的类,获取图片
    Graphics graphics = Graphics.FromImage(image);
    //画图方法,第一个参数就是要添加的水印
    graphics.DrawImage(image_Water,
     //第二个参数是一个坐标的问题,从x1,y1坐标开始,绘制的水印的长度和宽度,
     //一共四个参数,x1,y1,水印的长度,宽度
     new Rectangle(image.Width - image_Water.Width, image.Height - image_Water.Height, image_Water.Width, image_Water.Height),
     //从上一个参数获取的位置开始作为新的区域
     //新区域的0,0开始,也是宽度和长度,
     //最后一个参数就是,像素的问题,多少像素
     0, 0, image_Water.Width, image_Water.Height,GraphicsUnit.Pixel);
    //使用完了,把两个图片的资源都释放掉
    graphics.Dispose();
    image_Water.Dispose();
   }
   else
   {
    //这里是如果没有指定的图片的话,就用一个找不到的图片去代替
    image = Image.FromFile(context.Server.MapPath(None_Picture));
   }
   //新图片的类型
   context.Response.ContentType = "Image/Jpeg";
   //把新图片进行保存,输出流和格式
   image.Save(context.Response.OutputStream, ImageFormat.Jpeg);
   //使用完保存,释放掉图片的资源,结束
   image.Dispose();
   context.Response.End();


  }
 }
}
修改配置文件

<system.webServer>
 <handlers>
  <add verb="*" name="image_Water" path="Images/*.jpg" type="shuiyin.Water"/>
 </handlers>
</system.webServer>
path是加水印图片的地址,type是那个类的路径:
也就是命名空间 .(点)类名
一个简单的web窗体
<%@ Page Language="C#" AutoEventWireup="true" CodeBehind="ThreePicture_Water.aspx.cs" Inherits="shuiyin.ThreePicture_Water" %>

<!DOCTYPE html>

<html xmlns="http://www.w3.org/1999/xhtml">
<head runat="server">
<meta http-equiv="Content-Type" content="text/html; charset=utf-8"/>
 <title></title>
</head>
<body>
 <form id="form1" runat="server">
  <div>
   <img src="Images/adv1.jpg" />
   <img src="Images/adv2.jpg" />
   <img src="Images/adv3.jpg" />
  </div>
 </form>
</body>
</html>
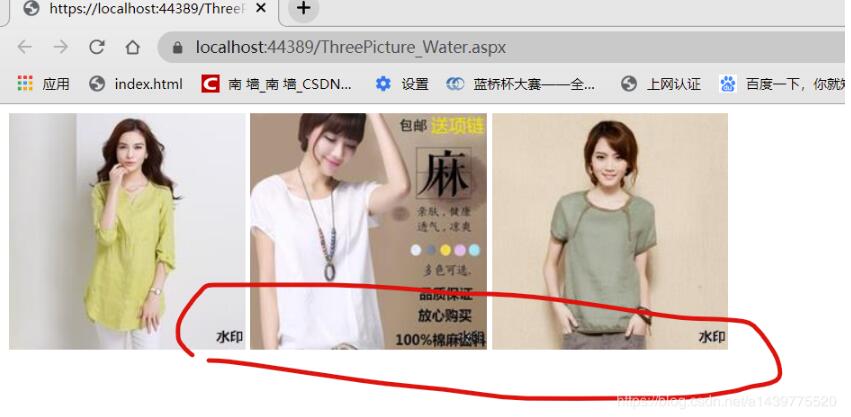
效果图
以上就是本文的全部内容,希望对大家的学习有所帮助,也希望大家多多支持站长技术。

最近大学里的一个同学突然辞职回武汉了。 我忍不住问他『大家都往深圳跑,你怎么...
在讲网页表格的结构化标记之前,还是先看几幅图片。 Html表格的结构化 所谓的结...
1.在vscode中搜索Autoprofixer 2.在安装完成之后要配置 在需要添加前缀的css文件...
本文转载自微信公众号「小姐姐味道」,作者小姐姐养的狗 。转载本文请联系小姐姐...
开启Fckeditor上传图片功能 考虑到目录安全性问题,默认Fckeditor2.6.6上传功能...
问题描述 虚拟机安装在VMware中打开FileZilla客户端输入虚拟机IP、用户名、密码...
打开Upload.ASP文件 找到下面代码: 复制代码 代码如下: % sAllowExt=Replace(UCa...
grep (缩写来自Globally search a Regular Expression and Print)是一种强大的...
upload.asp form action=http:// % = Request. ServerVariables(SERVER_NAME)/w...
前言 本文介绍的是利用CSS3的新属性box-sizing,解决div宽度设置width:100%后再...

