

最近和小伙伴 @anotheren 一起在搞事情,打算把微信的图片选择器那一套给做出来。于是就有了 AnyImageKit 这个框架,现在已经完成图片选择和编辑功能了。在做图片编辑功能的时候,裁剪这个功能做了很久,想到一个思路去做,做到一半发现不行,推翻重做,反复经历了这个过程两三次之后,最终给做出来了。这个功能的坑还是挺多的,而且网上关于这一块的资料不多,于是就想写一篇文章记录一下。

首先我们要先来解决三个小问题。
问题一:如何将图片完整的展示出来
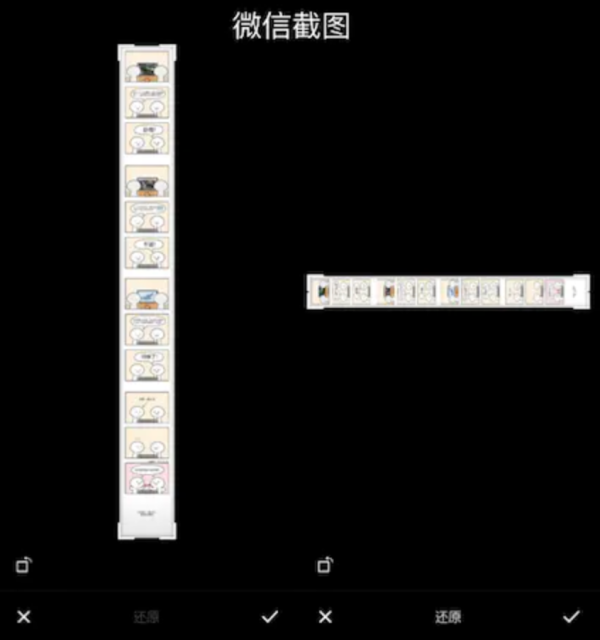
先来考虑横图(第二张图)的情况,设图片宽度为 scrollView.bounds.width,再将图片的高度进行等比缩放。
- width = scrollView.bounds.width
- height = image.width * scrollView.bounds.height / scrollView.bounds.width
接下来考虑竖图(第一张图)的情况,在上一步的基础上进行判断。
- // 如果图片高度超过 scrollView.bounds.height 就是竖图,将图片高度缩放到 scrollView.bounds.height,再根据比例计算宽度。
- if height > scrollView.bounds.height {
- height = scrollView.bounds.height
- width = image.height * scrollView.bounds.width / scrollView.bounds.height
- }
最后根据 size 计算一下 imageView.frame 这个问题就解决了。
注:灰色的部分是 scrollView
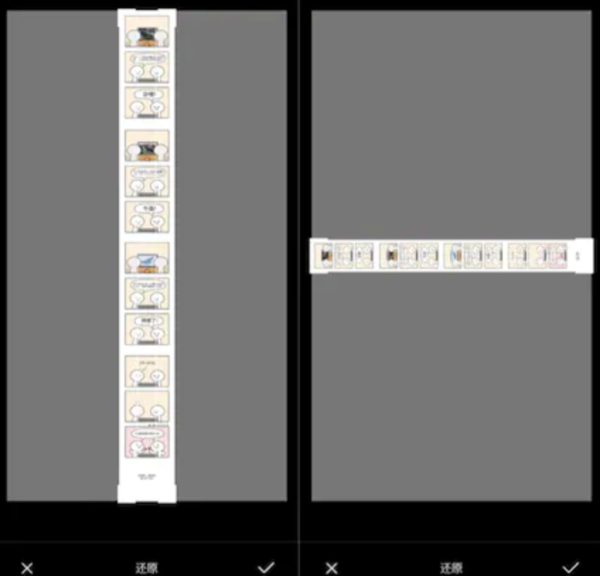
问题二:图片缩放后,如何展示超出 scrollView 的部分
看到这个问题就会很自然的想到,scrollView 可能是全屏的,所以才能全部展示出来。但是全屏的 scrollView 会有一些问题无法解决,下面的第三个问题会讲到,我们暂时不考虑这个解决方案。
第二个方案就相对简单多了,只需要设置 scrollView.clipsToBounds = false 就解决这个问题了。
问题三:无缩放比例时,如何使图片可以拉动
众所周知当 scrollView.contentSize < scrollView.bounds.size,scrollView 是无法滚动的,那么要怎么做才能使 scrollView 可滚动呢,答案是 contentInset。
在日常开发中,contentInset 这个 API 几乎用不到,可能有一些朋友对这个属性有点陌生,所以特别说明一下。contentInset 是 UIEdgeInsets,它的作用是给 scrollView 额外增加一段滚动区域。举个例子 MJRefresh 中的下拉刷新相信大家都用过,当正在刷新的时候,你会发现 scrollView 的顶部多出了一段可滚动区域,这个就是用 contentInset 这个 API 实现的。
了解了 contentInset 之后,我们要先更正一下 scrollView 可滚动的条件:
- scrollView.contentSize + scrollView.contentInset > scrollView.bounds.size
下面我们设置 contentInset 的值为 0.1(肉眼无感知)
- scrollView.contentInset = UIEdgeInsets(top: 0.1, left: 0.1, bottom: 0.1, right: 0.1)
这么设置完之后,图片可以左右滚动了,但是无法上下滚动,因为图片的宽和 scrollView 是相等的,但是高度不是,所以我们要针对高度进行一下计算:
- let bottomInset = scrollView.bounds.height - cropRect.height + 0.1
对于竖图来说就是处理宽度的问题,整合一下代码:
- let rightInset = scrollView.bounds.width - cropRect.width + 0.1
- let bottomInset = scrollView.bounds.height - cropRect.height + 0.1
- scrollView.contentInset = UIEdgeInsets(top: 0.1, left: 0.1, bottom: bottomInset, right: rightInset)
到这里问题三就解决了,现在我们反过来看问题二,如果在问题二中采用全屏 scrollView,那要第三个问题是不是就不好解决了呢~
裁剪
关于裁剪的 UI 部分这里就不展开说了,主要说明一下裁剪框的四个角是用 UIView 画出来的,他们的层级与 scrollView 相同,他们的位置可以用一个 CGRect 的变量 cropRect 来描述。
裁剪核心的内容就是当裁剪框移动时,如何将图片移动到正确的位置上。
根据动图所展示的效果,可以得出:
下面我们一步一步来看怎么解决这些问题。
ZoomScale
从动图中我们可以看到移动裁剪框之后要对 scrollView 进行缩放,而且有两种情况,一种是横图,一种是竖图,所以我们需要计算两种情况的缩放比例,再选择使用其中的一种。

我们假设图片的大小是 ABCD,我们移动点 D 到点 G 的位置,即裁剪框的位置是 AEFG。当用户松手后,AEFG 要放大到 ABCD 的位置,由此我们可以得出缩放比例为:AB/AE = 375/187.5 = 2.0
但是还没有结束,想象一下,当 AEFG 放大到 ABCD 后,再次将点 D 到点 G 的位置。这个操作相当于,图片未缩放前从点 G 移动到点 J。
根据之前的结论我们可以得知缩放比例是:AB/AH,在实际代码中 AB = scrollView.bounds.width,下面要求出 AH 的数值。
现在我们得出了横图缩放比例的公式,竖图也是一样的,代码如下:
- let zoomH = scrollView.bounds.width / (cropRect.width / scrollView.zoomScale)
- let zoomV = scrollView.bounds.height / (cropRect.height / scrollView.zoomScale)
接下来我们要分析该用横图的缩放比例还是竖图的。我们将裁剪框的宽,即 cropRect.width,缩放到 scrollView.bounds.width,根据缩放比例可计算出缩放后 cropRect.height,如果 cropRect.height > scrollView.bounds.height,意味着高度过高了,我们就要用竖图的缩放公式,反之用横图的,代码如下:
- let maxZoom = scrollView.maximumZoomScale
- let zoomH = scrollView.bounds.width / (cropRect.width / scrollView.zoomScale)
- let zoomV = scrollView.bounds.height / (cropRect.height / scrollView.zoomScale)
- let isVertical = cropRect.height * (scrollView.bounds.width / cropRect.width) > scrollView.bounds.height
- let zoom: CGFloat
- if !isVertical {
- zoom = zoomH > maxZoom ? maxZoom : zoomH
- } else {
- zoom = zoomV > maxZoom ? maxZoom : zoomV
- }
ContentOffset
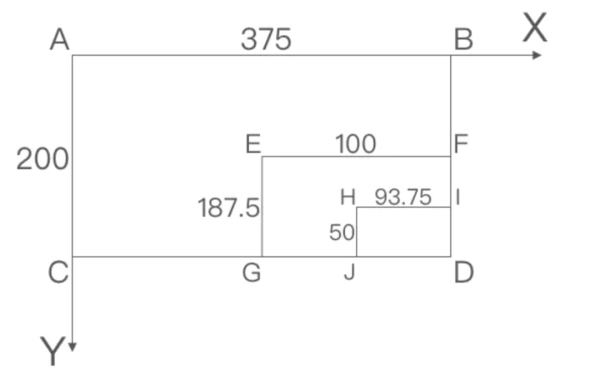
现在我们来计算 contentOffset,设图片为 ABCD,将点 A 移动到点 E,EFGD 放大 2.0 倍到 ABCD。由此可得:
- let maxZoom = scrollView.maximumZoomScale
- let zoomH = scrollView.bounds.width / (cropRect.width / scrollView.zoomScale)
- let zoomV = scrollView.bounds.height / (cropRect.height / scrollView.zoomScale)
- let isVertical = cropRect.height * (scrollView.bounds.width / cropRect.width) > scrollView.bounds.height
- let zoom: CGFloat
- if !isVertical {
- zoom = zoomH > maxZoom ? maxZoom : zoomH
- } else {
- zoom = zoomV > maxZoom ? maxZoom : zoomV
- }
上述这个公式并不是最终的公式,接下来基于当前缩放比例,再次把点 A 移动到点 E,这个操作相当于,图片未缩放前从点 E 移动到点 H,由此可得:
- 注:₁ 表示缩放前,₂ 表示缩放一次后;cropStartPanRect 是手势开始前裁剪框的位置
- E(x) = CG₂
- = CG₁ * zoom
- = (cropRect.origin.x - cropStartPanRect.origin.x) * zoom
最后我们根据移动的角,计算最终的 contentOffset
- let zoomScale = zoom / scrollView.zoomScale
- let offsetX = (scrollView.contentOffset.x * zoomScale) + ((cropRect.origin.x - cropStartPanRect.origin.x) * zoomScale)
- let offsetY = (scrollView.contentOffset.y * zoomScale) + ((cropRect.origin.y - cropStartPanRect.origin.y) * zoomScale)
- let offset: CGPoint
- switch position { // 一个枚举,标志角的位置
- case .topLeft: // 移动左上角,contentOffset x 和 y 都要改变
- offset = CGPoint(x: offsetX, y: offsetY)
- case .topRight: // 移动右上角,contentOffset y 要改变
- offset = CGPoint(x: scrollView.contentOffset.x * zoomScale, y: offsetY)
- case .bottomLeft: // 移动左下角,contentOffset x 要改变
- offset = CGPoint(x: offsetX, y: scrollView.contentOffset.y * zoomScale)
- case .bottomRight: // 移动右下角,contentOffset 不变
- offset = CGPoint(x: scrollView.contentOffset.x * zoomScale, y: scrollView.contentOffset.y * zoomScale)
- }
NewCropRect
最后拖动裁剪框松手后,我们需要把裁剪框放大并居中,这段逻辑和第一个问题计算图片的缩放比例中使用横图竖图的计算逻辑是一样的,就不再赘述了。
- let newCropRect: CGRect
- if (zoom == maxZoom && !isVertical) || zoom == zoomH {
- let scale = scrollView.bounds.width / cropRect.width
- let height = cropRect.height * scale
- let y = (scrollView.bounds.height - height) / 2 + scrollView.frame.origin.y
- newCropRect = CGRect(x: scrollView.frame.origin.x, y: y, width: scrollView.bounds.width, height: height)
- } else {
- let scale = scrollView.bounds.height / cropRect.height
- let width = cropRect.width * scale
- let x = (scrollView.bounds.width - width + scrollView.frame.origin.x) / 2
- newCropRect = CGRect(x: x, y: scrollView.frame.origin.y, width: width, height: scrollView.frame.height)
- }
结语
关于裁剪还有一些内容没讲,比如说完成裁剪,裁剪后再次进入裁剪的逻辑等。但是剩下这些裁剪逻辑的难度和上面这些内容差不多,如果你能理解上面的内容,相信剩下的逻辑对你来说也没有难度了。
最后欢迎大家给我们的 项目 点 Star,提 Issue 和 PR~

据国外媒体报道,苹果即将发布的iPhone 12可能在英国遇到5G网络连接问题,因为该...
自动化决策工具在组织的应用中正变得越来越普遍。然而,其背后的一些机器学习(ML...
1.我在偏袒他的时候别跟我讲什么大道理,我聋了。 2.我不是温柔之人,却为你做...
要如何才能 要如何才能关闭花呗和白条?月光族已经不是一个新鲜的词了,而这个词...
1.激情是会变麻木的,当在爱里伤害了别人,最终,自己会受到伤害。平平淡淡才是...
12月16日,上海市消保委发布《App广告消费者权益保护评价报告(2020)》,其中指...
最近华为高层宣布继续分红传统的新闻引爆了通信行业,无论站在哪个立场,大家都...
作为智能手机之后的又一科技概念,近年来智能硬件愈发惹人关注。从监测人们身体...
由于Wi-Fi通过无线电波进行传输,因此与有线网络相比,它更容易受到干扰。您自己...
工信部近日印发《工业互联网创新发展行动计划(2021-2023年)》指出,到2023年将在...

